Charcoal San Sebastian Cheesecake
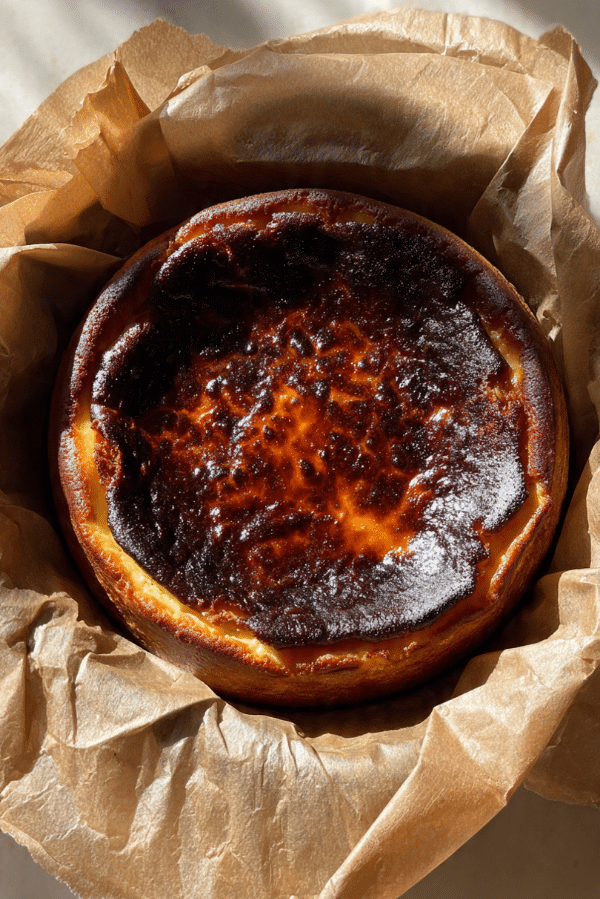
There is something wildly irresistible about a cheesecake that looks a little dramatic before you even cut into it. This one comes to the table with a dark, almost smoky top, a beautifully rustic surface, and that signature jiggly center that makes everyone lean in for a closer look. The charcoal brings a striking look and a subtle earthy depth, while the creamy filling stays lush, rich, and silky in every bite. Trust me, you’re going to love this.
Once that first slice slides onto the plate, the contrast is everything. The top is deeply caramelized, the middle is soft and custardy, and the flavor is rich without feeling too heavy. It feels elegant, a little mysterious, and still wonderfully simple at heart.
Why This Cheesecake Is So Hard to Forget
Some desserts are sweet and pleasant, and then some stop the whole room for a second. This is one of those. It has that gorgeous burnt top everyone loves in a classic Basque-style cheesecake, but the charcoal gives it an extra visual edge that makes it feel modern and a bit moody in the best way.
And now let’s dive a little deeper into what makes it so special. The texture is the real magic here. The outside sets just enough to hold its shape, while the inside stays creamy and tender. It is rich, yes, but not dense in that old-fashioned way. Instead, it melts slowly on the tongue, with a deep vanilla note and a subtle baked caramel finish that keeps each bite interesting.
A Little Story Behind This Bold Beauty
San Sebastian cheesecake, also known as Basque burnt cheesecake, comes from the Basque region of Spain and became famous for its intentionally dark top and creamy center. Unlike classic New York-style cheesecakes, this version skips the crust and embraces imperfection, which is part of its charm.
That rustic look is not an accident, and that is exactly why people adore it. The wrinkled parchment, the bronzed top, and the soft middle all belong to the character of the dessert. This charcoal version keeps that soul intact while adding a dramatic black hue that turns a beloved classic into something that feels fresh and memorable.
Why You Can Count on This Recipe Every Time
This kind of dessert looks fancy, but it is surprisingly forgiving, and that is part of why it has become such a favorite in home kitchens.
Versatile: It works beautifully as a dinner party dessert, a birthday centerpiece, or a quiet weekend treat with coffee.
Budget-Friendly: The ingredient list is short and built around familiar dairy staples, which makes it feel luxurious without being complicated.
Quick and Easy: The batter comes together in one bowl with very little fuss, and the oven does most of the work.
Customizable: You can lean into the charcoal for visual drama, or keep the flavor soft and vanilla-forward with a gentle touch.
Crowd-Pleasing: People love the creamy middle, the caramelized top, and the fact that it feels both rustic and elegant.
Make-Ahead Friendly: It actually gets even better after chilling, which makes it a dream for planning ahead.
Great for Leftovers: A cold slice the next day is pure joy, and the texture becomes even silkier after resting.
Expert Tips That Make a Big Difference
Before we get into the ingredients, here are a few little tricks that make this one a total game-changer.
- Use room temperature ingredients: This helps the batter blend smoothly, which means a silkier filling and fewer lumps.
- Do not overmix after adding the eggs: Mix just until combined so the batter stays creamy without trapping too much air.
- Bake it hot: That high heat is what gives the top its signature dark finish while keeping the center soft.
- Let it wobble: The middle should still jiggle when it comes out. That gentle movement means the inside will stay luscious after cooling.
- Chill before slicing: It is tempting to dive right in, but a few hours in the fridge gives you cleaner slices and better texture.
The Simple Tools You’ll Want Nearby
Now that the technique is clear, let’s set up the kitchen so everything feels easy from the start.
Mixing bowl: A large bowl gives you enough room to whisk the cream cheese and other ingredients smoothly.
Whisk: Perfect for blending the batter gently without overworking it.
Fine-mesh sieve: Helpful for sifting in the flour and charcoal powder so the batter stays velvety.
9-inch springform pan: This gives the cheesecake enough space to rise and settle properly.
Parchment paper: Essential for that classic rustic shape and easy release.
Measuring cups and spoons: Accurate measuring keeps the texture balanced and consistent.
What Goes Into This Creamy, Dark, Dreamy Dessert
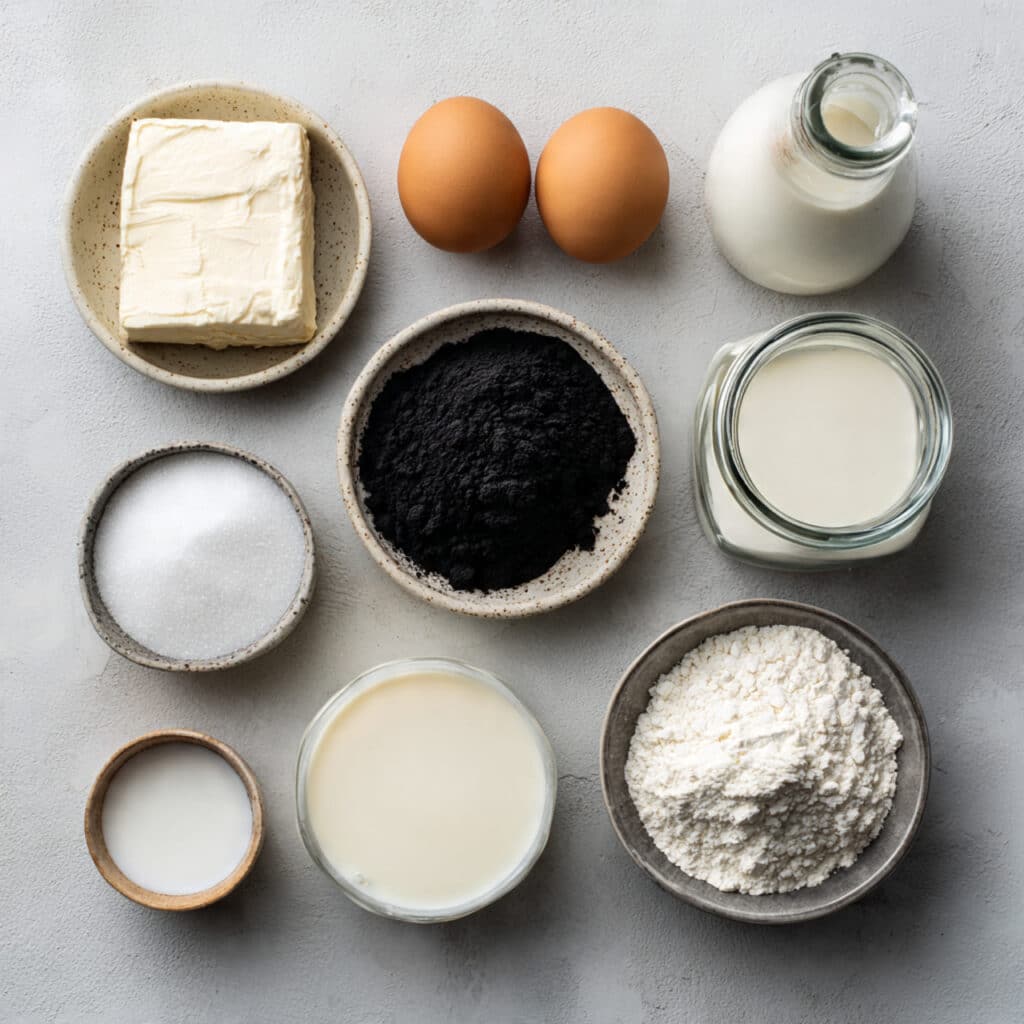
This recipe keeps things simple, which is exactly why every ingredient matters. Each one has a job to do, and together they create that rich, silky texture with the bold look that makes this dessert unforgettable.
- Cream cheese: 680 g, softened. This is the heart of the filling, giving the cheesecake its rich body and smooth, tangy base.
- Granulated sugar: 1 cup. It sweetens the batter and helps create that beautifully caramelized top.
- Large eggs: 4. These bind the filling and give it structure while keeping the center custardy.
- Heavy cream: 1 1/2 cups. This loosens the batter and brings that luxurious, creamy texture.
- Vanilla extract: 2 teaspoons. It rounds out the flavor and adds warmth.
- All-purpose flour: 2 tablespoons. A small amount helps the filling set without making it dense.
- Food-grade activated charcoal powder: 1 teaspoon. This creates the dramatic color and adds a faint earthy note.
- Fine salt: 1/4 teaspoon. Just enough to sharpen all the sweet and creamy flavors.
Easy Swaps If You Need Them
Once you see how simple the base is, it becomes easy to make a few thoughtful adjustments.
Cream cheese: Mascarpone can replace part of it for an even silkier texture.
Granulated sugar: Superfine sugar works beautifully and dissolves quickly into the batter.
Heavy cream: Full-fat whipping cream is a great alternative.
Vanilla extract: Vanilla bean paste can be used for a deeper, more aromatic finish.
All-purpose flour: Cornstarch can replace it in the same amount if needed for a slightly different finish.
The Ingredients That Really Steal the Show
Even in a simple dessert, a couple of ingredients do most of the heavy lifting. Let me tell you, it’s worth every bite when you choose them well.
Cream cheese: This is where the body, tang, and richness all begin. A full-fat version gives the filling that signature luscious texture.
Activated charcoal powder: Used lightly, it transforms the look of the cheesecake into something bold and unforgettable without overpowering the dessert.
Let’s Bake It Step by Step
Everything is ready, and now the fun part begins. This process is wonderfully straightforward, and once the batter is poured into the pan, the oven takes over and works its magic.
- Preheat Your Equipment: Preheat your oven to 425°F (220°C). Line a 9-inch springform pan with two overlapping sheets of parchment paper, pressing them in so the sides rise above the rim for that classic rustic look.
- Combine Ingredients: In a large bowl, whisk the softened cream cheese and sugar until smooth. Add the eggs one at a time, whisking gently after each addition. Pour in the heavy cream and vanilla extract, then whisk until fully combined. Sift in the flour, charcoal powder, and salt, then mix just until the batter is smooth and evenly dark.
- Prepare Your Cooking Vessel: Set the parchment-lined pan on a baking sheet. This makes it easier to move in and out of the oven and catches any drips.
- Assemble the Dish: Pour the batter into the prepared pan. Tap the pan lightly on the counter a couple of times to release any large air bubbles.
- Cook to Perfection: Bake for 30 to 35 minutes, until the top is very dark and the center still has a noticeable wobble. The edges should look set, and the middle should move gently when nudged.
- Finishing Touches: Let the cheesecake cool in the pan at room temperature for about 1 hour. Then transfer it to the refrigerator and chill for at least 4 hours, or overnight, so the texture can fully settle.
- Serve and Enjoy: Lift the cheesecake from the pan, peel back the parchment, and slice with a warm knife for the cleanest cuts. Serve chilled or slightly closer to room temperature for the creamiest bite.
What Makes the Texture and Flavor So Good
What makes this dessert unforgettable is the contrast. The top takes on a deep, toasted flavor with bittersweet caramel notes, while the center stays pale, creamy, and almost mousse-like beneath the dark surface.
And now that the cheesecake is baked, this is where patience pays off. As it chills, the texture tightens just enough to slice neatly, but it never loses that soft, luxurious center. The vanilla smooths everything out, the cream cheese adds gentle tang, and the charcoal gives the whole thing a subtle earthy edge that makes the flavor feel just a little more grown up.
Helpful Baking Tips for the Best Result
A few thoughtful habits make this recipe feel effortless from start to finish.
- Let all the chilled ingredients come to room temperature before mixing so the batter turns silky and even.
- Sift the flour and charcoal powder to avoid little pockets in the filling.
- Bake on the middle rack so the top colors evenly without overcooking the base.
- Warm your knife between slices to keep the edges neat and beautiful.
Mistakes to Skip for a Better Cheesecake
This recipe is forgiving, but a few common slip-ups can change the final texture.
- Do not bake until the center is fully firm, because that usually means it will turn too dense after chilling.
- Do not use cold cream cheese, because it can leave lumps in the batter that are hard to smooth out later.
- Do not skip the parchment paper, because it helps create the signature shape and makes unmolding much easier.
- Do not rush the chilling time, because the flavor and texture improve dramatically once fully rested.
Nutrition Facts at a Glance
This dessert is rich and satisfying, so a small slice goes a long way.
Servings: 10
Calories per serving: 395
Note: These are approximate values.
Time You’ll Want to Plan For
This is the kind of dessert that feels easy to fit into your day, especially because most of the time is hands-off.
Prep Time: 15 minutes
Cook Time: 35 minutes
Total Time: 50 minutes, plus chilling time
Make-Ahead and Storage Tips That Actually Help
This cheesecake is a fantastic make-ahead dessert, and honestly, it tastes even better after it has had time to rest. You can bake it the day before serving, chill it overnight, and slice it when you are ready. That extra time gives the interior a beautifully settled texture.
Store leftovers tightly covered in the refrigerator for up to 4 days. For longer storage, wrap individual slices well and freeze for up to 1 month. Thaw them overnight in the refrigerator before serving. For the best texture, enjoy it chilled or let it sit at room temperature for 15 to 20 minutes before eating.
The Best Ways to Serve It
Once fully chilled, this cheesecake is gorgeous all on its own, but there are a few ways to make it feel extra special. Serve each slice with espresso, strong coffee, or a cup of black tea for a beautiful contrast to the creamy richness.
You can also add a spoonful of lightly whipped cream or a few fresh berries on the side if you want something bright next to the deep, caramelized flavor. Keep the plating simple, because this dessert already knows how to make an entrance.
Fun Ideas for Leftovers
If you happen to have extra slices, there are some delicious ways to give them a second life. A chilled slice crumbled over whipped cream makes a beautiful layered dessert in a glass.
You can also tuck small cubes into a dessert board with berries and chocolate, or serve thin slices with coffee for an afternoon treat that feels quietly luxurious. Even straight from the fridge, it is the kind of leftover that never feels like settling.
A Few More Tips Before You Bake
There are always a few small details that make a recipe feel smoother, and this one is no different.
Try not to overthink the top color. It should look deeply bronzed, even bordering on black in places, and that is part of the style. Also, remember that the center keeps setting as it cools, so trust the wobble. This one’s a total game-changer once you get comfortable with that.
If you want the cleanest finish, remove the cheesecake from the fridge just a few minutes before slicing and wipe the knife between cuts. Those little details make each piece look bakery-worthy.
How to Make It Look Like a Showstopper
Presentation is half the fun here because this cheesecake already has such a dramatic look. Peel back the parchment only partway if you want a rustic, bakery-style effect, or remove it neatly for a cleaner finish.
Serve it on a simple cake stand or a matte plate so the dark top and creamy interior really stand out. A single clean slice removed from the cake also makes it look incredibly inviting, especially when that soft center is visible.
Variations Worth Trying
Once you fall in love with the texture, there are a few delicious ways to play with the flavor.
- Vanilla Bean Version: Swap the vanilla extract for vanilla bean paste for a deeper, more fragrant finish.
- Citrus Twist: Add 1 teaspoon finely grated orange zest for a brighter, more aromatic balance.
- Chocolate Touch: Stir in 2 tablespoons unsweetened cocoa powder along with the flour for a darker, more dessert-forward flavor.
- Mini Version: Divide the batter among parchment-lined muffin cups and bake for a shorter time for individual cheesecakes.
- Espresso Accent: Add 1 teaspoon instant espresso powder for a subtle bitterness that pairs beautifully with the caramelized top.
FAQ’s
1. Can I taste the charcoal strongly?
Not really. It is used in a small amount, so it mostly affects the color and adds only a very subtle earthy note.
2. Why is the top supposed to look so dark?
That deep color is part of the style of this cheesecake. It creates a toasted, caramelized flavor that balances the creamy center.
3. Does this cheesecake need a crust?
No, and that is one of the reasons it is so easy to make. The filling is the star here.
4. How do I know when it is done baking?
The edges should be set and the center should still wobble noticeably when you gently shake the pan.
5. Can I make it a day ahead?
Yes, absolutely. In fact, it is even better after chilling overnight.
6. What kind of charcoal should I use?
Use food-grade activated charcoal powder only, and measure it carefully.
7. Can I use a smaller pan?
Yes, but the cheesecake will be taller and may need a little extra baking time.
8. Why did my cheesecake crack?
A few cracks are not a problem here. This style is naturally rustic and imperfect, which is part of its beauty.
9. Can I freeze it?
Yes. Wrap slices well and freeze them for up to 1 month, then thaw in the refrigerator.
10. Is it better chilled or at room temperature?
Both are delicious. Chilled gives cleaner slices, while slightly warmer gives the creamiest texture.
Conclusion
There is something special about a dessert that feels both effortless and dramatic, and this one really delivers. Between the dark caramelized top, the silky center, and that striking charcoal color, it brings a little excitement to the table without asking for complicated steps. Trust me, you’re going to want to make this one again. It is bold, creamy, memorable, and just the kind of dessert that makes people pause after the first bite and ask for another slice.
Print
Charcoal San Sebastian Cheesecake
Description
A dramatic and creamy Basque-style cheesecake with a dark caramelized top, a silky custardy center, and a touch of food-grade activated charcoal for a bold look.
Ingredients
- 680 g cream cheese, softened
- 1 cup granulated sugar
- 4 large eggs
- 1 1/2 cups heavy cream
- 2 teaspoons vanilla extract
- 2 tablespoons all-purpose flour
- 1 teaspoon food-grade activated charcoal powder
- 1/4 teaspoon fine salt
Instructions
- Preheat the oven to 425°F (220°C). Line a 9-inch springform pan with two overlapping sheets of parchment paper, letting the paper rise above the rim.
- In a large bowl, whisk the softened cream cheese and granulated sugar until smooth.
- Add the eggs one at a time, whisking gently after each addition.
- Pour in the heavy cream and vanilla extract, then whisk until fully combined.
- Sift in the all-purpose flour, activated charcoal powder, and fine salt. Mix just until the batter is smooth and evenly combined.
- Place the lined pan on a baking sheet and pour the batter into the prepared pan. Tap the pan lightly on the counter to release large air bubbles.
- Bake for 30 to 35 minutes, until the top is very dark and the center still wobbles noticeably.
- Let the cheesecake cool in the pan for 1 hour at room temperature.
- Refrigerate for at least 4 hours, or overnight, until fully set.
- Slice with a warm knife and serve chilled or slightly closer to room temperature.
Notes
- Use room temperature ingredients for the smoothest batter.
- Do not overbake, the center should still jiggle when removed from the oven.
- Chilling overnight gives the best texture and cleaner slices.
- Use only food-grade activated charcoal powder.