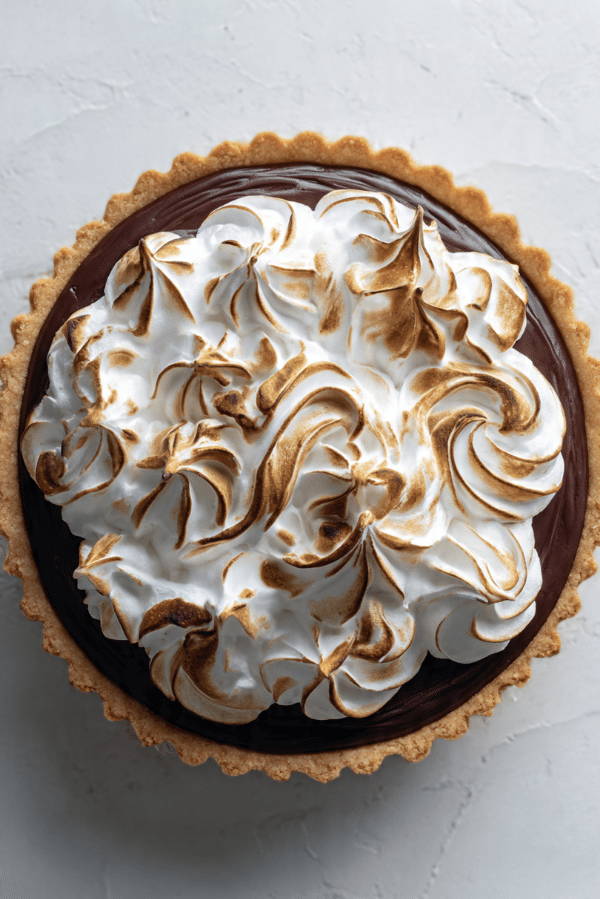
Chocolate Meringue Pie
There is something so comforting about sliding a chocolate pie onto the table and watching everyone go quiet for a second. The glossy chocolate filling, the cloudlike meringue with its golden tips, the crisp crust underneath, it all feels a little dramatic in the best possible way. This pie has that old fashioned charm people never get tired of, but it also tastes wonderfully timeless, rich, silky, airy, and absolutely worth making from scratch. Trust me, you’re going to love this.
The Dessert That Knows How to Steal the Whole Table
Some desserts are cozy and some are elegant, and this one somehow manages to be both. You get that deep cocoa flavor in every bite, balanced by a soft, sweet meringue that melts almost instantly on your tongue. Then comes the crust, flaky and buttery, giving the whole slice just enough structure to hold all that creamy goodness together. It is the kind of dessert that looks impressive without being fussy, which is exactly why it keeps finding its way back into family dinners, holiday spreads, and Sunday suppers.
A Sweet Slice of Southern Baking Nostalgia
This style of pie has deep roots in Southern home baking, where stovetop custard pies and meringue topped desserts have long been favorites for gatherings and celebrations. It belongs to that beautiful category of recipes that feel passed down, the kind scribbled on cards, remembered by texture, and judged by how tall the meringue stands. Over time, chocolate gave the classic meringue pie its own richer personality, turning a simple pantry dessert into something a little more luscious and memorable. Let me tell you, it’s worth every bite.
Why This Pie Earns a Spot in Your Recipe Box
Before we get into the mixing and whisking, it helps to know why this one is such a keeper. It is not just delicious, it is the kind of dessert that makes you feel like a smarter baker.
Versatile: It works beautifully for holidays, potlucks, birthdays, or just a random weekend when you want something special. Dress it up or keep it simple, it still feels like a showpiece.
Budget-Friendly: Most of the ingredients are pantry basics, like sugar, cocoa, milk, eggs, and cornstarch. You get a bakery style dessert without spending bakery money.
Quick and Easy: The method is straightforward and very manageable once you break it into steps. The filling comes together on the stove, and the meringue needs only a few minutes of beating.
Customizable: You can use a homemade crust or a good store bought one. You can also adjust the chocolate intensity by choosing bittersweet chocolate with a slightly darker profile.
Crowd-Pleasing: Chocolate and meringue are one of those combinations that almost everyone gets excited about. It is rich without feeling too heavy, which makes each slice feel balanced.
Make-Ahead Friendly: The crust can be baked ahead, and the full pie can be made earlier in the day before serving. That takes so much pressure off when you are planning a meal.
Great for Leftovers: A chilled slice the next day is still dreamy. The filling stays luscious, and the chocolate flavor somehow feels even deeper after a little rest.
Smart Baker Secrets That Make a Big Difference
Now that the pie has already won you over, here are a few small details that make the final result so much better.
- Use room temperature egg whites: They whip up with better volume, which helps create a fuller, more dramatic topping.
- Spread the meringue over hot filling: This helps the bottom of the meringue cook properly and lowers the chance of watery separation.
- Seal the edges well: Make sure the meringue touches the crust all the way around so it grips the pie instead of shrinking back.
- Cook the filling until clearly thickened: Do not stop the stovetop step too early. A properly thick filling slices more neatly and tastes silkier.
- Let the pie cool before slicing: It is tempting to dive in early, but a little patience gives you cleaner slices and better texture.
The Kitchen Tools That Make This Feel Easy
Before the chocolate starts melting and the egg whites start fluffing up, it helps to have everything ready.
Medium saucepan: This is where the chocolate filling thickens into that glossy, pudding-like layer.
Whisk: Essential for smoothing out the cocoa, cornstarch, milk, and egg yolks without lumps.
Mixing bowls: You will want one for the yolks and another very clean one for the egg whites.
Hand mixer or stand mixer: This makes whipping the meringue much faster and gives you better volume.
Rubber spatula: Perfect for scraping every bit of filling into the crust and shaping those swoopy meringue peaks.
9-inch pie plate: If your crust is already baked in one, you are set.
What You’ll Need to Build All Those Gorgeous Layers
This pie comes together with simple ingredients, but each one pulls its weight. The cocoa gives depth, the chocolate adds body, the eggs bring richness, and the meringue adds that airy finish that makes every forkful feel light and dramatic.
- Baked 9-inch pie crust: 1 crust, this holds everything together and adds that flaky contrast under the creamy filling.
- Granulated sugar: 1 1/4 cups, divided, this sweetens both the filling and the meringue while helping with structure.
- Unsweetened cocoa powder: 1/3 cup, this gives the filling its deep chocolate backbone.
- Cornstarch: 1/4 cup, this thickens the filling so it sets into smooth, sliceable layers.
- Salt: 1/4 teaspoon, this sharpens the chocolate flavor and keeps the sweetness balanced.
- Whole milk: 2 1/2 cups, this creates a silky custard texture and keeps the filling rich without being too heavy.
- Large eggs: 4, separated, the yolks enrich the filling and the whites become the fluffy topping.
- Bittersweet chocolate: 2 ounces, finely chopped, this melts into the cocoa base and adds a fuller chocolate flavor.
- Unsalted butter: 2 tablespoons, this makes the filling glossy and extra smooth.
- Vanilla extract: 1 1/2 teaspoons, divided, this rounds out both the chocolate filling and the meringue.
- Cream of tartar: 1/2 teaspoon, this helps stabilize the whipped egg whites so the topping keeps its shape.
Easy Swaps When You Need a Little Flexibility
Even a classic pie can give you some room to adapt, and that is always nice when you are baking from what you already have.
Whole milk: Evaporated milk diluted with a little water, for a slightly richer old school flavor.
Bittersweet chocolate: Semisweet chocolate, for a sweeter and softer chocolate profile.
Cornstarch: 6 tablespoons all purpose flour, if that is what you have on hand for thickening.
Cream of tartar: 1 teaspoon lemon juice, added to the whites for a bit of stability.
Homemade crust: Store bought baked pie crust, for a faster version that still tastes lovely.
Two Ingredients That Quietly Do the Heavy Lifting
Some ingredients are supportive, and some are absolute stars. In this pie, these two really shape the whole experience.
Unsweetened cocoa powder: This gives the filling that unmistakable chocolate depth right from the start. It brings a warm, rounded bitterness that keeps the pie from tasting flat or overly sweet.
Egg whites: Once whipped with sugar, they transform into a glossy topping that feels light as air. They are the reason this pie has that beautiful contrast between rich and delicate.
Let’s Bake It Step by Step
And now we get to the fun part, where all those simple ingredients turn into something that feels a little magical. Here are the steps you’re going to follow.
- Preheat Your Equipment: Preheat the oven to 350°F. Place your baked 9-inch pie crust on a baking sheet so it is easy to move in and out of the oven later.
- Combine Ingredients: In a medium saucepan, whisk together 3/4 cup of the granulated sugar, the cocoa powder, cornstarch, and salt. Gradually whisk in the milk until smooth. Add the egg yolks and whisk again until fully blended.
- Prepare Your Cooking Vessel: Set the saucepan over medium heat and cook, whisking constantly, until the mixture thickens and begins to bubble, about 8 to 10 minutes. Remove it from the heat, then stir in the chopped bittersweet chocolate, butter, and 1 teaspoon of the vanilla until completely smooth and glossy.
- Assemble the Dish: Pour the hot chocolate filling into the baked pie crust and smooth the top. In a very clean bowl, beat the egg whites and cream of tartar until foamy. Gradually add the remaining 1/2 cup sugar and beat until stiff, glossy peaks form. Beat in the remaining 1/2 teaspoon vanilla. Spread the meringue over the hot filling, making sure to seal it all the way to the crust.
- Cook to Perfection: Bake for 12 to 15 minutes, until the meringue is lightly golden on the peaks and set on the surface.
- Finishing Touches: Transfer the pie to a rack and let it cool completely. The filling will continue to set as it cools, and that makes a huge difference when you slice it.
- Serve and Enjoy: Slice once cooled and serve at room temperature or chilled. Every bite should give you flaky crust, silky chocolate, and a soft, sweet cloud of meringue on top.
The Texture Story in Every Single Bite
One of the best things about this pie is how many textures show up in one neat slice. The crust starts things off with a light crispness, then the filling comes in smooth and velvety, almost like the dreamiest homemade pudding you have ever had. The meringue finishes it off with a delicate, marshmallowy lift that keeps the chocolate from feeling too dense. Flavor wise, it starts deep and cocoa rich, then softens into something creamy and mellow, with vanilla quietly tying it all together. This one’s a total game-changer.
Little Tricks for an Even Better Bake
Once you have made it once, you will already feel more confident. These small tips just make the process smoother.
- Whisk constantly: This keeps the filling smooth and lowers the chance of scorching on the bottom of the pan.
- Use a spotless bowl for the whites: Even a little grease can keep the meringue from whipping properly.
- Create swirls with a spoon or spatula: Those little peaks brown beautifully and make the pie look extra special.
- Cool before refrigerating: Sudden chilling can encourage moisture on top, so let it cool down first.
Common Mistakes That Are Easy to Dodge
Every pie has a few little traps, but none of them are hard to avoid once you know what to watch for.
- Stopping the filling too soon: If it has not thickened properly on the stove, the slices may slump. Keep whisking until it is visibly thick and glossy.
- Adding meringue to cool filling: This can lead to separation. Spread it on while the filling is still hot.
- Underbeating the meringue: Soft meringue can collapse quickly. Beat until the peaks stand tall and glossy.
- Not sealing the edges: If the topping does not touch the crust all around, it may shrink as it bakes.
A Quick Look at the Nutrition
Here is the practical side of things, because sometimes it helps to know what you are serving before that second slice starts calling your name.
Servings: 8
Calories per serving: 410
Note: These are approximate values.
Time Well Spent in the Kitchen
This is one of those desserts that looks like it took all afternoon, but the hands on time is actually quite reasonable.
Prep Time: 25 minutes
Cook Time: 25 minutes
Total Time: 50 minutes
Make It Ahead, Store It Right, Enjoy It Longer
If you are planning for a dinner or holiday meal, you can bake the crust a day ahead and keep it covered at room temperature. The finished pie can also be made earlier the same day, which is incredibly helpful when you are juggling other dishes. Once cooled, store leftovers loosely covered in the refrigerator for up to 3 days. The meringue is always at its prettiest on day one, but the pie still tastes wonderful later. Freezing is not ideal here because the meringue can lose its texture, so this is one of those desserts best enjoyed fresh. For serving leftovers, a cold slice straight from the fridge is delicious, but a few minutes at room temperature softens the filling nicely.
The Best Ways to Bring It to the Table
This pie does not need much to shine, which is part of its charm. Serve it on its own when you want the chocolate and meringue to do all the talking. For a little contrast, pair each slice with fresh berries or a few raspberries on the side. A cup of coffee is a natural match, and so is a strong black tea if you want something warm and a little grounding next to all that sweetness. For holidays, it fits beautifully beside pecan pie and coconut desserts without feeling repetitive.
Leftovers Deserve a Second Chance Too
A leftover slice can become a completely different little treat. Crumble a bit of the pie into a dessert glass and layer it with whipped cream for a quick trifle style parfait. Chill small bite sized pieces and serve them with berries for a simple plated dessert. You can even spoon a little extra chocolate sauce over a slice the next day if you want to lean fully into the decadence.
A Few More Helpful Details Before You Bake Again
Sometimes the smallest details are the ones you remember the next time around.
Bring the eggs to room temperature: It helps both the custard and the meringue behave more predictably.
Chop the chocolate finely: Smaller pieces melt faster into the hot filling and leave you with a silkier finish.
Use a serrated motion when slicing: A gentle back and forth motion helps cut through the meringue neatly.
How to Make It Look Bakery Beautiful
This dessert already has natural drama, so presentation is mostly about letting that shine. Use the back of a spoon to lift soft peaks into the meringue before baking, then let those peaks catch the heat until the tips turn golden. Wipe the knife between slices for cleaner presentation. Serve on simple plates so the color contrast really pops, that creamy chocolate brown, the pale toasted meringue, and the warm crust edge. It looks stunning without trying too hard.
Delicious Twists You Can Try Next Time
Once you have the classic version down, there are some fun ways to play with it while keeping the same spirit.
Dark chocolate version: Use a slightly darker bittersweet chocolate for a deeper, more intense filling.
Espresso boost: Add 1 teaspoon instant espresso powder to the filling to make the chocolate taste even richer.
Chocolate cookie crust: Swap the pastry crust for a baked chocolate cookie crust if you want an extra cocoa note.
Mini pies: Divide the filling and meringue among small tart shells for individual servings that look extra charming.
Toasted coconut finish: Sprinkle a little toasted coconut over the cooled pie for added texture and a tropical hint.
FAQ’s
1. Can I use a store bought crust?
Yes, absolutely. A baked store bought crust works very well here and saves time without taking away from the final flavor.
2. Why does the meringue need to go on hot filling?
The hot filling helps start cooking the underside of the meringue right away, which can reduce separation and keep the layers bonded.
3. Can I make the pie the day before?
Yes, but it is best the same day for the prettiest meringue texture. You can still make it ahead if needed and keep it chilled.
4. How do I know the filling is thick enough?
It should coat the whisk heavily, look glossy, and hold soft shape in the pan before you pour it into the crust.
5. What kind of chocolate works best?
Bittersweet chocolate gives a balanced result that feels rich without becoming too sweet. Semisweet also works nicely.
6. Can I skip the cream of tartar?
You can, but it helps stabilize the egg whites. A little lemon juice can stand in if necessary.
7. Why did my meringue shrink?
That usually happens when it was not spread all the way to the crust or if it was slightly overbaked.
8. Should I serve it chilled or at room temperature?
Both are good. Room temperature gives a softer filling, while chilled slices feel firmer and extra refreshing.
9. Can I freeze it?
It is not the best candidate for freezing because the meringue can become watery and lose its airy texture.
10. How long will leftovers keep?
They are best within 3 days in the refrigerator, loosely covered so the topping stays as nice as possible.
Conclusion
Some recipes just feel like home the second they hit the table, and this pie is definitely one of them. It is rich but light, classic but still exciting, and every layer brings something special to the plate. Whether you are making it for a holiday meal or just because you need a dessert that feels a little extra lovely, this one delivers. Trust me, once you cut that first slice and see those layers, you will be so glad you made it.
Print
Chocolate Meringue Pie
Description
A classic chocolate meringue pie with a flaky baked crust, silky chocolate filling, and a fluffy toasted meringue topping that makes every slice rich, airy, and irresistible.
Ingredients
- 1 baked 9-inch pie crust
- 1 1/4 cups granulated sugar, divided
- 1/3 cup unsweetened cocoa powder
- 1/4 cup cornstarch
- 1/4 teaspoon salt
- 2 1/2 cups whole milk
- 4 large eggs, separated
- 2 ounces bittersweet chocolate, finely chopped
- 2 tablespoons unsalted butter
- 1 1/2 teaspoons vanilla extract, divided
- 1/2 teaspoon cream of tartar
Instructions
- Preheat Your Equipment: Preheat the oven to 350°F. Place the baked 9-inch pie crust on a baking sheet.
- Combine Ingredients: In a medium saucepan, whisk together 3/4 cup of the granulated sugar, the cocoa powder, cornstarch, and salt. Gradually whisk in the milk until smooth. Add the egg yolks and whisk until fully blended.
- Prepare Your Cooking Vessel: Cook over medium heat, whisking constantly, until the mixture thickens and begins to bubble, about 8 to 10 minutes. Remove from the heat and stir in the chopped bittersweet chocolate, butter, and 1 teaspoon of the vanilla until smooth.
- Assemble the Dish: Pour the hot filling into the baked pie crust. In a very clean bowl, beat the egg whites and cream of tartar until foamy. Gradually add the remaining 1/2 cup sugar and beat until stiff, glossy peaks form. Beat in the remaining 1/2 teaspoon vanilla. Spread the meringue over the hot filling, sealing it to the crust.
- Cook to Perfection: Bake for 12 to 15 minutes, until the meringue is lightly golden on the peaks and set on the surface.
- Finishing Touches: Transfer the pie to a rack and let it cool completely so the filling can set.
- Serve and Enjoy: Slice and serve at room temperature or chilled.
Notes
- For the best meringue volume, use room temperature egg whites.
- Spread the meringue over the filling while the filling is still hot to help prevent separation.
- Seal the meringue all the way to the crust edge so it does not shrink during baking.
- Store leftovers loosely covered in the refrigerator for up to 3 days.