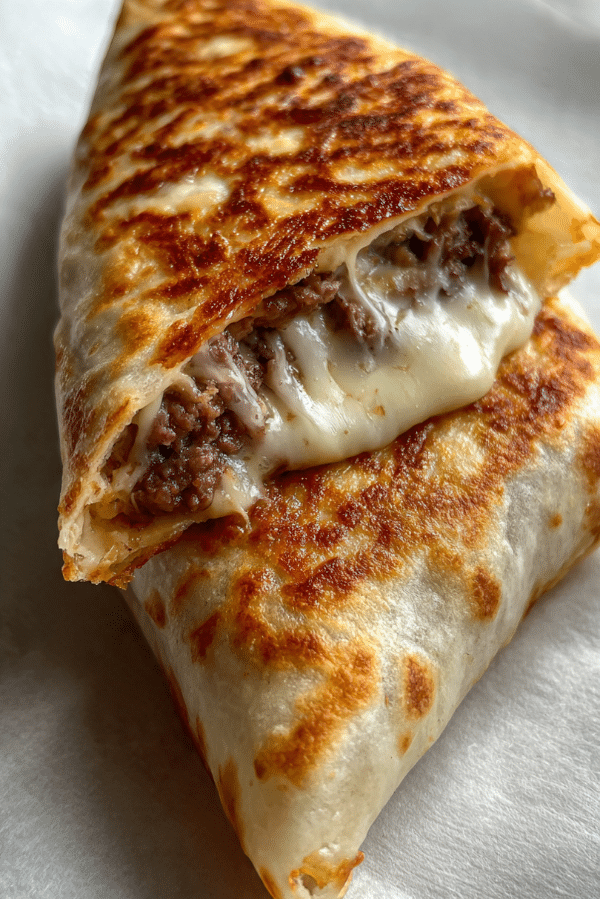
Crispy Beef and Melting Cheese Wrap
There’s something about the first bite of a wrap that gives you a full-on flavor hug. This crispy beef and melting cheese wrap is the kind of lunch or dinner you daydream about—golden, crunchy on the outside, with savory beef and gooey cheese on the inside. The edges crackle when you cut into it, the melted cheese stretches with each bite, and the seasoned filling bursts with bold flavors. Trust me, you’re going to love this one.
Why This Wrap Deserves a Spot in Your Weekly Lineup
Some recipes just get it right, and this one hits the sweet spot between texture, flavor, and convenience. It’s not just a wrap—it’s comfort food you can hold in your hands.
Where It Comes From and Why We Love It
Wraps have long been a canvas for culinary creativity. Inspired by Mexican burritos and American diner-style melts, this beef and cheese combo brings the best of both worlds. It blends the richness of slow-cooked ground beef with the stretchy, melty goodness of cheese, all hugged by a crisped-up tortilla. No wonder it feels so familiar yet exciting every time you make it.
What Makes It So Irresistibly Good
You know a recipe is golden when you keep coming back to it. This one checks all the boxes:
Versatile: Perfect with any ground meat or even a veggie alternative.
Budget-Friendly: Uses pantry staples and affordable ingredients.
Quick and Easy: From stove to plate in under 30 minutes.
Customizable: Add jalapeños, swap cheeses, go spicy or mild—your call.
Crowd-Pleasing: Kids love it, adults crave it, everyone’s happy.
Make-Ahead Friendly: Cook the filling earlier and just wrap and toast when ready.
Great for Leftovers: Reheats beautifully in a pan or air fryer.
Pro Tips for Seriously Good Results
If you want that golden crunch and perfect cheese pull every single time, here’s what you need to know:
- Preheat your pan: A cold pan = soggy wrap. Let it get hot before adding anything.
- Drain the beef: Too much moisture makes your wrap fall apart.
- Use a mix of cheeses: Blending sharp cheddar with mozzarella gives both flavor and stretch.
- Don’t overfill: Less is more when it comes to wrapping cleanly and evenly.
- Press it while toasting: Use a spatula to press gently—helps everything fuse together and crisps the tortilla.
Tools You’ll Want on Hand
You won’t need much, but these few items will make life easier:
Nonstick skillet: For that perfectly crisp exterior.
Wooden spoon or spatula: Great for breaking up the beef while cooking.
Mixing bowl: To toss your beef and seasonings evenly.
Tongs or turner: For flipping wraps without spilling the goods.
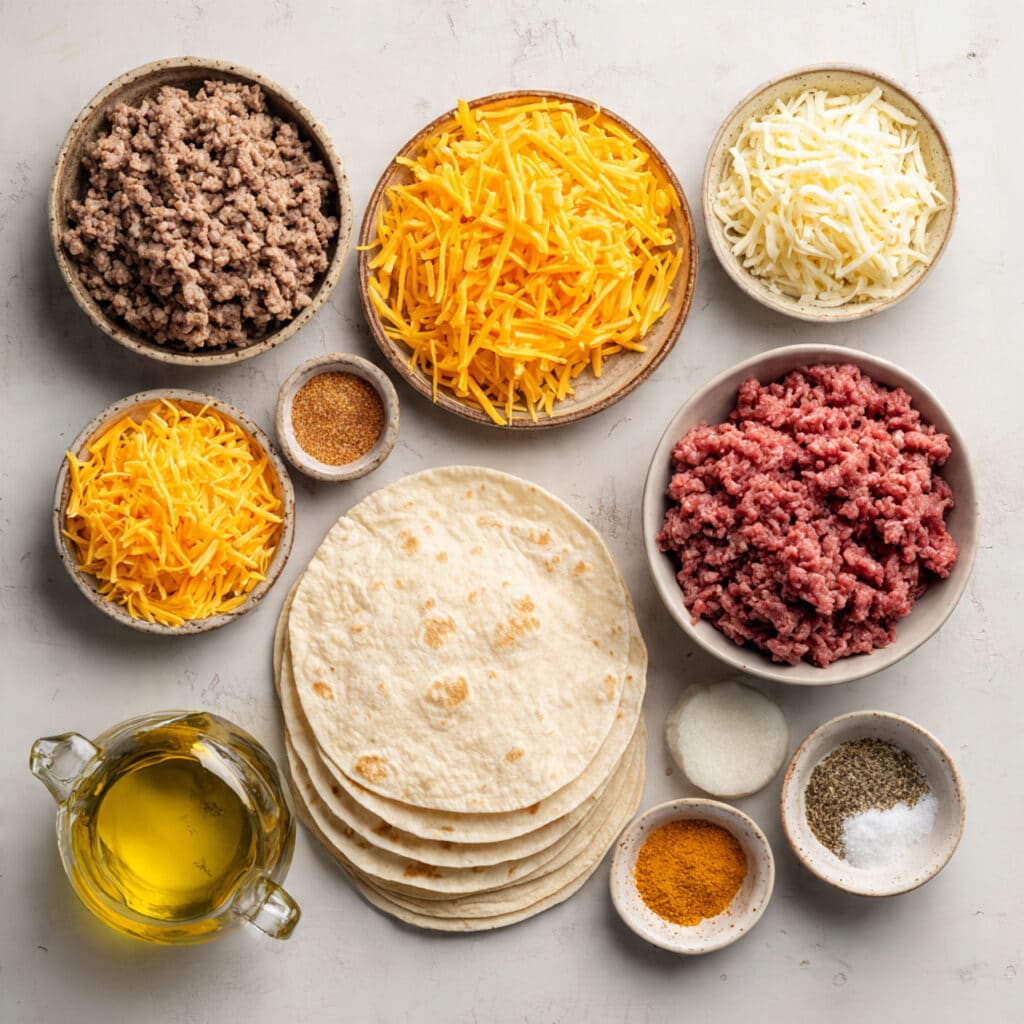
Ingredients You’ll Need for This Melty Masterpiece
Here’s what brings all the magic together. Simple things, bold results.
- Ground beef: 1 pound – Rich, savory base of the filling.
- Shredded cheddar cheese: 1 cup – Gives that sharp cheesy punch.
- Shredded mozzarella cheese: 1 cup – For maximum meltiness and stretch.
- Garlic powder: 1 teaspoon – Adds depth and warmth.
- Paprika: 1 teaspoon – A mild smokiness that enhances the beef.
- Onion powder: 1 teaspoon – Brings a subtle sweetness.
- Salt: ½ teaspoon – Just enough to bring it all together.
- Black pepper: ¼ teaspoon – Adds a gentle kick.
- Flour tortillas: 4 large – The crispy vessel that wraps it all up.
- Olive oil: 1 tablespoon – For toasting the wraps to a golden finish.
Ingredient Swaps for Any Pantry Situation
Running low on something? These substitutions have you covered:
Ground beef: Ground turkey or plant-based meat.
Cheddar cheese: Monterey Jack or Colby work great too.
Mozzarella: Try provolone or even gouda.
Flour tortillas: Go whole wheat or gluten-free if needed.
Olive oil: Butter or avocado oil can also crisp things up nicely.
Star Players in This Wrap
Some ingredients do the heavy lifting. These are the ones that make it unforgettable:
Ground Beef: When seasoned right, it’s juicy, hearty, and flavor-packed.
Shredded Cheese Combo: The mix of cheddar and mozzarella hits both taste and texture highs.
Let’s Make It Happen: Step-by-Step Instructions
Time to roll up those sleeves and let your kitchen smell amazing. Here’s how we do it:
- Preheat Your Equipment: Heat a nonstick skillet over medium heat until hot.
- Combine Ingredients: In a bowl, mix cooked ground beef with garlic powder, onion powder, paprika, salt, and pepper. Stir in both cheeses.
- Prepare Your Cooking Vessel: Wipe the skillet clean, then brush it lightly with olive oil.
- Assemble the Dish: Spoon the beef and cheese mix onto one half of each tortilla, then fold over to form a half-moon.
- Cook to Perfection: Place each folded wrap in the skillet and cook 2–3 minutes per side, pressing gently, until golden brown and crisp.
- Finishing Touches: Let them rest for 2 minutes before slicing. This helps the cheese set slightly.
- Serve and Enjoy: Slice in halves or thirds and serve warm with your favorite dipping sauce or a simple green salad.
Texture and Flavor: Why This Wrap Works
You get crunch from the toasted tortilla, a rich and savory filling, and melty cheese that ties everything together. Each bite hits with seasoning, chew, and warmth. It’s not just about taste—it’s about the feeling of a perfect bite.
Little Tips That Make a Big Difference
Cooking this wrap should be fun, not fussy. Keep these in mind:
- Let the beef cool slightly before adding cheese—it helps avoid greasy separation.
- Use a pan lid while toasting for extra melty cheese.
- If prepping ahead, store the beef-cheese mix separately until ready to wrap.
Mistakes to Skip and How to Fix Them
Avoid these pitfalls for a smoother cooking experience:
- Overfilling: Makes wrapping messy and hard to flip.
- Skipping the press: You miss out on that crispy, sealed edge.
- Undercooked filling: Always cook your beef fully before assembling.
Nutritional Snapshot
Servings: 4
Calories per serving: 520
Note: These are approximate values.
Prep and Cook Time Breakdown
Prep Time: 10 minutes
Cook Time: 15 minutes
Total Time: 25 minutes
Store Like a Pro and Enjoy Later
Want to prep ahead? Just cook the beef and cheese filling and store it in the fridge for up to 3 days. You can also assemble and refrigerate the wraps, then toast them when ready. For freezing, wrap in foil and freeze. Reheat in the oven or air fryer for best results.
Fun Ways to Serve It Up
Turn this wrap into a full meal by serving with:
- Spicy tomato salsa or chipotle mayo.
- A crisp side salad or coleslaw.
- A bowl of tomato soup for dipping.
Turn Leftovers into New Creations
Here’s how to give yesterday’s wrap a tasty new spin:
- Chop it up and mix into a breakfast scramble.
- Reheat and serve with a fried egg on top.
- Dice and toss into a quesadilla with extra cheese.
Bonus Tips to Elevate the Experience
Want to take things a notch higher?
- Add thin-sliced jalapeños or green onions for a fresh bite.
- Use a sandwich press for ultra-crispy edges.
- Serve with a squeeze of lime to brighten the richness.
Make It Pop on the Plate
Presentation matters. Here’s how to wow:
- Slice diagonally and stack with cheese facing out.
- Garnish the plate with chopped herbs or a small bowl of dip.
- Serve on a dark plate to highlight the golden crispiness.
Variations to Try
Switch it up and keep it exciting:
- Spicy Edition: Add hot sauce or diced chilies to the beef.
- Tex-Mex Style: Include black beans and corn in the filling.
- Breakfast Wrap: Add scrambled eggs and hash browns.
- BBQ Twist: Mix in barbecue sauce instead of spices.
- Veggie Version: Use sautéed mushrooms and bell peppers instead of beef.
FAQ’s
Q1: Can I use leftover taco meat for this?
Yes, just reheat it slightly and mix with cheese before wrapping.
Q2: Can I bake it instead of pan-frying?
You can. Bake at 400°F for 10–12 minutes until golden.
Q3: What’s the best cheese combo?
Cheddar and mozzarella offer great flavor and melt. Pepper jack is a spicy twist.
Q4: Is it freezer-friendly?
Yes, wrap individually in foil and freeze for up to 1 month.
Q5: Can I make it dairy-free?
Use plant-based cheese shreds and a vegan tortilla.
Q6: Is it kid-friendly?
Absolutely! Skip the spices if needed.
Q7: Can I meal-prep these?
Yes, assemble ahead and cook fresh or freeze.
Q8: How do I avoid soggy wraps?
Drain beef well and cook on medium heat for even crisping.
Q9: What sauce pairs best?
Chipotle mayo, sour cream, or spicy ketchup work well.
Q10: Can I use corn tortillas?
They may crack when folded. Use flour tortillas for better results.
Conclusion
This crispy beef and melty cheese wrap is the kind of meal you’ll crave over and over. Whether you’re cooking for yourself, your family, or friends, it brings comfort and flavor to the table with minimal effort. So go ahead, get that skillet hot, and enjoy every cheesy, crispy bite.
Print
Crispy Beef and Melting Cheese Wrap
Description
Crispy beef and melting cheese wrapped in a golden tortilla, this handheld delight is quick, satisfying, and packed with flavor.
Ingredients
- 1 pound ground beef
- 1 cup shredded cheddar cheese
- 1 cup shredded mozzarella cheese
- 1 teaspoon garlic powder
- 1 teaspoon paprika
- 1 teaspoon onion powder
- 1/2 teaspoon salt
- 1/4 teaspoon black pepper
- 4 large flour tortillas
- 1 tablespoon olive oil
Instructions
- Heat a nonstick skillet over medium heat until hot.
- In a bowl, mix cooked ground beef with garlic powder, onion powder, paprika, salt, and pepper. Stir in cheddar and mozzarella cheeses.
- Wipe the skillet clean and brush lightly with olive oil.
- Spoon the beef and cheese mix onto one half of each tortilla, then fold over to form a half-moon shape.
- Place folded wraps in the skillet and cook for 2–3 minutes per side, pressing gently, until golden brown and crispy.
- Let wraps rest for 2 minutes before slicing and serving warm.
Notes
- Press wraps gently with a spatula while cooking for even crisping.
- Use a mix of cheeses for flavor and melty texture.
- Drain beef well to avoid soggy wraps.