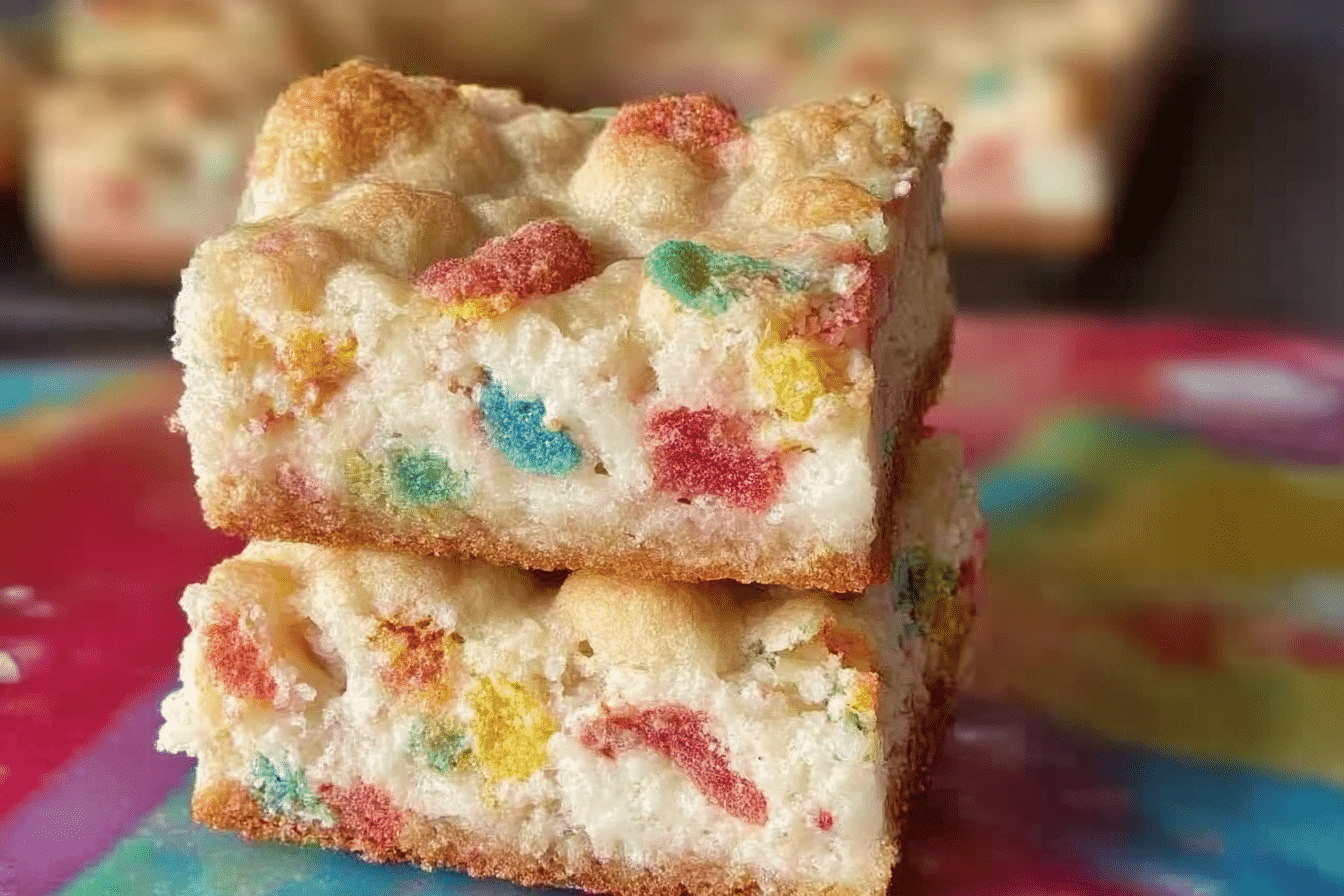
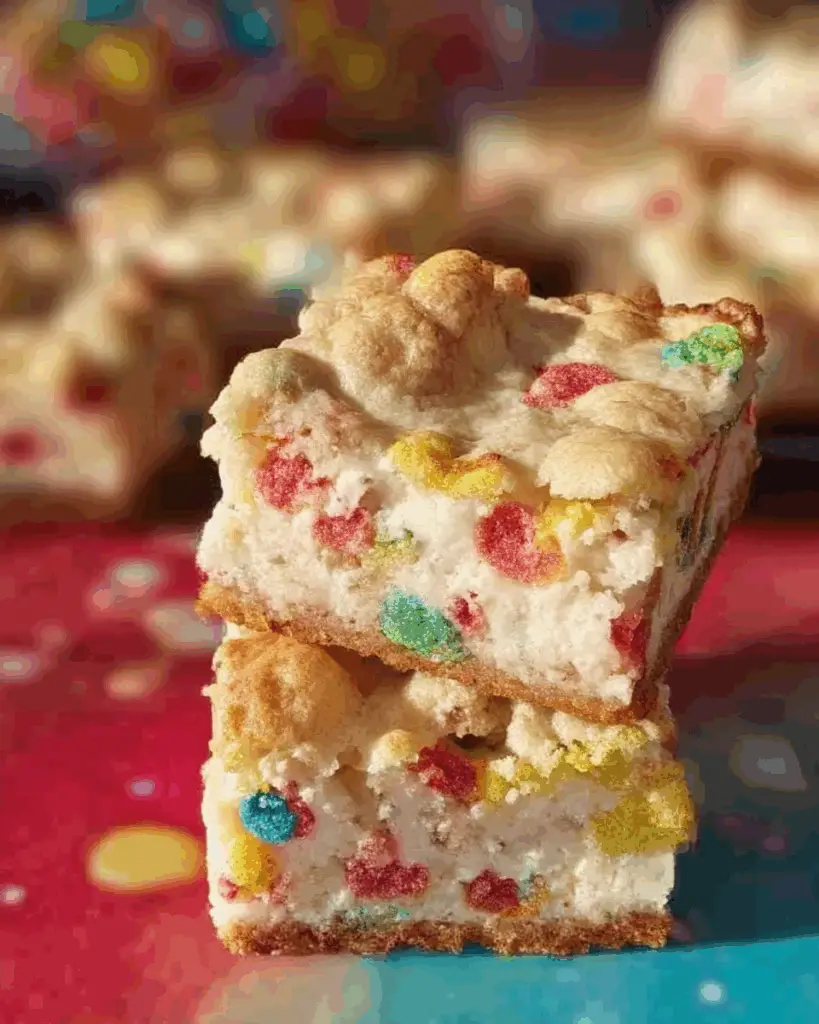
Fruity Pebbles Cookie Cheesecake Bars
Brace yourself for a technicolor dessert explosion that’s equal parts nostalgic and decadent. Fruity Pebbles Cookie Cheesecake Bars are the ultimate mash-up of chewy cookie base, luscious cheesecake, and a crunchy, rainbow cereal topping. Each bite is a flavor-packed adventure—soft, creamy, and just the right amount of sweet with the unmistakable fruity crunch we all loved as kids. One look, one taste, and you’ll be hooked.
Behind the Recipe
This recipe was born out of a craving for something whimsical, colorful, and comforting all at once. On a rainy afternoon, I found a half-used box of Fruity Pebbles in the pantry and some cream cheese in the fridge—what happened next was pure dessert magic. Layer by layer, it came together into a vibrant treat that instantly became a family favorite. It’s a dessert that brings out your inner child while still satisfying grown-up cravings for something truly indulgent.
Recipe Origin or Trivia
Fruity Pebbles, the rainbow-hued cereal inspired by the Flintstones, has been a breakfast staple since the 1970s. But over the years, it’s transcended the cereal bowl, popping up in everything from donuts to milkshakes. Combining it with cheesecake and cookie dough reflects a modern dessert trend: whimsical, multi-texture, hybrid treats that play on nostalgia while delivering bold flavors. It’s a delightful fusion of American baking creativity and pop-culture fun.
Why You’ll Love Fruity Pebbles Cookie Cheesecake Bars
There’s no resisting this colorful masterpiece.
Versatile: Great for parties, bake sales, birthdays, or just a weekend treat.
Budget-Friendly: Uses simple, affordable ingredients that are easy to find.
Quick and Easy: Minimal prep and fuss-free layering make it weeknight friendly.
Customizable: Try different cereals or flavored cream cheese for fun twists.
Crowd-Pleasing: Both kids and adults adore the combo of creamy and crunchy.
Make-Ahead Friendly: Perfect to prep a day in advance and chill until serving.
Great for Leftovers: Store in the fridge or freezer for a sweet anytime treat.
Print
Fruity Pebbles Cookie Cheesecake Bars
- Total Time: 45 minutes + chill time
- Yield: 9 bars
- Diet: Vegetarian
Description
Fruity Pebbles Cookie Cheesecake Bars are a vibrant, creamy, and crunchy dessert that blends nostalgic cereal with rich cheesecake and a chewy cookie base. A colorful, crowd-pleasing treat perfect for parties and celebrations.
Ingredients
- All-Purpose Flour: 1 cup – provides structure to the cookie base.
- Baking Soda: ½ teaspoon – helps the base rise slightly.
- Salt: ¼ teaspoon – balances sweetness and enhances flavor.
- Unsalted Butter: ½ cup, softened – makes the base rich and chewy.
- Brown Sugar: ½ cup – adds moisture and caramel depth.
- Granulated Sugar: ¼ cup – enhances sweetness and texture.
- Egg: 1 large – binds the cookie dough.
- Vanilla Extract: 1 teaspoon – rounds out the flavor profile.
- Fruity Pebbles Cereal: 1 ½ cups (divided) – for crunch, color, and nostalgia.
- Cream Cheese: 8 ounces, room temperature – creates a smooth, creamy cheesecake layer.
- Powdered Sugar: ½ cup – sweetens the cheesecake gently.
- Egg Yolk: 1 – helps firm the cheesecake without over-thickening.
Instructions
- Preheat Your Equipment: Preheat oven to 350°F (175°C) and line an 8×8 baking pan with parchment paper.
- Combine Ingredients: In a bowl, whisk flour, baking soda, and salt. In another bowl, cream butter and sugars, then beat in egg and vanilla. Gradually mix in dry ingredients and fold in ½ cup Fruity Pebbles.
- Prepare Your Cooking Vessel: Press cookie dough evenly into prepared pan, pressing slightly up the sides.
- Assemble the Dish: In a separate bowl, beat cream cheese until smooth. Add powdered sugar and egg yolk, mixing until creamy. Spread over cookie base.
- Cook to Perfection: Sprinkle remaining 1 cup Fruity Pebbles on top. Bake 25–30 minutes, until golden on edges and set in center.
- Finishing Touches: Cool completely in the pan, then chill in the fridge for at least 2 hours.
- Serve and Enjoy: Lift bars using parchment, slice, and serve chilled for best results.
Notes
- Let bars chill fully before cutting for clean layers.
- Use room temp cream cheese to prevent lumps.
- Try other cereals like Trix or Cocoa Pebbles for variety.
- Store bars in the fridge up to 5 days or freeze for longer.
- Prep Time: 15 minutes
- Cook Time: 30 minutes
- Category: Dessert
- Method: Baking
- Cuisine: American
Nutrition
- Serving Size: 1 bar
- Calories: 330
- Sugar: 26g
- Sodium: 160mg
- Fat: 18g
- Saturated Fat: 10g
- Unsaturated Fat: 7g
- Trans Fat: 0g
- Carbohydrates: 38g
- Fiber: 1g
- Protein: 4g
- Cholesterol: 55mg
Chef’s Pro Tips for Perfect Results
Here’s how to make every bar bakery-worthy.
- Use room temperature cream cheese: It blends smoother and avoids lumps.
- Don’t overmix the batter: Gently fold in ingredients to keep the texture creamy.
- Line your baking pan with parchment: It makes lifting and cutting bars a breeze.
- Chill completely before slicing: This ensures clean layers and neat cuts.
- Toast the cereal topping slightly: For extra crunch, lightly toast Fruity Pebbles before sprinkling.
Kitchen Tools You’ll Need
A few simple tools make this dessert a breeze to whip up.
8×8 Baking Pan: The perfect size for thick, indulgent layers.
Parchment Paper: Makes removing and cutting bars super easy.
Electric Mixer: Essential for a smooth, creamy cheesecake filling.
Mixing Bowls: For cookie dough, cheesecake, and cereal topping.
Spatula: Helps with even spreading and clean scraping.
Ingredients in Fruity Pebbles Cookie Cheesecake Bars
Each component brings color, texture, and flavor to this vibrant dessert.
1. All-Purpose Flour: 1 cup – the structure for the cookie base.
2. Baking Soda: ½ teaspoon – gives the cookie layer a slight lift.
3. Salt: ¼ teaspoon – balances sweetness throughout.
4. Unsalted Butter: ½ cup (softened) – creates that chewy cookie texture.
5. Brown Sugar: ½ cup – adds moisture and rich caramel notes.
6. Granulated Sugar: ¼ cup – sweetens the dough just right.
7. Egg: 1 large – binds everything together.
8. Vanilla Extract: 1 teaspoon – brings warmth and rounds out flavors.
9. Fruity Pebbles Cereal: 1 ½ cups (divided) – adds vibrant crunch and nostalgia.
10. Cream Cheese: 8 ounces (room temperature) – the star of the creamy cheesecake layer.
11. Powdered Sugar: ½ cup – keeps the cheesecake layer sweet but smooth.
12. Egg Yolk: 1 – helps firm the cheesecake without over-thickening.
Ingredient Substitutions
Want to switch it up? Try these easy swaps.
All-Purpose Flour: Use gluten-free 1:1 flour blend.
Butter: Swap with margarine or plant-based spread for dairy-free.
Brown Sugar: Coconut sugar works for a deeper flavor.
Fruity Pebbles: Substitute with Trix, Fruit Loops, or Cocoa Pebbles.
Cream Cheese: Vegan cream cheese works great for dairy-free bars.
Ingredient Spotlight
Fruity Pebbles: These rainbow rice crisps add both crunch and color, giving each bar personality and a playful vibe.
Cream Cheese: It brings creamy richness and tang to balance the sweet cookie layer and sugary cereal.
Instructions for Making Fruity Pebbles Cookie Cheesecake Bars
Ready to build dessert magic? Let’s dive in.
1. Preheat Your Equipment:
Preheat your oven to 350°F (175°C) and line an 8×8 baking pan with parchment paper, leaving some overhang.
2. Combine Ingredients:
In a bowl, whisk together flour, baking soda, and salt. In a separate bowl, cream the butter and sugars until light and fluffy. Beat in the egg and vanilla. Gradually add dry ingredients, then fold in ½ cup Fruity Pebbles.
3. Prepare Your Cooking Vessel:
Spread the cookie dough evenly into the prepared pan, pressing it slightly up the sides.
4. Assemble the Dish:
In another bowl, beat the cream cheese until smooth. Add powdered sugar and egg yolk, mixing until silky. Pour over the cookie base and smooth out.
5. Cook to Perfection:
Sprinkle remaining 1 cup Fruity Pebbles over the top. Bake for 25–30 minutes until the edges are golden and the center is set.
6. Finishing Touches:
Let cool completely in the pan. Chill in the fridge for at least 2 hours for best slicing.
7. Serve and Enjoy:
Lift the bars using the parchment overhang, slice into squares, and enjoy the fruity crunch and creamy richness in every bite.
Texture & Flavor Secrets
These bars strike a perfect balance—soft, chewy cookie base meets creamy cheesecake middle, all topped with a crunchy, colorful burst from the cereal. The key is contrast: rich, velvety cream cheese cuts through the sweetness while Fruity Pebbles add that essential pop of playful texture and citrusy zing.
Cooking Tips & Tricks
Let’s keep things easy and delicious.
- Use parchment paper for easy removal and clean cuts.
- Refrigerate overnight for clean layers.
- Add white chocolate chips to the cookie base for extra indulgence.
- Slightly press cereal topping into the cheesecake to prevent it from falling off.
What to Avoid
Avoid these missteps for perfect bars every time.
- Overbaking – the center should still jiggle slightly.
- Skipping the chill – warm bars won’t slice cleanly.
- Using cold cream cheese – leads to lumps in the filling.
Nutrition Facts
Servings: 9
Calories per serving: 330
Note: These are approximate values.
Preparation Time
Prep Time: 15 minutes
Cook Time: 30 minutes
Total Time: 45 minutes + chilling time
Make-Ahead and Storage Tips
These bars were made for make-ahead magic. Prepare a day in advance and store in the fridge until ready to serve. They keep well in an airtight container for up to 5 days in the refrigerator. For longer storage, freeze them tightly wrapped for up to 2 months. Thaw overnight in the fridge before serving.
How to Serve Fruity Pebbles Cookie Cheesecake Bars
Cut them into tidy squares and stack on a platter for a pop of color at any event. Pair with a glass of cold milk, a scoop of vanilla ice cream, or a cup of espresso. For party flair, top each bar with a dollop of whipped cream and a few extra cereal pieces.
Creative Leftover Transformations
Get creative and don’t let any crumb go to waste.
- Crumble into a parfait with whipped cream and berries.
- Chop and fold into vanilla ice cream for DIY fruity chunks.
- Sandwich between two cookies for a double-layered dessert.
Additional Tips
Here are a few extra ideas to elevate your bars:
- Mix a little lemon zest into the cheesecake layer for brightness.
- Use rainbow sprinkles with the cereal for an extra festive look.
- Drizzle with white chocolate after baking for added sweetness.
Make It a Showstopper
Presentation turns this treat into the centerpiece. Use a sharp knife for clean edges, and serve on a white platter to let the colors pop. Garnish with a light dusting of powdered sugar or edible glitter for a wow factor at birthdays or bake sales.
Variations to Try
Let your imagination run wild with these twists.
- Chocolate Chip Crunch: Mix mini chocolate chips into the cookie dough.
- Berry Swirl Cheesecake: Add a swirl of raspberry jam to the cheesecake layer.
- S’mores Style: Use crushed graham crackers in the base and add marshmallow fluff.
- Birthday Cake Bliss: Mix in cake batter extract and top with sprinkles.
- Peanut Butter Pop: Add a layer of peanut butter between cookie and cheesecake.
FAQ’s
Q1. Can I use a different cereal?
Yes! Try Fruit Loops, Trix, or Cocoa Pebbles for a different twist.
Q2. Can I freeze these bars?
Absolutely. Wrap tightly and freeze for up to 2 months.
Q3. Is it okay to use low-fat cream cheese?
You can, but full-fat yields the creamiest texture.
Q4. Can I make these gluten-free?
Yes, just use a gluten-free flour blend and check cereal labels.
Q5. How do I know when it’s done baking?
The edges should be lightly golden and the center mostly set.
Q6. Can I double the recipe?
Definitely—use a 9×13 pan and increase baking time slightly.
Q7. Why is my cheesecake layer runny?
It likely needed more chilling or was underbaked.
Q8. Can I make it dairy-free?
Yes, use dairy-free cream cheese and butter alternatives.
Q9. What’s the best way to cut clean slices?
Chill completely, use a sharp knife, and wipe between cuts.
Q10. Can I add food coloring?
Sure! Add it to the cheesecake layer for even more color fun.
Conclusion
Fruity Pebbles Cookie Cheesecake Bars are the fun, colorful dessert you didn’t know you needed. They’re creamy, crunchy, chewy, and utterly irresistible. Trust me, it’s worth every bite—and your dessert table will never be the same again.