Homemade Bagels
There is something extra satisfying about pulling a tray of fresh bagels out of the oven, especially when the kitchen smells warm, yeasty, and just a little sweet. The crust turns golden and glossy, the centers stay tender and chewy, and that first bite has the kind of bakery-style texture that makes you pause for a second. Trust me, you’re going to love this.
What makes these bagels so special is that they feel impressive, but the process is actually very manageable once you settle into it. You mix, knead, shape, boil, and bake, and each step brings you closer to that classic chewy bite. And now let’s dive into what makes this recipe one you’ll want to make again and again.
Why These Fresh Bagels Are Worth Every Minute
Some recipes are nice to have, and some become part of your regular rhythm. This one lands firmly in the second category. The dough is simple, the ingredients are familiar, and the results taste like something from a cozy neighborhood bakery.
The outside has that signature chew, the inside stays soft and springy, and the sesame topping adds a light nutty finish that makes every bite feel complete. Let me tell you, it’s worth every bite. Once you taste them warm with a little butter or cream cheese, store-bought starts feeling a lot less exciting.
A Little Story Behind This Beloved Bread
Bagels have deep roots in Eastern European Jewish baking traditions, and over time they became a staple in bakeries around the world. Their defining character comes from the step that sets them apart from many other breads, a quick boil before baking, which creates that glossy exterior and dense, satisfying chew.
That old-world method is still the magic here, and it is part of why making them at home feels so rewarding. You are not just baking bread, you are following a process that has been loved for generations, and somehow that makes the final tray feel even more special.
Reasons This Recipe Earns a Spot in Your Kitchen
Before we get into the details, it helps to know why this recipe is such a keeper. It is dependable, flexible, and surprisingly fun.
Versatile: These bagels work for breakfast, lunch, or a snack. Serve them plain, toasted, or piled high with your favorite fillings.
Budget-Friendly: The ingredient list is simple and made from pantry basics. You get bakery-style results without the bakery price.
Quick and Easy: For a yeast recipe, the steps are straightforward and approachable. Once you shape the dough, the rest moves along nicely.
Customizable: You can keep them plain or swap the sesame topping for poppy seeds, onion flakes, or everything seasoning. This one’s a total game-changer for anyone who likes options.
Crowd-Pleasing: Fresh bagels disappear fast. They are one of those homemade bakes that make everyone wander into the kitchen asking when they will be ready.
Make-Ahead Friendly: You can prep the dough ahead of time and chill it after shaping if needed. That makes baking day feel much easier.
Great for Leftovers: Extra bagels toast beautifully the next day. They also freeze well, which means future breakfasts are already looking better.
Baker’s Secrets for Better Texture Every Time
Now that you know why this recipe works so well, here are a few small tricks that make a big difference.
- Use bread flour for the chewiest texture and best structure.
- Keep the dough fairly firm, which helps the bagels hold their shape during boiling and baking.
- Do not skip the boiling step, because that is what gives the crust its classic chew.
- Shape the holes a little larger than you think you need, because they shrink as the dough rises and bakes.
- Bake until deeply golden, not pale, so you get the best flavor and texture.
The Simple Tools That Make the Process Smoother
You do not need specialty equipment, which is part of the charm here. A few basic kitchen tools are enough to get beautiful results.
Large mixing bowl: Gives the dough enough room to come together and rise comfortably.
Measuring cups and spoons: Helpful for keeping the dough balanced and consistent.
Stand mixer or sturdy hands for kneading: Either works well, as long as the dough becomes smooth and elastic.
Baking sheet: Holds the shaped rounds for proofing and baking.
Parchment paper: Helps prevent sticking and makes cleanup easier.
Large pot: Essential for the boiling step, which creates that signature crust.
Slotted spoon: Makes lifting the bagels from the water much easier.
Pastry brush: Useful for brushing on the egg white before topping.
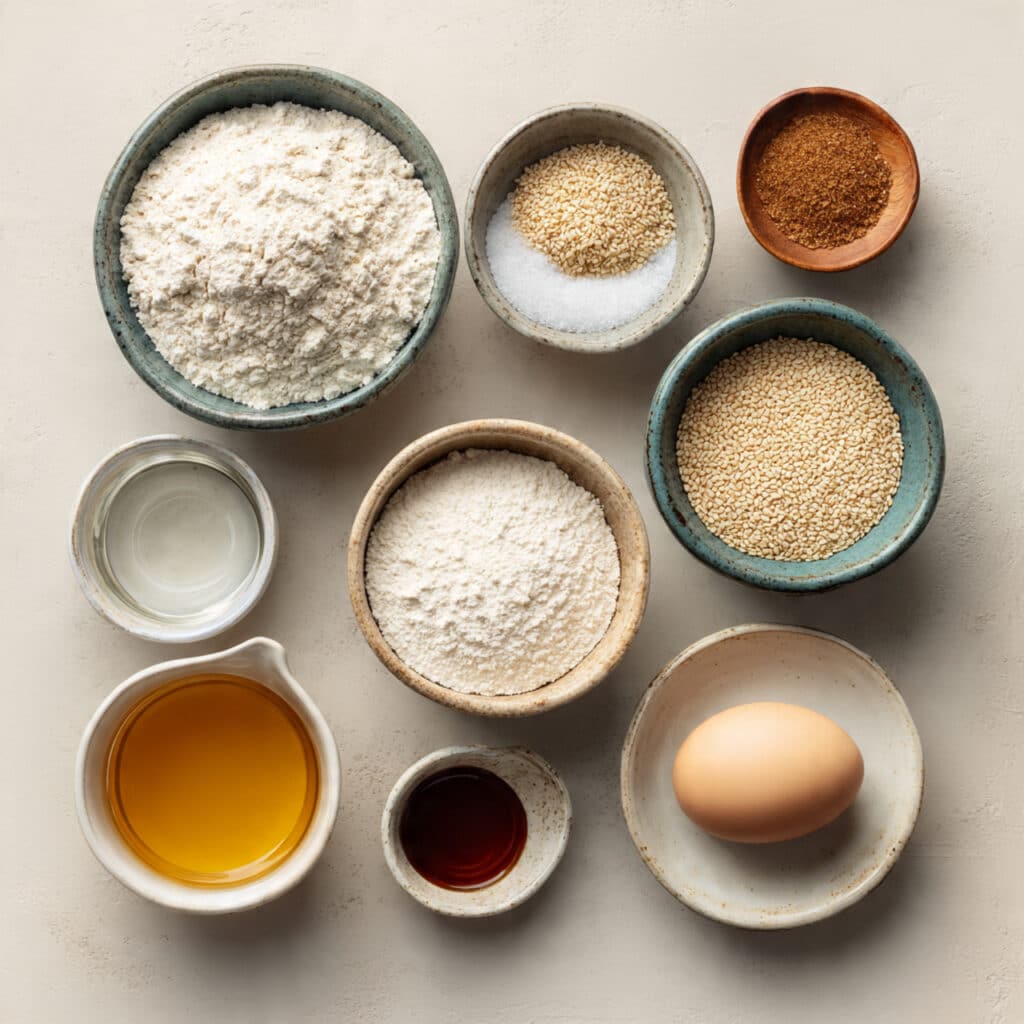
What You Will Need to Make These Chewy Favorites
This ingredient list is short, but each item pulls its weight. Together, they create a dough that is sturdy, flavorful, and wonderfully chewy with a shiny finish.
- Bread flour: 4 cups (520 g), this gives the bagels their classic chewy structure and sturdy crumb.
- Warm water: 1 1/2 cups (360 ml), this wakes up the yeast and brings the dough together.
- Instant yeast: 2 3/4 teaspoons (8 g), this helps the dough rise and keeps the texture light inside.
- Brown sugar: 1 tablespoon (13 g), this adds a subtle sweetness and supports the yeast.
- Fine salt: 2 teaspoons (10 g), this sharpens the flavor and balances the dough.
- Honey: 1 tablespoon (21 g), this goes into the boiling water and helps create a glossy crust.
- Egg white: 1 large, beaten with 1 tablespoon water, this helps the sesame seeds stick and adds shine.
- Sesame seeds: 2 tablespoons, these add crunch and a toasted, nutty finish.
Easy Swaps If You Need to Improvise
Even a reliable recipe leaves room for flexibility, and that is always nice in a real kitchen.
Bread flour: All-purpose flour, the texture will be slightly less chewy but still delicious.
Brown sugar: Barley malt syrup or granulated sugar.
Honey: Barley malt syrup or brown sugar in the boiling water.
Sesame seeds: Poppy seeds, dried onion flakes, everything seasoning, or no topping at all.
The Ingredients That Quietly Do the Heavy Lifting
A couple of ingredients deserve a little spotlight because they shape the final texture in such a big way.
Bread flour: This is the key to the satisfying chew. Its higher protein content helps the dough develop strength, which is exactly what you want here.
Honey: Even though it goes into the boiling water instead of the dough, it helps encourage that gently shiny, well-browned crust that makes fresh bagels look so inviting.
Let’s Make Them Step by Step
This is the part where everything starts to feel real, and honestly, it is a very fun process. Once the dough is mixed and shaped, the whole kitchen starts to feel like a little bakery. Here are the steps you’re going to follow.
- Preheat Your Equipment: Preheat your oven to 425°F (220°C). Line a baking sheet with parchment paper so the bagels are ready to go once they are boiled.
- Combine Ingredients: In a large bowl, mix the warm water, instant yeast, and brown sugar. Add the bread flour and salt, then knead for about 8 to 10 minutes until the dough is smooth, firm, and elastic. Cover and let it rise for about 60 minutes, or until puffy.
- Prepare Your Cooking Vessel: Bring a large pot of water to a gentle boil and stir in the honey. Keep the heat at a steady simmer so the bagels poach without getting rough or misshapen.
- Assemble the Dish: Divide the dough into 8 equal pieces. Roll each into a ball, then poke a hole through the center and gently stretch it into a ring. Place the shaped rounds on the prepared baking sheet and let them rest for 10 minutes while the water stays ready.
- Cook to Perfection: Boil the bagels 1 minute per side, working in batches so the pot is not crowded. Return them to the baking sheet, brush each one with the beaten egg white and water, then sprinkle with sesame seeds. Bake for 20 to 25 minutes, until deeply golden brown.
- Finishing Touches: Let the bagels cool for at least 15 minutes before slicing. This helps the crumb settle and keeps the inside pleasantly chewy instead of gummy.
- Serve and Enjoy: Slice, toast if you like, and serve warm with butter, cream cheese, jam, or your favorite sandwich filling.
The Texture and Flavor Payoff
When they are done right, the contrast is everything. The crust has that gentle pull and chew you hope for, while the inside stays soft, dense in the best way, and just airy enough to feel light rather than heavy.
The flavor is subtle but layered. The dough has a mild savoriness from the salt, a faint sweetness from the brown sugar, and the honey in the boil helps the crust taste rounded and rich. Add sesame seeds on top, and you get a toasty finish that makes the whole thing feel complete.
Helpful Tips That Make the Whole Process Easier
A few little details can make homemade bagels feel much more relaxed and predictable.
- Let the dough knead until it feels smooth and slightly firm, because a loose dough can spread too much.
- Wet your fingers lightly when shaping the center holes if the dough keeps springing back.
- Keep the boil gentle, not aggressively bubbling, so the bagels stay nicely shaped.
- Cool them a bit before slicing so the interior texture sets up properly.
What to Avoid for Better Results
Even a simple recipe has a few spots where things can go off track, but they are easy to avoid once you know what to watch for.
- Do not use water that is too hot with the yeast, because it can weaken the rise. Warm water should feel pleasantly warm, not hot.
- Do not skip the boil, because that is where the classic texture begins.
- Do not make the center hole too small, because it can close up while baking.
- Do not pull them from the oven too early, because pale bagels usually taste less developed and feel less chewy.
Nutrition Facts at a Glance
Servings: 8
Calories per serving: 245
Note: These are approximate values.
Timing at a Glance
Prep Time: 1 hour 40 minutes
Cook Time: 25 minutes
Total Time: 2 hours 5 minutes
Make-Ahead and Storage Tips That Actually Help
If you like planning ahead, this recipe works beautifully. You can shape the bagels, cover them, and refrigerate them for several hours before boiling and baking. That little bit of flexibility is incredibly helpful on busy mornings.
Once baked, store them in an airtight container at room temperature for up to 2 days. For longer storage, freeze them in a sealed bag for up to 2 months. Reheat or toast straight from thawed, and they come right back to life with that lovely chewy texture.
Best Ways to Serve Them
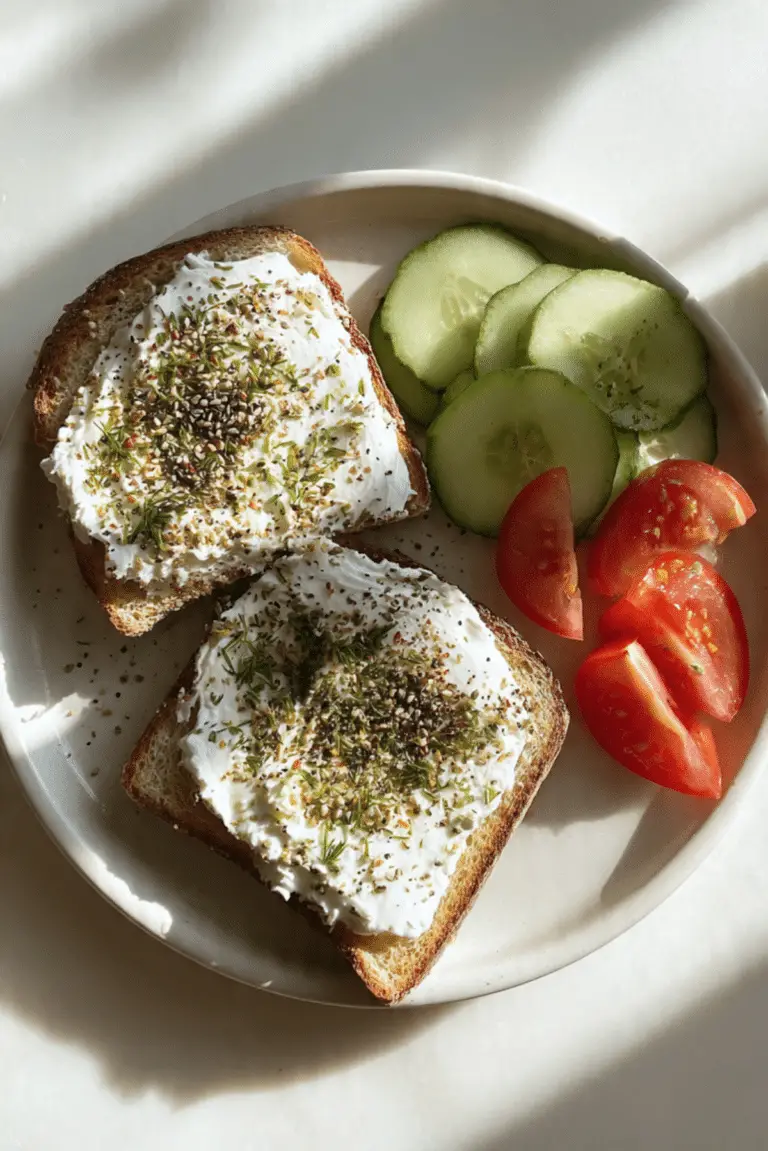
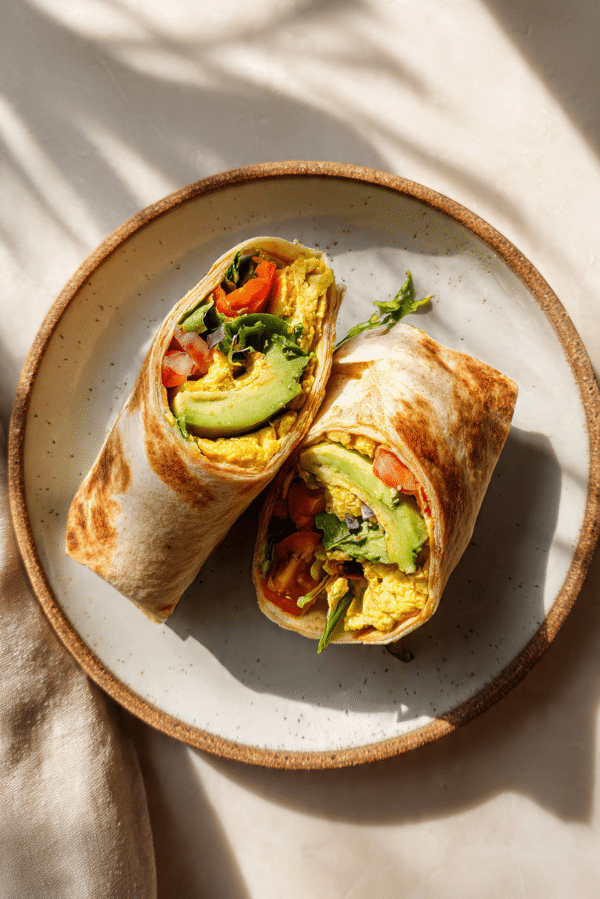
Fresh bagels are already a treat, but the serving options make them even more fun. Spread one with cream cheese for a classic breakfast, or go savory with sliced tomato, cucumber, and a sprinkle of salt.
They also make excellent sandwich bread. Fill one with egg and cheese for breakfast, or layer with lettuce, roasted vegetables, and your favorite spread for lunch. And if you want something simple, a warm toasted half with butter is hard to beat.
Smart Ways to Use Leftovers
A good bagel never really goes to waste. Day-old ones toast up beautifully and get even more character once crisped.
Slice leftovers into thin rounds and bake them into bagel chips, or cube them for a savory breakfast casserole. You can even use them as the base for mini breakfast melts, which is a very good move when you want something fast but comforting.
A Few Extra Notes Before You Bake Again
The more you make these, the more natural the process feels. That is part of the fun. You start noticing the dough texture, the way the rings puff in the hot water, and the color they take on in the oven.
For the best flavor, give the baked bagels a little cooling time before slicing. Also, toast day-two bagels to bring back their crisp edges and warm center. It makes a real difference.
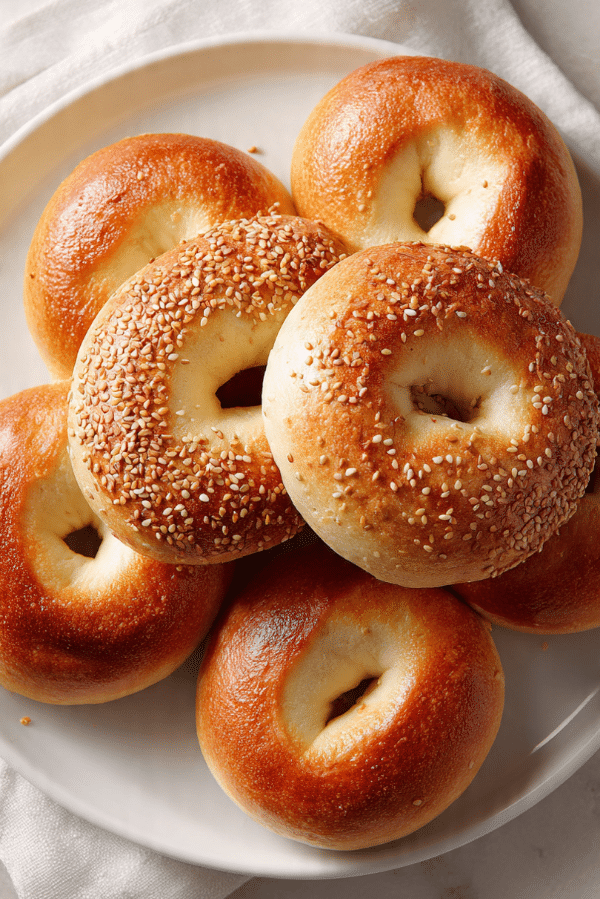
How to Make Them Look Bakery Beautiful
Presentation matters, especially with something this classic. Brush the tops evenly so they bake up glossy, and make sure the sesame seeds are sprinkled generously but neatly.
Serve them stacked on a wooden board or a simple plate with little bowls of cream cheese, jam, or butter on the side. The golden tops and ring shape already do most of the work, so you really do not need much else.
Variations to Try Once You’ve Mastered the Base
Once you feel comfortable with the method, you can start playing around a little.
Everything style: Swap the sesame seeds for everything seasoning for a more savory, punchy finish.
Poppy seed version: Use poppy seeds instead of sesame for a classic deli-inspired look and taste.
Cinnamon raisin twist: Add cinnamon and raisins to the dough for a sweeter breakfast option.
Onion topping: Sprinkle with dried onion flakes after the egg white for extra savoriness.
Plain and simple: Skip the topping entirely and let the chewy crust speak for itself.
FAQ’s
1. Can I use all-purpose flour instead of bread flour?
Yes, you can. The texture will be a little softer and less chewy, but the bagels will still turn out very nicely.
2. Why do I have to boil the bagels first?
Boiling creates the chewy outer layer that makes a bagel taste like a bagel. It also helps the crust bake up glossy and beautifully browned.
3. Can I make the dough by hand?
Absolutely. It takes a little effort, but kneading by hand works very well as long as the dough becomes smooth and elastic.
4. How do I know the dough is kneaded enough?
It should feel firm, smooth, and stretchy. If it tears easily or feels rough, give it a few more minutes.
5. Can I skip the egg white?
Yes, but the topping may not stick as well and the tops will be a bit less shiny.
6. Why did my bagel holes disappear?
They were probably shaped too small. Make the center opening a little wider before proofing and boiling.
7. Can I freeze them after baking?
Yes, and they freeze very well. Slice them first if you want easier toasting later.
8. How should I reheat them?
The toaster is the easiest option. You can also warm them in the oven for a few minutes.
9. Can I make them plain with no topping?
Of course. They are delicious even without seeds, especially when served warm.
10. What is the best way to slice them cleanly?
Let them cool first, then use a serrated knife. That keeps the crust intact and the crumb looking neat.
Conclusion
Fresh bagels at home feel a little magical, even though the ingredient list is wonderfully simple. From the chewy crust to the soft center, every step leads to something deeply comforting and seriously delicious.
Once you make a batch, the process starts to feel familiar in the best possible way. And now that you’ve seen how doable it is, there is a good chance these bagels are about to become a regular part of your kitchen routine.
Print
Homemade Bagels
Description
Soft, chewy, golden bagels with a glossy crust and a tender interior, finished with sesame seeds for a classic bakery-style bite.
Ingredients
- 4 cups (520 g) bread flour
- 1 1/2 cups (360 ml) warm water
- 2 3/4 teaspoons (8 g) instant yeast
- 1 tablespoon (13 g) brown sugar
- 2 teaspoons (10 g) fine salt
- 1 tablespoon (21 g) honey
- 1 large egg white, beaten with 1 tablespoon water
- 2 tablespoons sesame seeds
Instructions
- Preheat the oven to 425°F (220°C) and line a baking sheet with parchment paper.
- In a large bowl, mix the warm water, instant yeast, and brown sugar. Add the bread flour and salt, then knead for 8 to 10 minutes until the dough is smooth, firm, and elastic.
- Cover the dough and let it rise for 60 minutes, or until puffy.
- Bring a large pot of water to a gentle boil and stir in the honey.
- Divide the dough into 8 equal pieces. Roll each piece into a ball, poke a hole through the center, and gently stretch into a ring shape.
- Place the shaped bagels on the prepared baking sheet and let them rest for 10 minutes.
- Boil the bagels for 1 minute per side, working in batches.
- Return the boiled bagels to the baking sheet, brush each one with the beaten egg white and water, and sprinkle with sesame seeds.
- Bake for 20 to 25 minutes, until deeply golden brown.
- Cool for at least 15 minutes before slicing and serving.
Notes
- Use bread flour for the chewiest texture.
- Make the center hole slightly larger than you think you need, because it shrinks during rising and baking.
- Keep the boiling water at a gentle simmer so the bagels hold their shape.
- Freeze cooled bagels in a sealed bag for up to 2 months.