MICROWAVE NUTELLA FUDGE
Imagine this. You’re standing in your kitchen, sweet cravings kicking in, but the idea of turning on the oven sounds like a full-blown mission. That’s where this Microwave Nutella Fudge steps in to save the day. It’s rich, it’s silky, it’s melt-in-your-mouth magic that comes together in minutes. No baking, no stress, just chocolatey bliss in every square.
Behind the Recipe
This recipe was born out of those cozy nights when you want something sweet and indulgent without making a mess. I remember the first time I made it on a chilly December evening. The warmth of the fudge, that deep hazelnut aroma, and the way it just melts on your tongue was a total mood-lifter. It’s the kind of treat that makes you feel like a kid again, sneaking fudge from the fridge when no one’s watching.
Recipe Origin or Trivia
Fudge has been around since the late 1800s, believed to have originated in the United States as a happy kitchen accident. Over time, it evolved into countless versions, from peanut butter to maple to the star of our show—Nutella. Nutella itself, with its roots in Italy, became a global sensation for its creamy hazelnut cocoa blend. Putting it into fudge? That’s just pure genius, blending old-fashioned charm with modern flavor obsession.
Why You’ll Love MICROWAVE NUTELLA FUDGE
This one’s a total game-changer, and here’s why:
Versatile: Perfect for snacking, gifting, or dressing up dessert platters.
Budget-Friendly: Uses pantry staples with no fancy equipment.
Quick and Easy: Ready in under 10 minutes and sets in the fridge.
Customizable: Add your favorite nuts, swirls, or toppings.
Crowd-Pleasing: Everyone from toddlers to grandparents will ask for seconds.
Make-Ahead Friendly: Whip it up a day before your event.
Great for Leftovers: Stores beautifully for days without losing texture.
Chef’s Pro Tips for Perfect Results
Let me tell you, getting that perfect fudge texture is easier than you think with these tips:
- Use sweetened condensed milk, not evaporated milk. They’re not interchangeable and you need that creamy sweetness.
- Line your pan with parchment. It makes lifting and slicing a breeze.
- Microwave in short bursts. Stir between every 20–30 seconds to avoid scorching the chocolate.
- Let it chill fully. Give it 2–3 hours minimum in the fridge before slicing.
- Use high-quality Nutella. Or a rich hazelnut spread with similar texture for the best taste.
Kitchen Tools You’ll Need
You don’t need a gourmet kitchen to make this treat. Just these few basics:
Microwave-safe bowl: For melting everything evenly.
Spatula: To stir and scrape out every last bit of that fudgey goodness.
Parchment paper: For a clean lift and no sticking.
8×8-inch pan: Perfect size for a good-thickness fudge slab.
Measuring cups and spoons: Accuracy makes all the difference.
Ingredients in MICROWAVE NUTELLA FUDGE
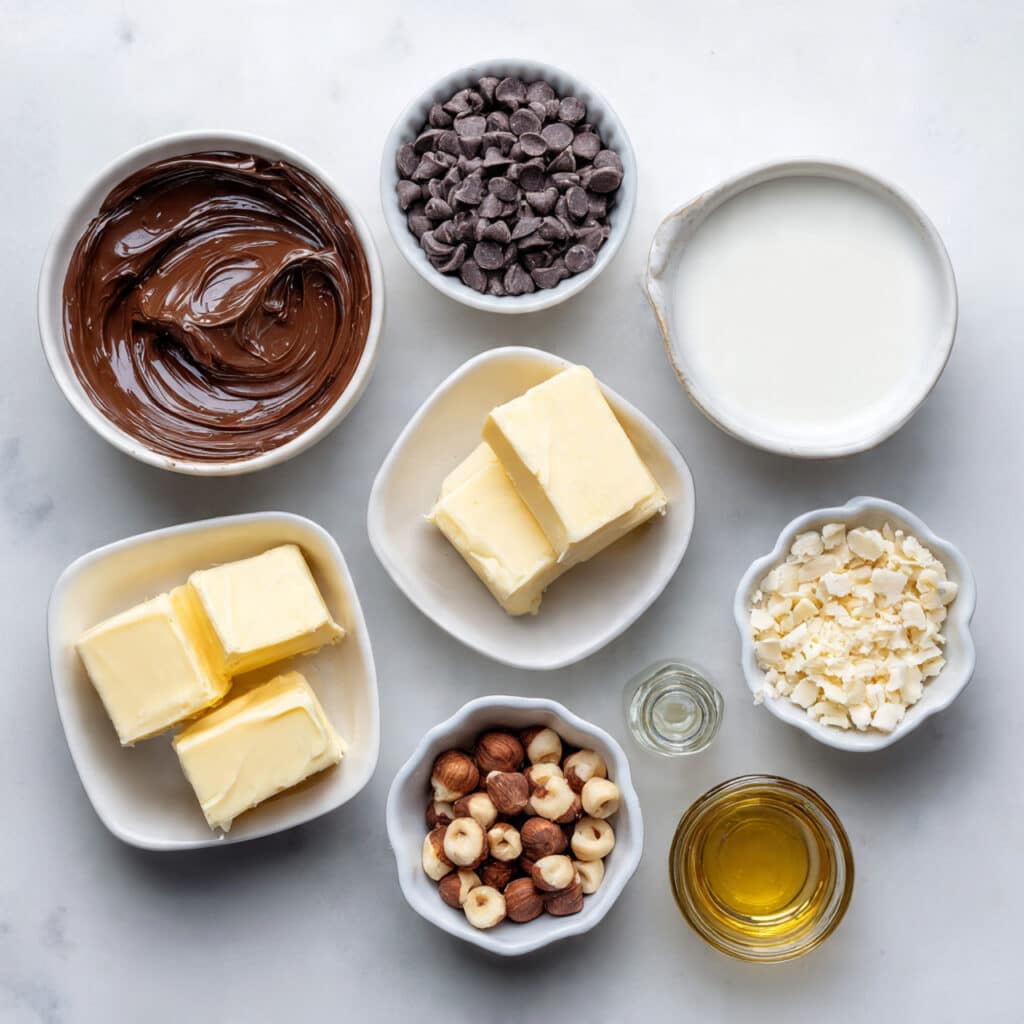
This is where the magic happens. Every ingredient here brings richness, texture, and balance to each square.
- Nutella: 1 cup. Delivers that luscious hazelnut-chocolate flavor and creamy base.
- Semi-sweet chocolate chips: 1 1/2 cups. Adds structure and deep chocolate richness.
- Sweetened condensed milk: 1 can (14 oz). Binds everything and keeps the texture smooth and fudgy.
- Butter: 2 tablespoons. Adds extra creaminess and a silky finish.
- Vanilla extract: 1 teaspoon. Enhances flavor depth.
- Chopped hazelnuts (optional): 1/2 cup. Adds a delightful crunch and nutty punch.
Ingredient Substitutions
Whether you’re out of something or need a tweak, here’s how to pivot:
Nutella: Any creamy hazelnut spread.
Semi-sweet chocolate chips: Use milk or dark chocolate chips depending on preference.
Sweetened condensed milk: Coconut condensed milk for a dairy-free version.
Butter: Coconut oil for a subtle tropical hint.
Hazelnuts: Swap for almonds, pecans, or skip entirely for a smoother texture.
Ingredient Spotlight
Nutella: This velvety hazelnut cocoa spread is the heart of this recipe. It brings sweetness, creaminess, and that unmistakable flavor we all adore.
Sweetened Condensed Milk: It’s the unsung hero here. Sweet, sticky, and essential for that melt-in-your-mouth consistency.
Instructions for Making MICROWAVE NUTELLA FUDGE
Grab your mixing bowl, we’re about to whip up something delicious. Here’s how the magic unfolds:
-
Preheat Your Equipment:
No preheating needed! Just make sure your microwave is clean and ready. -
Combine Ingredients:
In a microwave-safe bowl, combine Nutella, chocolate chips, condensed milk, and butter. -
Prepare Your Cooking Vessel:
Line an 8×8-inch pan with parchment paper, leaving some overhang for easy lifting later. -
Assemble the Dish:
Microwave the mixture in 30-second intervals, stirring between each, until completely smooth and glossy. Stir in vanilla extract and hazelnuts if using. -
Cook to Perfection:
Once everything is melted and combined, pour the fudge mixture into the lined pan and spread evenly with a spatula. -
Finishing Touches:
Gently tap the pan on the counter to level out. Sprinkle more chopped nuts on top if you’d like a crunchier finish. -
Serve and Enjoy:
Refrigerate for at least 2–3 hours or until set. Lift out, slice into squares, and indulge!
Texture & Flavor Secrets
Each bite of this fudge offers a smooth, dense texture with a luxurious melt-in-your-mouth feel. The Nutella provides a deep hazelnut note, while the chocolate chips bring that slightly bitter contrast. A sprinkle of nuts adds just the right crunch to keep things interesting.
Cooking Tips & Tricks
Here are a few ways to make sure your fudge comes out perfect every single time:
- Use parchment paper for clean edges and easy removal.
- Stir often to prevent scorching in the microwave.
- If adding nuts, toast them first for extra flavor.
- Let the fudge come to room temp slightly before slicing for neater squares.
What to Avoid
These common mistakes are easy to dodge with a little know-how:
- Don’t overheat the mixture. It can turn grainy.
- Avoid using evaporated milk. It won’t give the right consistency.
- Don’t rush the chilling time. Patience = perfect texture.
- Skip flavored spreads. Stick to plain hazelnut-chocolate varieties.
Nutrition Facts
Servings: 16 squares
Calories per serving: 210
Note: These are approximate values.
Preparation Time
Prep Time: 5 minutes
Cook Time: 2 minutes
Total Time: 2 hours 10 minutes (including chilling)
Make-Ahead and Storage Tips
This fudge is a make-ahead dream. Whip it up the night before your event or craving and let it set overnight. Store it in an airtight container in the fridge for up to a week. For longer storage, freeze pieces individually and thaw as needed for a sweet fix.
How to Serve MICROWAVE NUTELLA FUDGE
Slice it into bite-sized squares and serve on a platter with berries, drizzle with caramel for extra decadence, or package in little boxes for the perfect edible gift. Trust me, it’s a showstopper at dessert tables or with coffee.
Creative Leftover Transformations
Got extra fudge? Here’s how to remix it:
- Crumble over ice cream for instant sundae magic.
- Chop and fold into cookie dough.
- Melt slightly and swirl into brownie batter.
- Use as a frosting layer in cakes or cupcakes.
Additional Tips
To keep things ultra-delicious and fresh:
- Store with parchment between layers to avoid sticking.
- Use a hot knife to slice clean squares.
- Sprinkle a pinch of sea salt on top for that sweet-salty balance.
Make It a Showstopper
Presentation counts. Stack the squares high on a marble board, drizzle with melted Nutella, and finish with gold sprinkles or chopped toasted hazelnuts. A garnish of mint leaves adds a festive touch for parties.
Variations to Try
Switch things up with these tasty twists:
- Peanut Butter Swirl: Add a few dollops before setting and swirl with a knife.
- Espresso Kick: Stir in 1 teaspoon of instant coffee for depth.
- White Chocolate Version: Use white chocolate chips and swirl with Nutella.
- Fruit & Nut: Add dried cranberries and pistachios for a festive look.
- Mint Chocolate: Mix in peppermint extract and top with crushed mint candies.
FAQ’s
Q1: Can I use homemade Nutella?
A1: Yes, as long as it’s creamy and smooth, it’ll work beautifully.
Q2: How long does it take to set?
A2: Typically 2 to 3 hours in the fridge, but overnight is best for clean cuts.
Q3: Can I make this dairy-free?
A3: Absolutely. Use dairy-free chocolate chips and coconut condensed milk.
Q4: Does it need to be refrigerated?
A4: Yes, it keeps its texture best when stored cold.
Q5: Can I double the recipe?
A5: Yes, just use a larger pan to keep the same thickness.
Q6: Can I use a stove instead of microwave?
A6: Of course. Melt everything over low heat in a saucepan, stirring constantly.
Q7: What if my fudge turns grainy?
A7: It likely overheated. Microwave in shorter intervals and stir well next time.
Q8: Can I freeze it?
A8: Yes, cut and wrap pieces individually for easy thaw-and-enjoy treats.
Q9: How long does it last?
A9: About a week in the fridge or 2 months in the freezer.
Q10: Can I add toppings?
A10: Definitely. Try crushed pretzels, sprinkles, or flaky sea salt for extra flair.
Conclusion
If you’re looking for a dessert that’s quick, indulgent, and utterly irresistible, Microwave Nutella Fudge is the answer. It’s that sweet reward at the end of a long day, the crowd favorite at every gathering, and a little bite of joy straight from the fridge. So go ahead, make a batch today. Trust me, you’re going to love this.
Print
MICROWAVE NUTELLA FUDGE
Description
Indulgent and ultra-easy, this Microwave Nutella Fudge is rich, creamy, and ready in minutes—no baking required.
Ingredients
- 1 cup Nutella
- 1 1/2 cups semi-sweet chocolate chips
- 1 can (14 oz) sweetened condensed milk
- 2 tablespoons butter
- 1 teaspoon vanilla extract
- 1/2 cup chopped hazelnuts (optional)
Instructions
- In a microwave-safe bowl, combine Nutella, chocolate chips, sweetened condensed milk, and butter.
- Microwave in 30-second intervals, stirring in between, until smooth and fully melted.
- Stir in vanilla extract and chopped hazelnuts if using.
- Line an 8×8-inch pan with parchment paper.
- Pour the mixture into the lined pan and spread evenly.
- Tap gently on the counter to smooth the top and release any bubbles.
- Refrigerate for 2–3 hours or until fully set.
- Once set, lift out, slice into squares, and enjoy.
Notes
- Use parchment for clean removal and slicing.
- Don’t overheat—stir often to avoid scorching.
- Top with sea salt, nuts, or sprinkles for extra flair.
- Let fudge come to room temperature slightly before slicing for neater edges.