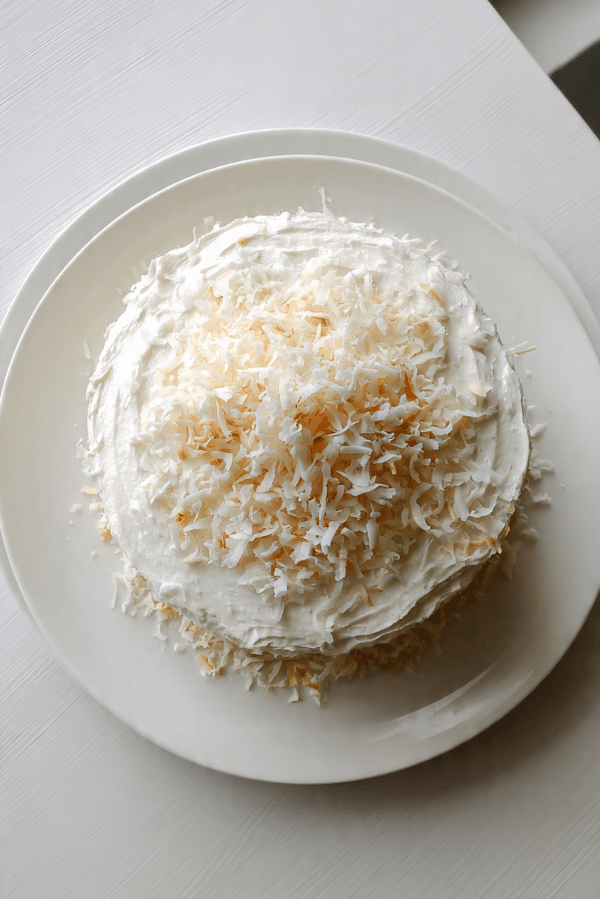
No Bake Chocolate Biscuit Cake
There is something so comforting about a chilled chocolate dessert that asks almost nothing from you except a little stirring, a little patience, and a big appetite. This cake is rich, fudgy, slightly crunchy, and deeply chocolatey, with biscuit pieces tucked into every slice. Trust me, you’re going to love this, because it feels fancy when you serve it, but it comes together with very little effort.
The kind of dessert that disappears fast
Some recipes win people over because they are dramatic, and some do it because they are easy enough to make on a random afternoon. This one somehow does both. You get that glossy chocolate finish, that beautiful sliceable texture, and those little biscuit chunks that make every bite more interesting. Let me tell you, it’s worth every bite, especially when you want something sweet, nostalgic, and just a little bit indulgent.
A sweet classic with old-fashioned charm
Desserts like this have roots in the European fridge cake tradition, where crushed biscuits are folded into melted chocolate and chilled until firm. Versions of it show up in home kitchens across the UK and beyond, sometimes called chocolate biscuit cake, sometimes fridge cake, and sometimes tiffin, depending on the ingredients and style. What stays the same is the magic of turning simple pantry staples into something that feels special enough for a celebration.
Why this recipe earns a spot in your favorites
This cake keeps proving itself once you make it, and now let’s dive into exactly why it works so well.
Versatile: You can serve it as a casual afternoon treat, a birthday dessert, or a make-ahead sweet for guests. It fits almost any occasion without feeling overdone.
Budget-Friendly: The ingredient list is simple and familiar, which means you can create something impressive without spending a lot. That is always a win in my kitchen.
Quick and Easy: There is no oven, no tricky technique, and no complicated prep. Most of the work is just melting, mixing, and chilling.
Customizable: You can adjust the sweetness, swap the biscuit style, or add a few little extras like vanilla or a pinch of salt. It is flexible without losing its charm.
Crowd-Pleasing: Chocolate and biscuits are a combination almost nobody says no to. The texture alone makes it a total game-changer.
Make-Ahead Friendly: In fact, this dessert is better when made ahead because the chilling time helps everything set beautifully. That means less stress later.
Great for Leftovers: Slices keep well in the fridge, and they stay delicious for days. A little cold piece with coffee is hard to beat.
Smart little secrets for the best result
Before you begin, a few small details can make the final cake even better. These are the kind of tiny kitchen tricks that turn a good dessert into one you want to make again and again.
- Use good chocolate: Since chocolate is the star here, choose one that tastes great on its own. A mix of dark chocolate and cocoa gives the cake a deeper flavor.
- Do not crush the biscuits too finely: You want a mix of chunky and smaller pieces so the texture stays interesting.
- Let the chocolate mixture cool slightly before combining: If it is too hot, the biscuits can soften too much and lose their bite.
- Line the pan well: This makes unmolding and slicing much easier, especially once the cake is fully chilled.
- Chill thoroughly before slicing: A rushed slice can look messy, so give it enough time to firm up properly.
The simple tools that make it easy
The nice thing here is that you do not need much, which makes the whole process feel even more doable.
Saucepan: You will use this to gently melt the butter, chocolate, cocoa powder, and condensed milk into one smooth mixture.
Mixing bowl: Perfect for holding the crushed biscuits before everything comes together.
Spatula or wooden spoon: Helpful for folding the biscuit pieces through the chocolate without breaking them too much.
8-inch round cake tin or loaf pan: Either works well, as long as it is lined so the cake lifts out easily.
Parchment paper: This keeps sticking away and helps you remove the cake neatly.
Sharp knife: For clean, pretty slices once the cake is fully chilled.
What goes into every rich and crunchy bite
The beauty of this cake is in how a few everyday ingredients come together so naturally. Each one adds something important, whether it is structure, sweetness, or that deep chocolate flavor that makes the whole thing irresistible.
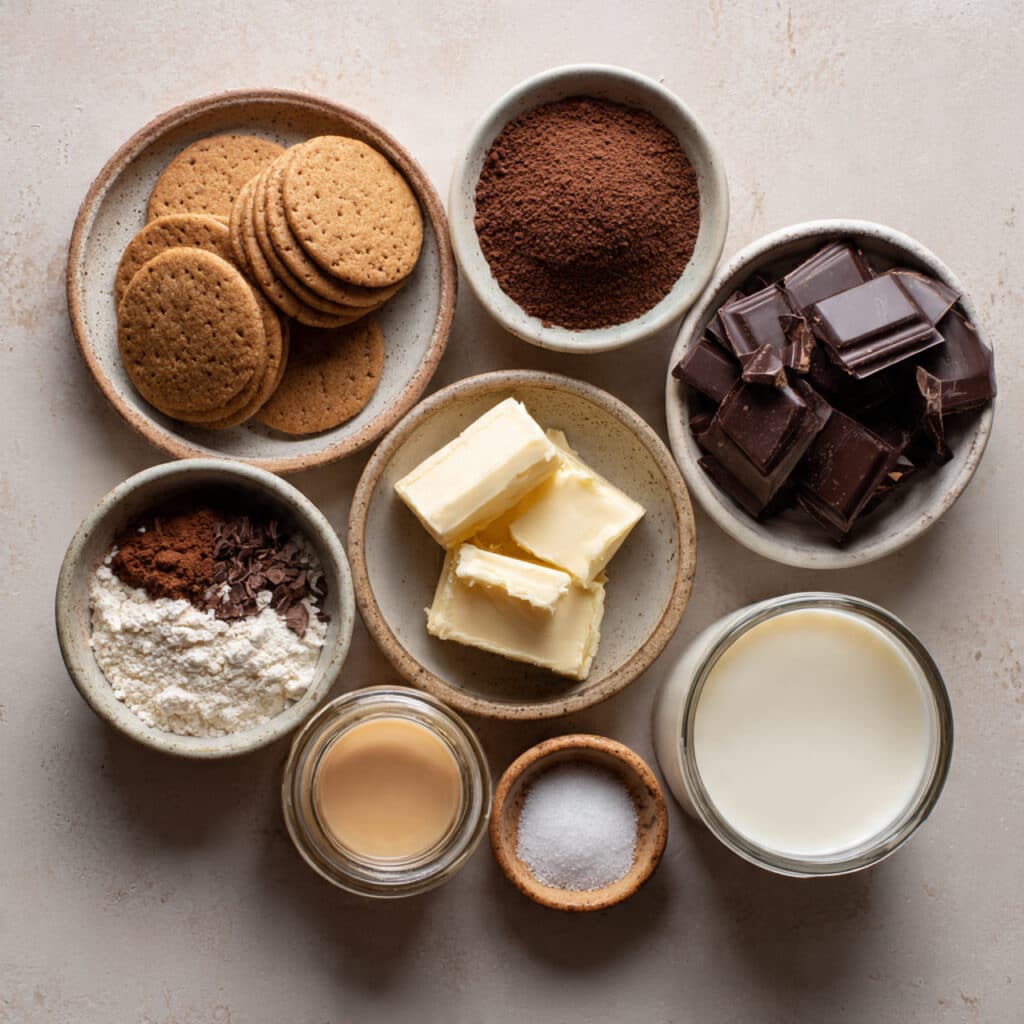
- Digestive biscuits: 250 g, roughly crushed. These create the signature chunky texture and give the cake its satisfying bite.
- Dark chocolate: 200 g, chopped. This brings rich, bold chocolate flavor and helps the cake set firmly once chilled.
- Unsalted butter: 100 g. Butter melts into the chocolate and gives the cake a smooth, luscious body.
- Sweetened condensed milk: 200 g. This adds sweetness and helps bind the mixture into a dense, fudgy slice.
- Unsweetened cocoa powder: 2 tablespoons. Cocoa deepens the chocolate flavor and gives the mixture a fuller, more intense taste.
- Vanilla extract: 1 teaspoon. A small amount, but it rounds everything out beautifully.
- Pinch of salt: 1 pinch. This quietly sharpens the chocolate flavor and keeps the sweetness balanced.
- Chocolate ganache topping: 100 g dark chocolate plus 80 ml heavy cream. This creates that glossy finish that makes the cake look polished and party-ready.
Easy swaps if you want to tweak it
One of the nicest parts about a chilled dessert like this is how forgiving it can be. You have room to adjust without taking away what makes it special.
Digestive biscuits: Graham crackers or tea biscuits.
Dark chocolate: Semi-sweet chocolate.
Unsalted butter: Salted butter, just skip the added pinch of salt.
Sweetened condensed milk: Coconut condensed milk for a dairy-free style variation.
Vanilla extract: A splash of coffee extract or a little orange extract.
Heavy cream for ganache: Full-fat coconut cream.
The ingredients that truly make it shine
Some ingredients do more than simply show up, they completely shape the personality of the dessert.
Dark chocolate: This is where the cake gets its deep, grown-up richness. It keeps the sweetness from going too far and gives every bite that smooth, lingering chocolate finish.
Digestive biscuits: These are what make the texture so memorable. Instead of a plain soft slice, you get little pockets of crunch and structure that make the whole thing much more fun to eat.
Let’s bring it all together
Now comes the fun part, and honestly, this is where the recipe feels almost effortless. You are only a few simple steps away from a chilled chocolate cake that looks impressive and tastes even better.
- Preheat Your Equipment: No oven is needed for this recipe, which is part of the magic. Simply line an 8-inch round tin or loaf pan with parchment paper and set it aside.
- Combine Ingredients: In a saucepan over low heat, melt the dark chocolate, butter, sweetened condensed milk, cocoa powder, vanilla extract, and salt. Stir until the mixture is smooth, glossy, and fully combined.
- Prepare Your Cooking Vessel: Make sure your lined pan is ready before you fold in the biscuits. This helps you move quickly once the mixture is finished.
- Assemble the Dish: Place the roughly crushed biscuits in a mixing bowl, pour the warm chocolate mixture over them, and fold gently until every piece is coated. Spoon the mixture into the prepared pan and press it down evenly.
- Cook to Perfection: Since this is a no-bake dessert, the fridge does the work here. Chill the cake for 4 hours, or until firm.
- Finishing Touches: Warm the heavy cream until just hot, pour it over the 100 g chopped dark chocolate, let it sit for 1 minute, then stir until smooth. Spread the ganache over the chilled cake and return it to the fridge for 30 minutes to set.
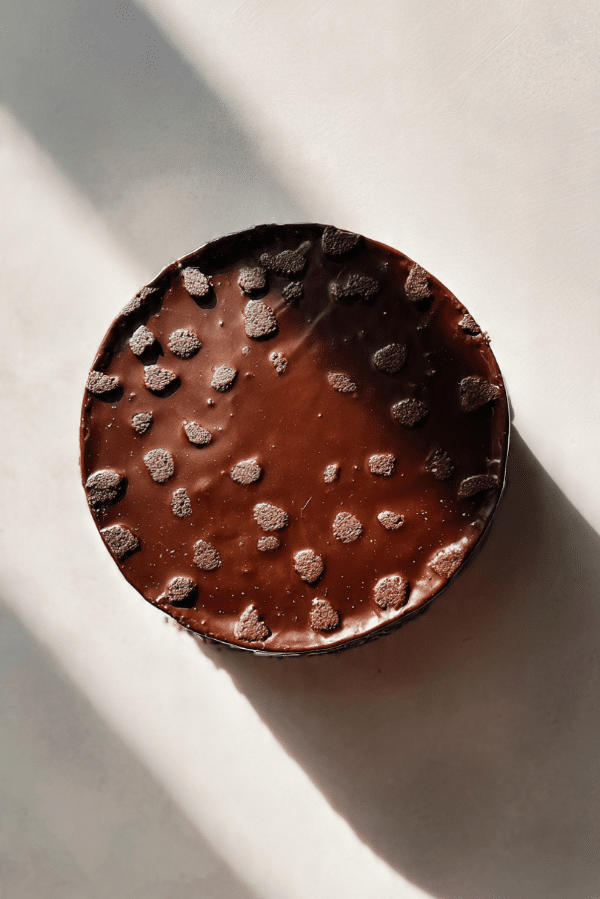
- Serve and Enjoy: Lift the cake from the pan, slice it with a sharp knife, and serve chilled. Each piece should look glossy, dense, and full of biscuit texture.
The texture is where the magic happens
What makes this dessert so satisfying is the contrast in every bite. The chocolate mixture sets into something soft and fudgy, almost like a truffle-style filling, while the biscuits keep their gentle crunch. Then the ganache on top adds a silky finish that melts first on your tongue before the denser center kicks in. The flavor deepens as it chills, too, so the chocolate tastes rounder, richer, and somehow even more comforting the next day.
Little tips that make a big difference
A recipe this simple still has a few ways to make it even smoother, and these are worth remembering.
- Chop the chocolate evenly: Smaller pieces melt faster and more smoothly.
- Use a hot knife for slicing: Wipe it clean between cuts for neat slices.
- Press the mixture firmly into the pan: This helps the cake hold together beautifully.
- Let it sit for a few minutes before serving: A short rest outside the fridge softens the texture just enough.
A few things you do not want to do
Even easy desserts have a couple of small traps, but they are easy to avoid once you know them.
- Do not over-crush the biscuits: If they turn into crumbs, you lose that lovely chunky texture.
- Do not overheat the chocolate mixture: Gentle heat is enough, and it keeps the texture silky.
- Do not skip lining the pan: It makes removal much easier and saves you frustration later.
- Do not slice too soon: If the cake has not chilled enough, the slices can fall apart.
A quick look at the nutrition
Servings: 10
Calories per serving: 375
Note: These are approximate values.
Time well spent for a dessert like this
The nice thing here is that most of the time is hands-off, which makes the whole process feel very relaxed.
Prep Time: 20 minutes
Cook Time: 0 minutes
Total Time: 4 hours 50 minutes
Make-ahead and storage made easy
This is one of those desserts that feels like a gift to your future self. You can make it a day ahead, keep it covered in the fridge, and slice it when needed. It stays well for up to 5 days in the refrigerator, and the flavor stays rich and lovely. For longer storage, freeze slices in an airtight container with parchment between them for up to 2 months. Thaw them overnight in the fridge, then serve chilled for the best texture.
The best ways to serve it
This cake is rich enough to stand alone, but a few simple serving ideas make it feel even more special. A small spoonful of whipped cream on the side works beautifully, and fresh berries add brightness that cuts through the chocolate. It is also wonderful with coffee, espresso, or a cold glass of milk. For a dinner party moment, serve each slice on a chilled plate so the ganache stays glossy and neat.
Turn the leftovers into something new
Leftovers rarely last long, but if you have them, they can become something a little different the next day.
Slice it into small cubes and serve it as part of a dessert platter. Crumble a piece over vanilla ice cream for an instant sundae feel. You can even tuck tiny chunks into whipped cream cups for a quick layered dessert that feels surprisingly fancy.
Extra ways to make it even better
Once you have made it once, you start noticing all the tiny ways to make it your own. A little flaky salt on top can add contrast, and a touch of orange zest in the chocolate mixture gives it a brighter edge. Even the type of biscuit can change the final mood, which makes the recipe fun to revisit whenever the craving hits.
Make it look bakery-worthy
Presentation matters, especially with a simple dessert like this. Spread the ganache smoothly, then create a few soft swirls on top with the back of a spoon. Slice the cake cleanly and arrange the pieces on a plain plate so the glossy chocolate and biscuit-studded center really stand out. This one’s a total game-changer when you want something easy that still looks like you put in serious effort.
Fun variations to try next time
If you love the base recipe, there are plenty of ways to play with it while keeping that same easy spirit.
- Hazelnut version: Fold in a few tablespoons of chopped toasted hazelnuts for extra crunch.
- Mocha twist: Add 1 teaspoon instant espresso powder to the chocolate mixture for a deeper flavor.
- Orange chocolate style: Stir in 1 teaspoon finely grated orange zest for a fresh citrus note.
- Milk chocolate version: Replace part of the dark chocolate with milk chocolate for a sweeter, creamier bite.
- Mini bar format: Press the mixture into a square pan and cut it into snack-size bars.
FAQ’s
Q1: Can I make this cake without condensed milk?
Yes, but the texture and sweetness will change. Condensed milk helps bind the cake and gives it that dense, fudgy feel.
Q2: What biscuits work best here?
Digestive biscuits are classic, but graham crackers or plain tea biscuits also work well.
Q3: How long does it need to chill?
The cake needs at least 4 hours to firm up properly, and overnight is even better.
Q4: Can I freeze it?
Yes. Slice it first, wrap the pieces well, and freeze for up to 2 months.
Q5: Is it very sweet?
It is sweet, but the dark chocolate keeps it balanced and not overly sugary.
Q6: Can I use milk chocolate only?
You can, though the final result will be sweeter and a little softer in flavor.
Q7: Why is my cake falling apart?
Usually that means it was not pressed firmly enough into the pan or did not chill long enough.
Q8: Can I make it in a loaf pan?
Absolutely. A loaf pan works very well and gives you neat, even slices.
Q9: Should I store it at room temperature?
No, it is best kept chilled so the structure stays firm and the ganache remains set.
Q10: Can I add nuts or dried fruit?
Yes, as long as you do not add too much. A small amount can be folded in without affecting the texture too much.
Conclusion
This cake is the kind of dessert that makes life feel a little easier and a lot more delicious. It is rich, chocolatey, beautifully textured, and wonderfully low-effort, which is a combination I will always say yes to. Whether you are making it for guests, for family, or just because you want something sweet waiting in the fridge, this recipe delivers every time. Trust me, once you slice into that glossy top and see those biscuit-filled layers, you will already be thinking about making it again.
Print
No Bake Chocolate Biscuit Cake
Description
A rich and fudgy no bake chocolate biscuit cake made with crushed digestive biscuits, dark chocolate, butter, condensed milk, and a smooth chocolate ganache topping. It is easy to make, sliceable, and perfect for preparing ahead.
Ingredients
- 250 g digestive biscuits, roughly crushed
- 200 g dark chocolate, chopped
- 100 g unsalted butter
- 200 g sweetened condensed milk
- 2 tablespoons unsweetened cocoa powder
- 1 teaspoon vanilla extract
- 1 pinch salt
- 100 g dark chocolate, for ganache
- 80 ml heavy cream, for ganache
Instructions
- Line an 8-inch round cake tin or loaf pan with parchment paper.
- In a saucepan over low heat, melt 200 g dark chocolate, butter, sweetened condensed milk, cocoa powder, vanilla extract, and salt, stirring until smooth and glossy.
- Place the crushed digestive biscuits in a large mixing bowl.
- Pour the chocolate mixture over the biscuits and fold gently until all the biscuit pieces are evenly coated.
- Spoon the mixture into the prepared pan and press it down firmly into an even layer.
- Chill for 4 hours, or until firm.
- For the ganache, heat the heavy cream until just hot, pour it over the 100 g dark chocolate, let it sit for 1 minute, then stir until smooth.
- Spread the ganache over the chilled cake and refrigerate for 30 minutes more.
- Lift from the pan, slice, and serve chilled.
Notes
- Do not crush the biscuits too finely, a mix of chunks and smaller pieces gives the best texture.
- Use a sharp knife warmed in hot water for cleaner slices.
- The cake keeps well in the fridge for up to 5 days.
- Freeze individual slices for up to 2 months and thaw in the fridge before serving.