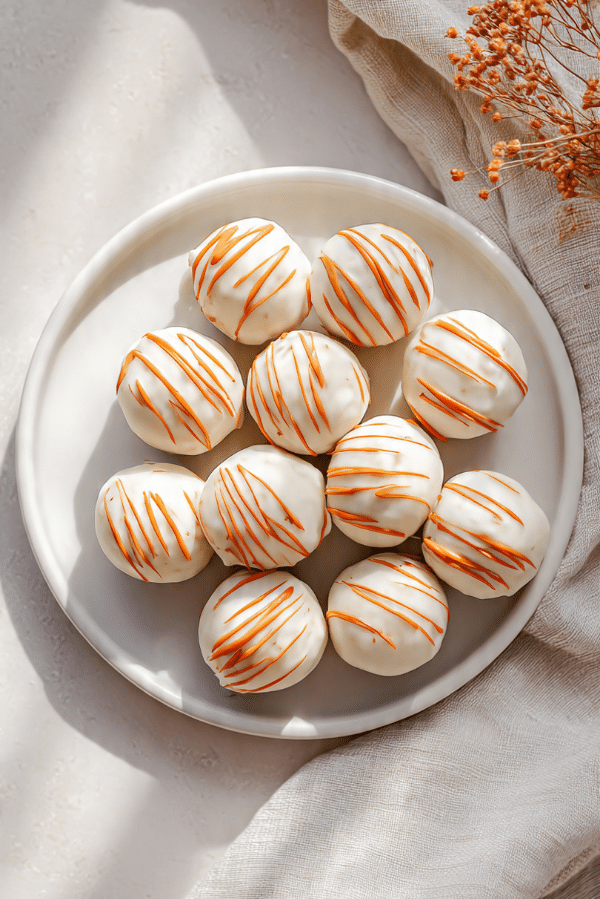
No-Bake Pumpkin Cake Balls
There is something about pumpkin season that instantly slows things down. The air feels cozier, kitchens smell warmer, and suddenly all you want is an easy sweet treat that feels homemade without a lot of effort. These no-bake pumpkin cake balls fit perfectly into that mood. They are soft, lightly spiced, and coated in a smooth chocolate shell that cracks just enough when you bite in. Trust me, you’re going to love this, especially when you realize you do not even have to turn on the oven.
A Little Story Behind This Treat
This recipe came from one of those afternoons when I wanted dessert but did not want a mess. I had pumpkin puree in the fridge, a half block of cream cheese, and a craving for something fun to roll and dip. One batch later, these little bites became a fall staple. They feel festive without being fussy, and let me tell you, it’s worth every bite when you see how fast they disappear.
Where Pumpkin Cake Balls Fit In
Pumpkin desserts have long been tied to autumn gatherings, from harvest festivals to casual family dinners. While baked cakes and pies usually steal the spotlight, no-bake treats like this have become popular for busy kitchens that still want seasonal flavor. These cake balls take that classic pumpkin spice comfort and turn it into a modern, make-ahead dessert that travels well and serves beautifully.
Why You’ll Love This Recipe
This is the part where everything really comes together.
Versatile: These little bites work for parties, lunchbox treats, or a quiet night dessert with tea.
Budget-Friendly: Simple pantry ingredients keep costs low without sacrificing flavor.
Quick and Easy: No oven, no baking time, and very little cleanup.
Customizable: You can switch coatings, spices, or decorations to match any occasion.
Crowd-Pleasing: Sweet, creamy, and bite-sized means everyone reaches for seconds.
Make-Ahead Friendly: They actually taste better after chilling.
Great for Leftovers: Any extras store beautifully for later cravings.
Chef’s Pro Tips for Perfect Results
Getting the texture just right makes all the difference here.
- Chill the mixture before rolling so the balls hold their shape.
- Use a small cookie scoop to keep sizes even.
- Tap off extra chocolate gently to avoid thick coating.
- Let the coating set fully before stacking or storing.
Kitchen Tools You’ll Need
Before diving in, it helps to have a few basics ready.
Mixing Bowl: Large enough to combine everything smoothly.
Hand Mixer or Spatula: Either works, depending on how soft your cream cheese is.
Cookie Scoop: Keeps portions neat and consistent.
Parchment Paper: Prevents sticking while the coating sets.
Microwave-Safe Bowl: Perfect for melting chocolate gently.
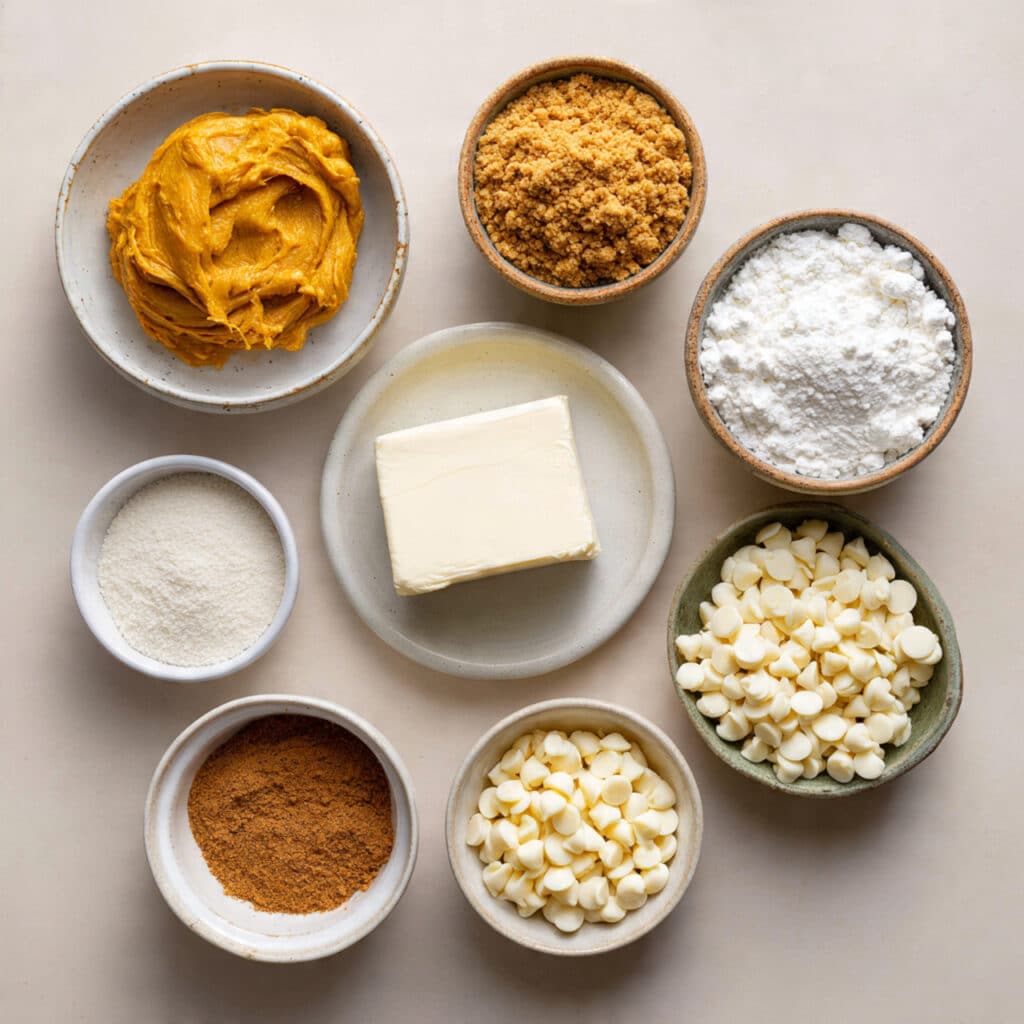
Ingredients That Make It All Work
Each ingredient plays its part, and together they create that perfect balance of soft and sweet.
- Pumpkin Puree: 1 cup, adds moisture and classic fall flavor.
- Cream Cheese: 4 ounces, softened, brings richness and structure.
- Vanilla Extract: 1 teaspoon, rounds out the sweetness.
- Pumpkin Spice: 1 teaspoon, adds warmth and aroma.
- Graham Cracker Crumbs: 1 and 1⁄2 cups, forms the cake-like base.
- Powdered Sugar: 1⁄2 cup, sweetens and binds the mixture.
- White Chocolate Chips: 12 ounces, melted, for coating.
Ingredient Swaps That Still Work
Flexibility is part of the fun.
White Chocolate Chips: Milk or dark chocolate both work well.
Graham Cracker Crumbs: Vanilla wafer crumbs make a great substitute.
Pumpkin Spice: A mix of cinnamon and nutmeg works in a pinch.
Ingredient Spotlight
Pumpkin Puree: This brings natural sweetness and that unmistakable autumn color, keeping the interior soft and tender.
Cream Cheese: It adds creaminess while helping the mixture hold its shape once chilled.
Let’s Make Them Together
Now let’s dive into the fun part.
- Preheat Your Equipment: No oven needed, but clear space in the fridge for chilling.
- Combine Ingredients: In a bowl, mix pumpkin puree, cream cheese, vanilla, pumpkin spice, graham crumbs, and powdered sugar until smooth.
- Prepare Your Cooking Vessel: Line a baking sheet with parchment paper.
- Assemble the Dish: Scoop and roll the mixture into small balls and place them on the sheet.
- Cook to Perfection: Chill for 30 minutes until firm.
- Finishing Touches: Dip each ball into melted white chocolate and return to the parchment.
- Serve and Enjoy: Chill again until the coating sets, then enjoy.
Texture and Flavor Secrets
The magic here is contrast. The inside stays soft and creamy with gentle spice, while the chocolate shell adds a delicate snap. As they chill, the flavors meld together, making each bite smoother and more balanced.
Helpful Tips to Keep in Mind
A few small tweaks go a long way.
- Chill between steps for cleaner dipping.
- Stir melted chocolate gently to keep it smooth.
- Decorate while the coating is still wet if adding drizzle.
What to Avoid
Even easy recipes have a few pitfalls.
- Overmixing, which can make the texture dense.
- Skipping the chill time, leading to misshapen balls.
- Overheating chocolate, which causes graininess.
Nutrition Snapshot
Servings: 24
Calories per serving: 110
Note: These are approximate values.
Time Breakdown
Prep Time: 20 minutes
Cook Time: 0 minutes
Total Time: 50 minutes
Make-Ahead and Storage Tips
These are perfect for planning ahead. Store them in an airtight container in the fridge for up to five days. You can also freeze them for longer storage, then thaw overnight in the fridge before serving.
How to Serve Them
Arrange them on a simple platter, add a warm drink nearby, and you have an instant fall dessert spread. They pair beautifully with coffee, chai, or hot cocoa.
Creative Leftover Ideas
Crumble them over ice cream, tuck them into gift boxes, or serve them as part of a dessert board with fruit and cookies.
Extra Helpful Advice
Use room-temperature cream cheese for the smoothest mixture and always chill before dipping for the cleanest finish.
Make Them Look Special
A light drizzle of contrasting chocolate or a dusting of seasonal sprinkles instantly elevates their look without extra effort.
Fun Variations to Try
- Add crushed cookies to the coating.
- Roll in cocoa powder for a truffle-style finish.
- Mix in mini chocolate chips for extra texture.
- Use orange-tinted chocolate for a festive touch.
FAQ’s
Q1: Can I use homemade pumpkin puree?
Yes, just make sure it is thick and not watery.
Q2: Do these need to stay refrigerated?
Yes, refrigeration helps them keep their shape and texture.
Q3: Can I freeze them?
Absolutely, they freeze very well.
Q4: How long do they last?
Up to five days refrigerated.
Q5: Can I skip the coating?
You can, but the coating helps hold everything together.
Q6: Are they overly sweet?
No, the pumpkin and spice balance the sweetness nicely.
Q7: Can kids help make these?
Yes, rolling the balls is very kid-friendly.
Q8: What size should I make them?
About one tablespoon each works best.
Q9: Can I add nuts?
Yes, finely chopped nuts can be mixed in.
Q10: Do they travel well?
They do, especially when kept cool.
Conclusion
These no-bake pumpkin cake balls are one of those recipes you come back to every fall. They are simple, comforting, and quietly impressive. This one’s a total game-changer when you want something seasonal without the stress. Give them a try, and I promise they’ll earn a regular spot in your kitchen.
Print
No-Bake Pumpkin Cake Balls
Description
Soft, creamy no-bake pumpkin cake balls coated in smooth white chocolate, perfect for an easy fall dessert without turning on the oven.
Ingredients
- Pumpkin puree: 1 cup
- Cream cheese, softened: 4 ounces
- Vanilla extract: 1 teaspoon
- Pumpkin spice: 1 teaspoon
- Graham cracker crumbs: 1 1/2 cups
- Powdered sugar: 1/2 cup
- White chocolate chips: 12 ounces
Instructions
- In a large mixing bowl, combine pumpkin puree, softened cream cheese, vanilla extract, pumpkin spice, graham cracker crumbs, and powdered sugar until smooth and well blended.
- Line a baking sheet with parchment paper.
- Using a cookie scoop or spoon, roll the mixture into evenly sized balls and place them on the prepared baking sheet.
- Refrigerate the cake balls for 30 minutes until firm.
- Melt the white chocolate chips gently in a microwave-safe bowl, stirring until smooth.
- Dip each chilled cake ball into the melted white chocolate, allowing excess to drip off.
- Place the coated cake balls back onto the parchment paper.
- Refrigerate again until the chocolate coating is fully set, then serve.
Notes
- Chill the mixture if it feels too soft before rolling.
- Tap off excess chocolate gently for a smooth coating.
- Decorate with drizzle while the chocolate is still wet if desired.