Pikelets
There is something so comforting about a warm batch of little golden rounds fresh from the pan, especially when the kitchen smells faintly sweet and buttery. These soft, fluffy beauties are the kind of treat that feels simple in the best possible way, the sort of thing you make once and suddenly want to keep in your regular routine. Trust me, you’re going to love this, because every bite is light, tender, and just waiting for a swipe of jam or a spoonful of cream.
Why These Little Golden Pancakes Always Hit the Spot
Some recipes win people over because they are dramatic, and others do it with pure comfort. This one belongs in that second group. It is cozy, nostalgic, and wonderfully unfussy, which is exactly why it has stayed beloved for so long.
The texture is what really makes them special. They are softer and thicker than a crepe, smaller than a standard pancake, and beautifully fluffy in the middle with lightly golden edges. Let me tell you, it’s worth every bite, especially when they are still a little warm and the topping melts right in.
A Bit of Background Behind This Beloved Tea-Time Treat
And now, let’s dive into the story behind them, because that makes the first bite even more fun. Pikelets are especially popular in Australia and New Zealand, where they are often served as a quick homemade snack or a sweet tea-time treat. They sit somewhere between a pancake and a griddle cake, with a charmingly simple style that makes them feel homey and familiar.
Over the years, they have become one of those reliable kitchen classics that families pass around without much fuss. The beauty is in their simplicity, and that is probably why they have lasted. A small bowl of batter, a warm pan, and a few minutes later, you have something golden and comforting ready to serve.
Why This Recipe Earns a Permanent Spot in the Kitchen
Before we move from the story to the mixing bowl, here is exactly why this one’s a total game-changer.
Versatile: They are lovely with jam, honey, cream, fresh fruit, or even just a little butter. You can dress them up for brunch or keep them simple for an afternoon snack.
Budget-Friendly: The batter uses everyday staples that are likely already in the kitchen. That means no special shopping trip, and that is always a win.
Quick and Easy: From bowl to plate, the whole process moves fast. On busy mornings or lazy weekends, that kind of ease feels amazing.
Customizable: You can add vanilla, lemon zest, or a pinch of cinnamon if you want a little twist. The base is simple, which makes it easy to adapt.
Crowd-Pleasing: Kids love them, adults love them, and they disappear from the plate faster than you expect. That alone tells you everything.
Make-Ahead Friendly: They keep well for later, which means you can cook once and snack happily all day.
Great for Leftovers: If you somehow have extras, they reheat beautifully and still taste soft and delicious.
Smart Little Secrets for Better Results Every Time
Now that you know why they are worth making, let’s talk about the small details that really help them shine.
- Use a thick but pourable batter: It should fall from the spoon slowly, not run like water. That texture helps them stay fluffy and round.
- Let the batter rest for 5 minutes: This gives the flour time to hydrate and helps the final texture feel softer.
- Keep the pan on medium heat: Too hot, and the outside browns before the center cooks through. Gentle heat gives you that lovely even color.
- Wait for bubbles before flipping: Once little bubbles appear on the surface and the edges look set, they are ready to turn.
- Brush the pan lightly with butter: A very thin layer adds flavor without making the surface greasy.
The Simple Tools That Make the Job Easier
Before the batter comes together, it helps to have a few basics ready to go. Nothing fancy is needed here, which is part of the charm.
Mixing bowl: A medium bowl gives you enough room to whisk without flour flying everywhere.
Whisk: This helps you combine the batter smoothly and keeps lumps to a minimum.
Measuring cups and spoons: Since this is a small batter, accurate measuring makes a real difference.
Nonstick skillet or griddle: A good pan helps you get that even golden finish without sticking.
Spatula: A thin spatula makes flipping much easier, especially once the bubbles start to appear.
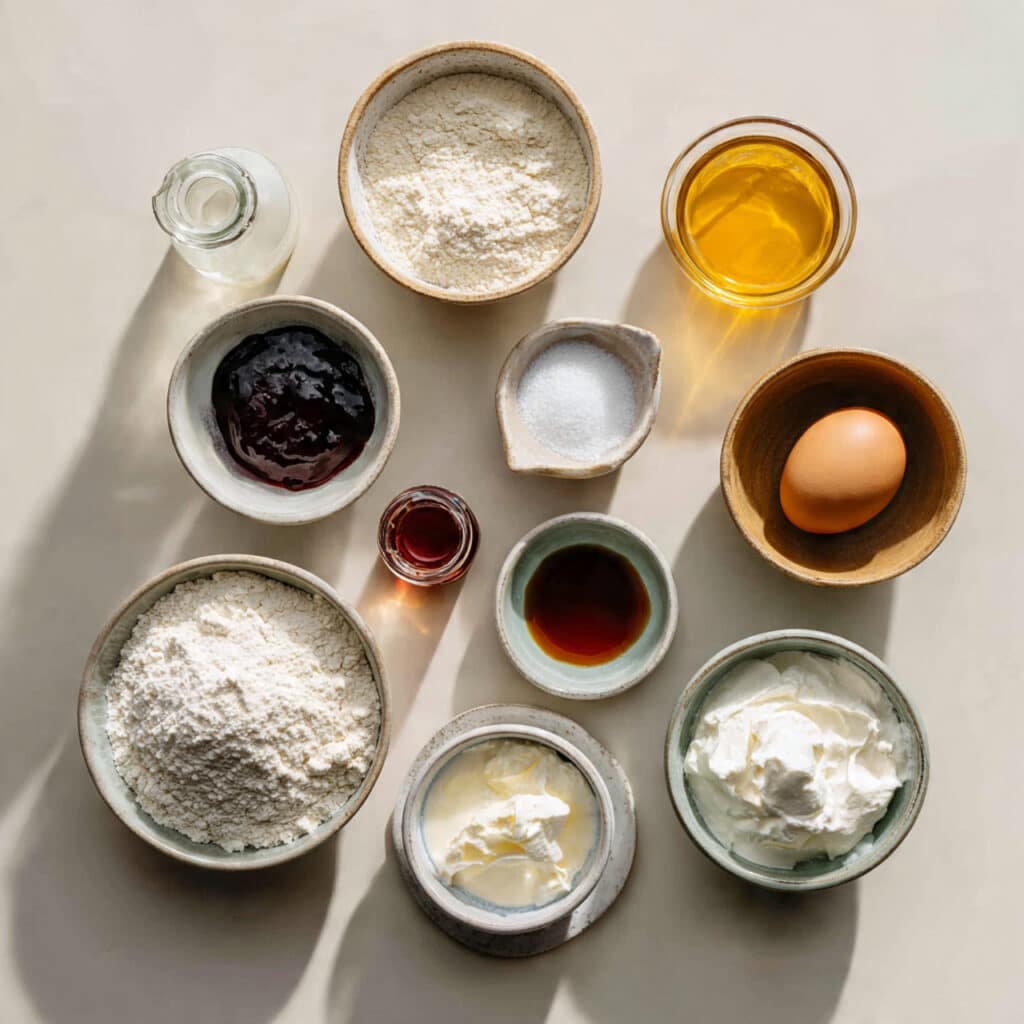
What You’ll Need to Bring This Batter to Life
And now we get to the heart of it, the ingredients. Each one has a simple job, and together they create that soft, lightly sweet bite that makes these so lovable.
- Self-raising flour: 1 cup, this gives the batter structure and the gentle lift that creates a fluffy middle.
- Caster sugar: 1 tablespoon, this adds a light sweetness and helps the surface brown nicely.
- Salt: 1 pinch, just enough to sharpen the flavor and balance the sweetness.
- Egg: 1 large, lightly beaten, this binds the batter and adds tenderness.
- Milk: 3/4 cup, this loosens the batter and keeps the texture soft and smooth.
- Vanilla extract: 1 teaspoon, this adds a warm sweet aroma that makes the batter taste a little more special.
- Butter: 1 teaspoon, melted, for brushing the pan so the rounds cook up golden and fragrant.
- Jam: for serving, this brings a fruity sweetness that pairs beautifully with the soft texture.
- Whipped cream: for serving, this adds a cool, airy finish that feels classic and indulgent.
Easy Swaps If You Need a Flexible Option
If you need to work with what you have, this recipe is wonderfully forgiving. A few smart swaps can still get you to a delicious plate.
Self-raising flour: Plain flour plus 2 teaspoons baking powder.
Caster sugar: Granulated sugar, pulsed briefly if you want a finer texture.
Milk: Any plain unsweetened dairy-free milk that cooks well.
Vanilla extract: A small splash of maple syrup or a pinch of cinnamon for a different note.
Whipped cream: Greek yogurt or a spoonful of thick plain yogurt.
The Ingredients That Quietly Do the Heavy Lifting
Some ingredients may look modest, but they are doing a lot behind the scenes.
Self-raising flour: This is the reason the rounds puff up so nicely without extra effort. It creates that soft, airy crumb that makes them feel tender instead of dense.
Vanilla extract: Even though it is just a teaspoon, it adds a warm bakery-style aroma that makes the batter smell irresistible while cooking.
Let’s Cook a Batch Together
This is the fun part, and honestly, it moves quickly. Once the bowl is mixed and the pan is warm, the whole kitchen starts to feel inviting. Here are the steps you’re going to follow.
- Preheat Your Equipment: Place a nonstick skillet or griddle over medium heat. Let it warm gently while you prepare the batter so the first round cooks evenly.
- Combine Ingredients: In a medium bowl, whisk together the self-raising flour, caster sugar, and pinch of salt. Add the beaten egg, milk, and vanilla extract, then whisk until you have a smooth, thick but pourable batter. Let it rest for 5 minutes.
- Prepare Your Cooking Vessel: Brush the warm pan very lightly with melted butter. You want just enough to coat the surface without pooling.
- Assemble the Dish: Spoon small rounds of batter into the pan, about 1 tablespoon each, leaving a little space between them so they can spread gently.
- Cook to Perfection: Cook for 1 to 2 minutes, until bubbles appear on the surface and the edges look set. Flip carefully, then cook the second side for about 1 minute more, until golden and cooked through.
- Finishing Touches: Transfer the cooked rounds to a plate and keep them warm while you finish the remaining batter. Add a little extra butter to the pan only as needed.
- Serve and Enjoy: Stack them up and serve warm with jam and whipped cream. The contrast of fluffy cakes and cool creamy topping is absolutely lovely.
The Texture and Flavor Magic That Happens in the Pan
As they cook, the batter transforms into soft little rounds with delicate golden tops and tender centers. The outside gets just enough color to add a hint of caramelized sweetness, while the inside stays light and airy.
That gentle vanilla note comes through in the aroma first, then the mild sweetness follows in the bite. Add jam and cream, and suddenly you get layers of flavor, fruity, creamy, buttery, and soft all at once. It is simple, but it feels complete.
Handy Tips That Make a Good Batch Even Better
A few thoughtful touches can take the final result from good to really memorable.
- Use a cookie scoop or tablespoon: This helps keep each round close in size, which means they cook more evenly.
- Do a test round first: The first one tells you whether the pan is too hot or the batter needs a splash more milk.
- Keep finished ones under a clean towel: This helps them stay warm and soft while the rest cook.
- Serve them warm: That is when the texture is at its best and the toppings melt into every little nook.
Common Slip-Ups and How to Dodge Them
Even easy recipes have a few sneaky trouble spots, so here are the ones to watch for.
- Batter too thin: If it spreads too much in the pan, whisk in a little more flour, 1 teaspoon at a time.
- Pan too hot: If the bottoms brown too fast, lower the heat slightly and give the pan a minute to settle.
- Flipping too early: Wait until bubbles appear and the edges look a little dry, otherwise they may tear.
- Overmixing the batter: Whisk just until smooth enough. Too much mixing can make the texture less tender.
A Quick Look at the Nutrition
These little rounds are simple and satisfying, especially when you want something homemade that does not feel too heavy.
Servings: 4
Calories per serving: 250
Note: These are approximate values.
Time You’ll Want to Set Aside
The best part is how quickly everything comes together. This is exactly the kind of recipe that fits into a relaxed morning or an easy afternoon baking moment.
Prep Time: 10 minutes
Cook Time: 10 minutes
Total Time: 20 minutes
Make-Ahead and Storage Tips That Actually Help
If you want to stay one step ahead, you absolutely can. The cooked rounds keep nicely, which makes them handy for lunchboxes, snacks, or quick breakfasts.
Store them in an airtight container in the fridge for up to 3 days. To reheat, warm them briefly in a skillet over low heat or give them a few seconds in the microwave until soft. You can also freeze them in a single layer, then transfer to a freezer-safe bag. Reheat straight from frozen or thaw overnight in the fridge. If you want to prep ahead, mix the dry ingredients in advance and add the wet ingredients just before cooking for the freshest texture.
The Best Ways to Serve Them
Once the stack is ready, there are plenty of fun directions to go. Jam and whipped cream are classic for a reason, but they are not the only option.
Try serving them with sliced strawberries, a drizzle of honey, or a spoonful of lemon curd if you want something bright and tangy. For a cozy breakfast feel, pair them with tea, hot chocolate, or a creamy coffee. They also work beautifully on a brunch table with fruit on the side.
Smart and Tasty Ways to Use the Extras
And now let’s talk leftovers, because they can be just as fun as the fresh batch. A few extras open the door to all sorts of easy little treats.
Turn them into mini sandwich stacks with cream and fruit between each layer. Spread one with jam and top with another for a quick snack. You can even toast them lightly and add a little butter for a warmer, crisp-edged version the next day.
A Few Extra Tips Before You Head Back to the Stove
Sometimes it is the little details that make cooking feel smoother and more enjoyable. These are the things I always keep in mind.
Use room-temperature milk and egg if possible, because they blend into the batter more easily. Do not overcrowd the pan, since that makes flipping awkward. And keep your first batch as a cook’s treat if needed, because once the pan settles into the right temperature, the rest usually come out even better.
How to Make Them Look Extra Special on the Plate
This part is pure fun, and it makes even a simple stack feel a bit celebratory. A beautiful presentation turns an everyday snack into something that feels made with care.
Stack them slightly off-center on a simple plate so you can see the golden edges. Add jam in a small dish and a soft spoonful of whipped cream beside the stack. A few slices of fresh fruit nearby can add color without taking over. The final look should feel warm, inviting, and just a little irresistible.
Fun Variations Worth Trying Next
Once you make the classic version, it is hard not to start imagining other ways to play with it. Here are a few easy ideas.
Vanilla Berry Version: Fold a few fresh blueberries into the batter for tiny bursts of sweetness.
Cinnamon Twist: Add 1/4 teaspoon cinnamon to the dry ingredients for a warmer, cozy flavor.
Lemon Bright: Stir in a little lemon zest for a fresher finish that works beautifully with jam.
Chocolate Chip Treat: Add a small handful of chocolate chips for a sweeter, more dessert-like batch.
Yogurt Topping Style: Skip the cream and serve with thick yogurt and fruit for a tangy finish.
FAQ’s
Q1: What is the difference between pikelets and pancakes?
Pikelets are usually smaller and a bit thicker, with a soft fluffy center that makes them perfect for snacking or afternoon tea.
Q2: Can I make the batter ahead of time?
It is best cooked soon after mixing, but you can prepare the dry ingredients ahead and add the wet ingredients later.
Q3: Can I freeze them?
Yes, they freeze very well. Let them cool completely first, then store them in layers with baking paper between them.
Q4: Why are mine browning too fast?
The heat is likely a little high. Lower it slightly so the centers have time to cook before the outside darkens.
Q5: Can I use plain flour instead of self-raising flour?
Yes, just add 2 teaspoons of baking powder to 1 cup of plain flour.
Q6: How do I know when to flip them?
Look for bubbles on the surface and edges that appear set. That is your cue.
Q7: Can I make them without vanilla?
Absolutely. They will still taste lovely, though the vanilla adds a warm sweet aroma.
Q8: What toppings work best?
Jam and whipped cream are classic, but honey, fruit, lemon curd, or yogurt are all delicious too.
Q9: How thick should the batter be?
It should be thick enough to hold a round shape in the pan, but loose enough to spoon easily.
Q10: Can I serve them cold?
Yes, but they are at their absolute best warm, when the texture is softest and the toppings melt slightly into the surface.
Conclusion
Some recipes are flashy, and some quietly earn your affection by being reliable, cozy, and completely delicious. This is one of those. It comes together with simple ingredients, fills the kitchen with a sweet comforting smell, and delivers soft golden bites that feel like a little treat any time of day. Trust me, once you make a batch, you will understand why people come back to them again and again.
Print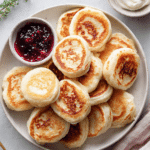
Pikelets
Description
Soft, fluffy pikelets with a lightly sweet vanilla aroma, cooked until golden and served warm with jam and whipped cream. A quick and comforting classic for breakfast, snack time, or afternoon tea.
Ingredients
- 1 cup self-raising flour
- 1 tablespoon caster sugar
- 1 pinch salt
- 1 large egg, lightly beaten
- 3/4 cup milk
- 1 teaspoon vanilla extract
- 1 teaspoon butter, melted, for brushing the pan
- Jam, for serving
- Whipped cream, for serving
Instructions
- Preheat a nonstick skillet or griddle over medium heat.
- In a medium bowl, whisk together the self-raising flour, caster sugar, and salt.
- Add the beaten egg, milk, and vanilla extract, then whisk until the batter is smooth, thick, and pourable. Let it rest for 5 minutes.
- Brush the warm pan lightly with melted butter.
- Spoon about 1 tablespoon of batter per pikelet into the pan, leaving space between each one.
- Cook for 1 to 2 minutes, until bubbles appear on the surface and the edges look set.
- Flip and cook for about 1 minute more, until golden and cooked through.
- Transfer to a plate and repeat with the remaining batter, brushing the pan with more butter only if needed.
- Serve warm with jam and whipped cream.
Notes
- For even cooking, keep the heat at medium rather than high.
- If the batter feels too thick, add a small splash of milk.
- If using plain flour instead of self-raising flour, add 2 teaspoons baking powder.
- These are best served warm, but they also reheat well for later.