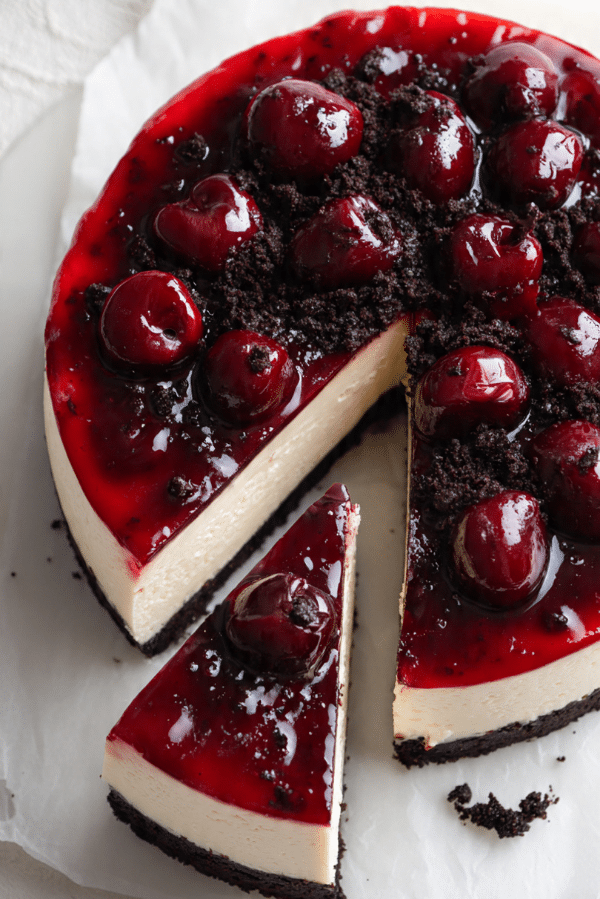
Upside Down Black Forest Cheesecake
There is something wildly satisfying about flipping a dessert and watching it reveal its best side first, and that is exactly the magic here. This cheesecake comes out with a glossy cherry crown, a creamy middle, and a deep chocolate cookie base that feels rich, dramatic, and just a little bit special. The first slice is smooth and velvety, the fruit is bright and jammy, and the chocolate brings that familiar Black Forest feeling that makes every bite taste like a celebration. Trust me, you’re going to love this.
The kind of dessert that steals the whole table
Some desserts quietly sit in the corner, and then there are desserts like this one. The jewel-toned cherry layer catches the light, the creamy center stays lush and soft, and that dark cookie crust gives every forkful a little extra depth. It feels elegant enough for a holiday table, but it is also the kind of thing you make just because you want your weekend to taste better. Let me tell you, it’s worth every bite.
A classic flavor story with a fun little twist
Black Forest flavors have roots in the famous German pairing of cherries, chocolate, and cream, a combination that has stayed beloved for generations because it simply works. This version takes that familiar trio and gives it a playful cheesecake spin, with the fruit layer becoming the first thing you see after the flip. It still carries that cozy, old-world dessert charm, but it also feels fresh and a bit unexpected, which honestly makes it even more fun to serve.
Why this dessert earns a spot in your recipe box
Before we get into the details, it helps to know why this one keeps calling people back for a second slice. It is not just beautiful, it is dependable too, and that makes a huge difference when you want a dessert that looks impressive and actually delivers.
Versatile: This works for birthdays, dinner parties, holiday tables, or one of those random weekends when you want to bake something that feels extra special. It looks dressed up, but it never feels fussy.
Budget-Friendly: Most of the ingredients are easy to find and familiar, which means you can make something bakery-worthy without chasing specialty items. Frozen cherries even work beautifully when fresh ones are not in season.
Quick and Easy: The process is very manageable once you break it into stages. You make the cherry layer, mix the filling, press in the crust, then bake and chill.
Customizable: You can lean darker with bittersweet chocolate, brighten the fruit with a little extra lemon, or even switch the fruit if you want a different spin. The base recipe is sturdy and forgiving.
Crowd-Pleasing: Chocolate and cherries are one of those combinations almost nobody argues with. Add creamy cheesecake to the mix and suddenly everyone is hovering near the dessert table.
Make-Ahead Friendly: This one actually gets better after chilling, which makes it perfect for planning ahead. You can make it the day before and enjoy a much calmer serving moment later.
Great for Leftovers: The slices hold well, and the flavors settle in beautifully overnight. A leftover slice with coffee the next day is a tiny luxury.
Smart baking notes that make all the difference
And now that you know why this cheesecake is such a keeper, let’s talk about the little tricks that help it turn out smooth, neat, and sliceable.
- Use room temperature cream cheese, sour cream, eggs, and heavy cream so the filling blends smoothly without lumps.
- Let the cherry layer cool a bit before adding the cheesecake filling so the layers stay distinct and clean.
- Wrap the springform pan well if you use a water bath, because nobody wants a soggy crust.
- Do not overmix once the eggs go in, because too much air can encourage cracking.
- Chill the cheesecake fully before unmolding and flipping, because patience here gives you the prettiest finish.
The kitchen tools that make the process easier
Before the ingredients hit the counter, it helps to gather the right tools so everything flows more smoothly from one step to the next.
Springform pan: A 9 inch springform pan makes unmolding much easier and helps the cheesecake keep its shape.
Mixing bowls: You will want a few medium bowls for the crust, cherry layer, and filling.
Electric mixer: This helps create a smooth, creamy batter without too much effort.
Saucepan: A small saucepan is perfect for cooking the cherries into a glossy topping layer.
Rubber spatula: Great for scraping the bowl and folding everything together gently.
Roasting pan or deep baking dish: Useful if you bake the cheesecake in a water bath for a silkier texture.
Fine mesh sieve or cherry pitter: Handy if you are working with fresh cherries and want to speed things up.
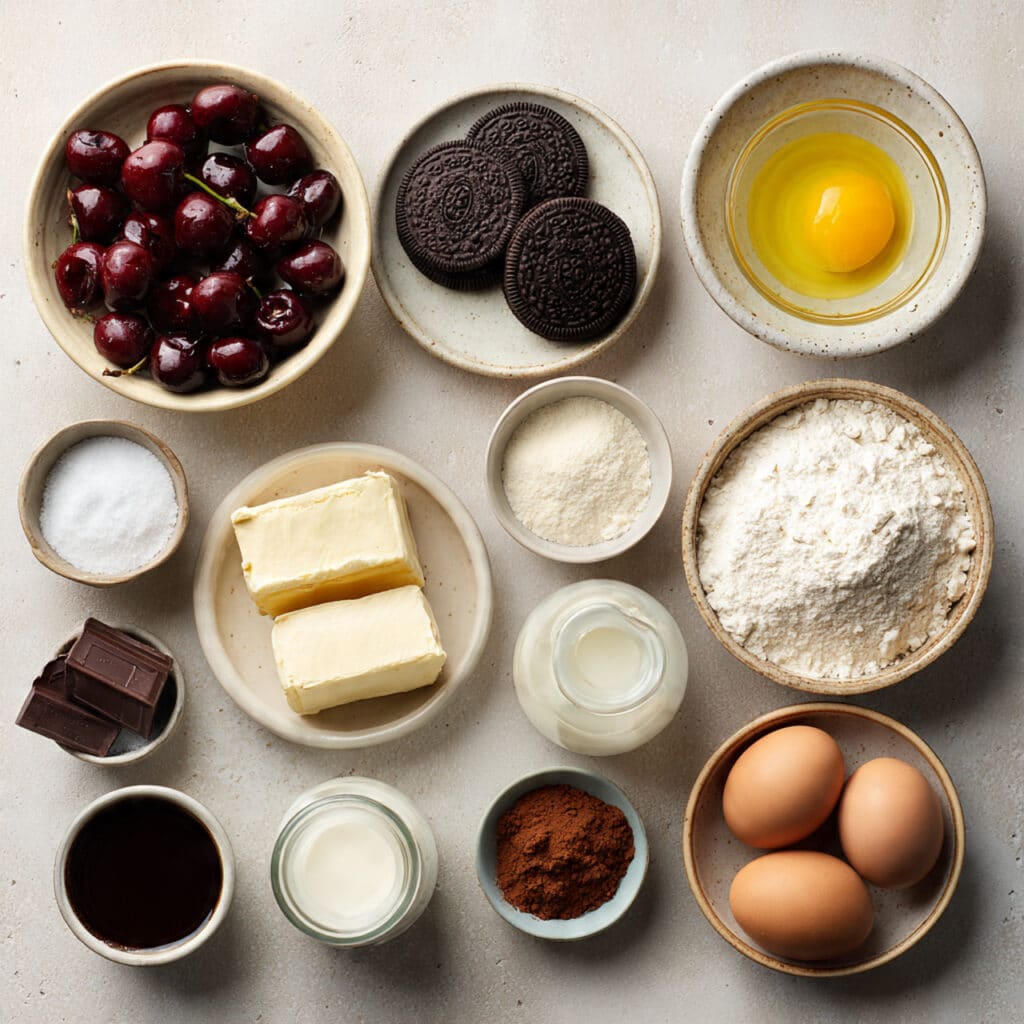
Everything you need to build those beautiful layers
Now let’s get into the ingredients, because this is where the whole dessert starts telling its story. Each part has a job, and when they come together, you get that balance of creamy, fruity, and chocolatey in every slice.
- Pitted cherries: 3 cups, fresh or frozen, these create the glossy fruit layer that gives the cheesecake its dramatic upside down finish.
- Granulated sugar: 1 1/3 cups total, divided, this sweetens both the cherry topping and the creamy filling without making either one heavy.
- Cornstarch: 2 tablespoons, this thickens the cherries into a spoonable, slice-friendly layer.
- Lemon juice: 1 tablespoon, this brightens the cherries and keeps the flavor lively instead of flat.
- Water: 1/4 cup, this helps the cherry mixture cook evenly and turn glossy.
- Chocolate sandwich cookies: 24 cookies, finely crushed, these form the dark, cocoa-rich crust that gives the dessert its Black Forest personality.
- Unsalted butter: 5 tablespoons, melted, this binds the cookie crumbs into a firm crust.
- Unsweetened cocoa powder: 2 tablespoons, this deepens the chocolate flavor in the crust.
- Fine salt: 1/4 teaspoon, divided, this sharpens both the chocolate and the creamy notes.
- Cream cheese: 24 ounces, softened, this is the rich, tangy base that gives the center its classic cheesecake texture.
- Sour cream: 3/4 cup, softened, this adds extra silkiness and a gentle tang.
- Heavy cream: 1/2 cup, this loosens the batter just enough and helps the filling stay lush.
- Vanilla extract: 1 teaspoon, this rounds out the dairy notes and softens the sharper edges of the chocolate.
- Dark chocolate: 4 ounces, melted and slightly cooled, this brings in that unmistakable Black Forest richness.
- All-purpose flour: 2 tablespoons, this gives the filling a little extra stability for cleaner slices.
- Large eggs: 3, room temperature, these set the cheesecake while keeping it smooth and creamy.
Easy swaps if you need a little flexibility
If you are missing an ingredient or just want to make the dessert fit what you have on hand, there is plenty of room to adjust without losing the spirit of it.
Pitted cherries: Sweet or tart frozen cherries work just as well as fresh.
Chocolate sandwich cookies: Chocolate wafer cookies are a great stand-in for the crust.
Sour cream: Full-fat Greek yogurt can replace it for a slightly tangier finish.
Dark chocolate: Semisweet chocolate works nicely if you want a softer chocolate flavor.
Heavy cream: You can use whipping cream in the same amount.
All-purpose flour: Cornstarch can replace it in the filling, use 1 tablespoon instead of 2 tablespoons flour.
The two ingredients that really define the dessert
A few ingredients do more than just show up here, they set the tone for the whole cheesecake.
Cherries: These bring brightness, color, and that classic Black Forest character. Their jammy sweetness against the creamy filling is what makes each bite feel layered and alive.
Dark chocolate: This is what keeps the dessert from tasting overly sweet. It adds depth, a little bitterness, and that rich bakery-style finish that makes the fruit taste even better.
Let’s bake it step by step
And now let’s dive into the part where the kitchen starts smelling amazing. The process is simple when you take it one layer at a time, and every step gets you closer to that glossy, dramatic flip at the end.
- Preheat Your Equipment: Preheat your oven to 325°F. Lightly grease a 9 inch springform pan, then line the bottom with parchment paper for easier unmolding later.
- Combine Ingredients: In a saucepan, combine the cherries, 1/3 cup of the granulated sugar, cornstarch, lemon juice, and water. Cook over medium heat for 5 to 7 minutes, stirring often, until the cherries release their juices and the mixture turns glossy and slightly thickened. Spread this cherry mixture evenly into the prepared pan and let it cool for 10 minutes. In a separate bowl, stir together the crushed chocolate sandwich cookies, melted butter, cocoa powder, and 1/8 teaspoon of the salt. In a large mixing bowl, beat the cream cheese with the remaining 1 cup granulated sugar until smooth. Beat in the sour cream, heavy cream, vanilla extract, melted dark chocolate, flour, and remaining 1/8 teaspoon salt. Add the eggs one at a time, mixing on low speed just until combined.
- Prepare Your Cooking Vessel: Wrap the outside of the springform pan in two layers of foil if you plan to use a water bath. Place the pan into a larger roasting pan.
- Assemble the Dish: Pour the cheesecake filling gently over the cooled cherry layer and smooth the top. Sprinkle the cookie crumb mixture evenly over the filling and press it down lightly so it forms an even crust layer.
- Cook to Perfection: Place the roasting pan in the oven and add hot water halfway up the sides of the springform pan if using a water bath. Bake for 50 to 55 minutes, until the edges are set and the center still has a slight wobble. Turn off the oven, crack the oven door, and let the cheesecake rest inside for 30 minutes. Remove it, cool to room temperature, then chill for at least 4 hours before unmolding.
- Finishing Touches: Run a thin knife around the edge of the pan, release the springform ring, place a serving plate over the top, and carefully invert the cheesecake so the cherry layer is now on top. Peel away the parchment gently.
- Serve and Enjoy: Slice with a warm knife, wiping between cuts for neat edges, and serve chilled so every layer stays beautiful and defined.
The texture and flavor payoff is absolutely worth it
What makes this dessert so memorable is the contrast. The cherry layer is glossy and soft, with little bursts of fruit that feel bright and juicy. The cheesecake center is creamy and smooth, almost mousse-like once fully chilled, while the chocolate cookie crust brings a firmer bite and a deep cocoa finish. As it all comes together, the tang from the cream cheese, the richness of the chocolate, and the sweet tart fruit build into something that feels balanced instead of heavy. This one’s a total game-changer.
Helpful little tricks for your best bake
Once you have the main method down, these extra details can make the whole experience even smoother.
- Chill the cheesecake overnight if you can, because the flavor and texture get even better by the next day.
- Dip your knife in hot water before slicing for those clean, bakery-style edges.
- If your cherries are very tart, add an extra tablespoon of sugar to the fruit layer.
- Use low mixer speed after adding the eggs so the filling stays silky instead of airy.
Common slip-ups and how to avoid them
Every cheesecake has a few moments where things can go sideways, but they are easy to avoid once you know what to watch for.
- Do not pour hot cherry topping into the pan and immediately add the filling, because the layers can blur together. Let the fruit cool briefly first.
- Do not overbake the center, because it will lose that creamy texture. A gentle wobble is exactly what you want.
- Do not skip the chilling time, because the cheesecake needs those hours to firm up enough for a clean flip.
- Do not rush the unmolding, because a patient release gives you a much prettier top layer.
A quick look at the nutrition details
Before another forkful starts calling your name, here is the practical side of things.
Servings: 12
Calories per serving: 465
Note: These are approximate values.
Timing that helps you plan ahead
This dessert is very doable, especially when you know how the time breaks down.
Prep Time: 35 minutes
Cook Time: 5 hours 25 minutes
Total Time: 6 hours
How to prep, store, and save slices for later
The nice thing about this cheesecake is that it fits beautifully into a make-ahead plan. You can bake it a full day in advance, keep it chilled in the pan, and flip it right before serving for the freshest presentation. Leftovers should be stored covered in the refrigerator for up to 4 days. For longer storage, freeze individual slices on a tray until firm, then wrap them well and freeze for up to 1 month. Thaw overnight in the refrigerator for the best texture. For serving, keep it cold and let each slice sit at room temperature for about 10 minutes if you want the filling a little softer.
The best ways to bring it to the table
And once it is chilled and ready, the serving part is honestly half the fun. This cheesecake looks gorgeous on its own, but it also pairs beautifully with a strong cup of coffee, espresso, or even a simple mug of hot chocolate if you are feeling extra cozy. For a dinner party, serve thin slices after a lighter meal so the dessert feels luxurious without being overwhelming. For celebrations, slightly larger wedges make sense because nobody is taking a tiny piece of something this good.
Clever ways to use the leftovers
If you somehow end up with extra slices, there are a few fun ways to keep things interesting. Crumble a slice into dessert glasses with a spoonful of whipped cream for a quick parfait-style treat. Cube chilled pieces and layer them with fresh cherries for a trifle-inspired dessert. You can even freeze small squares and enjoy them almost like a cheesecake truffle straight from the freezer. Let me tell you, leftover cheesecake is never really a problem.
A few extra details that make it even better
Sometimes it is the little things that turn a good dessert into a great one. Use good chocolate here, because the flavor comes through clearly. Taste the cherry mixture before it goes into the pan so you can adjust sweetness if needed. And keep your ingredients at room temperature, because that one choice alone gives you a smoother batter and a more polished final texture.
Simple ways to make it look bakery beautiful
This cheesecake already has that glossy cherry finish working in its favor, so presentation does not need to be complicated. Serve it on a clean cake stand or a simple white platter so the deep red fruit really stands out. Wipe the serving plate before bringing it to the table, and cut the slices with a hot knife for sharp layers. That clean contrast of red cherries, pale filling, and dark crust is what makes people stop and stare.
Fun variations to play with next time
Once you have made the original version, it is easy to branch out into a few delicious twists.
More chocolate: Stir an extra 2 tablespoons cocoa powder into the crust and use bittersweet chocolate in the filling for a deeper, darker profile.
Mixed berry version: Replace 1 cup of the cherries with raspberries or blackberries for a brighter, slightly more tart fruit layer.
Almond note: Add 1/4 teaspoon almond extract to the cherry mixture for a flavor that leans into classic Black Forest vibes.
Mini cheesecakes: Divide the recipe into lined muffin tins for individual portions that are easy to serve at parties.
Crunchy topping finish: Add a spoonful of finely chopped chocolate sandwich cookies over each slice right before serving for extra texture.
FAQ’s
1. Can I make this dessert a day ahead?
Answer: Yes, and it is actually better that way. The extra chill time helps the filling firm up and gives you cleaner slices.
2. Do I have to use a water bath?
Answer: No, but it does help the cheesecake bake more gently and evenly. If you skip it, keep a close eye on the center so it does not overbake.
3. Can I use frozen cherries?
Answer: Absolutely. Thaw and drain them lightly if they seem very wet, then cook them just as you would fresh cherries.
4. What kind of chocolate works best?
Answer: Dark chocolate gives the nicest contrast with the sweet fruit, but semisweet is a great choice if you want a softer edge.
5. Why is my filling lumpy?
Answer: Most likely the cream cheese was too cold. Room temperature ingredients blend far more smoothly.
6. How do I keep the cheesecake from cracking?
Answer: Avoid overmixing after the eggs go in, do not overbake, and let it cool gradually before chilling.
7. Can I freeze the whole cheesecake?
Answer: Yes, though I prefer freezing slices. It is easier to thaw only what you need, and the presentation stays neater.
8. What if I do not have a springform pan?
Answer: A deep cake pan can work, but unmolding is trickier. A springform pan really makes the flip much easier.
9. Can I make the crust thicker?
Answer: Yes, you can increase the cookie crumbs slightly if you love a more substantial chocolate base. Just keep enough butter to bind it.
10. How long should it chill before serving?
Answer: At least 4 hours, though overnight is even better for texture and flavor.
Conclusion
This upside down cherry and chocolate cheesecake is one of those desserts that feels dramatic in the best possible way, but the process is much friendlier than it looks. You get the glossy fruit, the creamy middle, and the deep chocolate finish all in one beautiful slice, and every part of it tastes like it belongs there. It is rich, balanced, and just plain lovely to share. Bake it once, bring it to the table, and watch how quickly everyone falls for it.
Print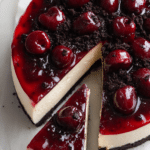
Upside Down Black Forest Cheesecake
Description
A rich and creamy cheesecake layered with glossy cherries and a dark chocolate cookie crust, then flipped for a stunning upside down finish that feels both elegant and comforting.
Ingredients
- 3 cups pitted cherries, fresh or frozen
- 1 1/3 cups granulated sugar, divided
- 2 tablespoons cornstarch
- 1 tablespoon lemon juice
- 1/4 cup water
- 24 chocolate sandwich cookies, finely crushed
- 5 tablespoons unsalted butter, melted
- 2 tablespoons unsweetened cocoa powder
- 1/4 teaspoon fine salt, divided
- 24 ounces cream cheese, softened
- 3/4 cup sour cream, softened
- 1/2 cup heavy cream
- 1 teaspoon vanilla extract
- 4 ounces dark chocolate, melted and slightly cooled
- 2 tablespoons all-purpose flour
- 3 large eggs, room temperature
Instructions
- Preheat the oven to 325°F. Lightly grease a 9 inch springform pan and line the bottom with parchment paper.
- In a saucepan, combine the cherries, 1/3 cup of the granulated sugar, cornstarch, lemon juice, and water. Cook over medium heat for 5 to 7 minutes, stirring often, until glossy and slightly thickened. Spread the mixture into the prepared pan and cool for 10 minutes.
- In a medium bowl, stir together the crushed chocolate sandwich cookies, melted butter, cocoa powder, and 1/8 teaspoon of the salt.
- In a large bowl, beat the cream cheese with the remaining 1 cup granulated sugar until smooth. Beat in the sour cream, heavy cream, vanilla extract, melted dark chocolate, flour, and remaining 1/8 teaspoon salt. Add the eggs one at a time, mixing on low speed just until combined.
- Wrap the outside of the springform pan in foil and place it in a larger roasting pan if using a water bath.
- Pour the cheesecake filling gently over the cooled cherry layer and smooth the top. Sprinkle the cookie crumb mixture evenly over the filling and press lightly.
- If using a water bath, add hot water halfway up the sides of the springform pan. Bake for 50 to 55 minutes, until the edges are set and the center still has a slight wobble.
- Turn off the oven, crack the oven door, and let the cheesecake rest inside for 30 minutes. Remove and cool to room temperature, then chill for at least 4 hours.
- Run a thin knife around the edge, release the springform ring, place a serving plate over the top, and carefully invert the cheesecake so the cherry layer is on top.
- Slice with a warm knife, wiping between cuts, and serve chilled.
Notes
- Room temperature dairy ingredients help create the smoothest filling.
- Frozen cherries work well, just thaw and drain lightly if needed.
- For the cleanest slices, chill overnight and use a hot knife.
- A water bath helps the cheesecake bake evenly and stay silky.