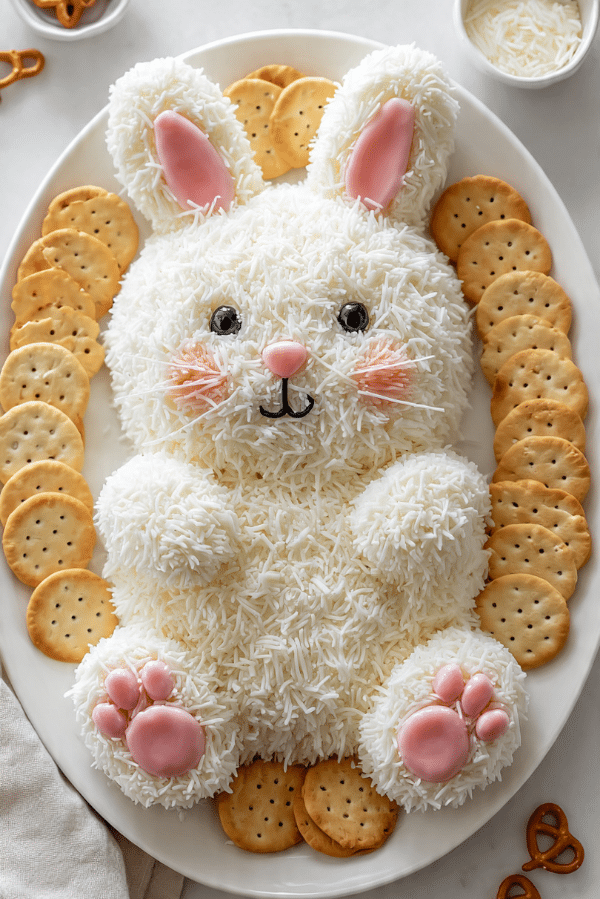
Bunny Cheese Ball with Crackers
There is something about a playful appetizer that instantly makes people smile, and this Bunny Cheese Ball with Crackers does exactly that. The moment you set it down on the table, with its fluffy white coating and sweet pink paw details, everyone gathers around. It is creamy, savory, slightly tangy, and paired with crisp crackers and crunchy pretzels, which makes every bite satisfying. Trust me, you’re going to love this, especially when you see how simple it is to pull together.
Why This Playful Appetizer Steals the Show
This Bunny Cheese Ball with Crackers is not just adorable, it is genuinely delicious. The creamy blend of cheeses melts together smoothly, while a hint of seasoning adds depth without overpowering the spread. Then you roll it in finely shredded cheese, which gives that soft bunny fur look and adds a delicate texture contrast. Paired with buttery round crackers, crisp squares, and salty pretzels, it becomes the kind of snack that disappears fast.
This one’s a total game-changer for spring gatherings, brunch tables, and family parties. It looks impressive, yet it is surprisingly simple.
A Fun Twist on Classic Cheese Ball Traditions
Cheese balls have been a party staple for decades, especially in American home entertaining. Traditionally served during holidays, they were shaped into simple rounds and rolled in nuts or herbs. Over time, creative home cooks began shaping them into festive designs for different celebrations.
This bunny version leans into that playful spirit. It keeps the rich, creamy base that everyone loves but transforms it into something whimsical and memorable. Let me tell you, it is worth every bite and every compliment you will get.
Why You Can Always Count on This Recipe
Before we dive deeper, let’s talk about why this recipe works so well every single time.
Versatile: You can serve it for Easter, baby showers, brunches, or even as a fun weekend snack centerpiece.
Budget-Friendly: Cream cheese and shredded cheese are affordable, and crackers are easy to find in bulk.
Quick and Easy: Minimal prep and no baking required, which means less stress in the kitchen.
Customizable: You can adjust the seasoning or swap coatings to fit your taste.
Crowd-Pleasing: Creamy cheese and crunchy crackers are universally loved.
Make-Ahead Friendly: It actually tastes better after chilling, so you can prepare it the day before.
Great for Leftovers: Any extra spread can be used in sandwiches or wraps the next day.
Pro Tips for Shaping and Flavor Success
Getting that perfect bunny shape and balanced flavor is easier than you think.
- Chill the mixture before shaping so it firms up and holds its form.
- Use plastic wrap when forming the body and head to keep the surface smooth.
- Finely shred the outer cheese for a soft, fluffy texture.
- Press the coating gently so it sticks evenly without flattening the shape.
Kitchen Tools That Make It Effortless
You do not need anything fancy, just a few reliable basics.
Mixing Bowl: For blending the cheeses smoothly.
Hand Mixer or Spatula: Helps create a creamy, lump free mixture.
Plastic Wrap: Makes shaping clean and easy.
Serving Platter: A wide white plate allows space for crackers and pretzels around the bunny.
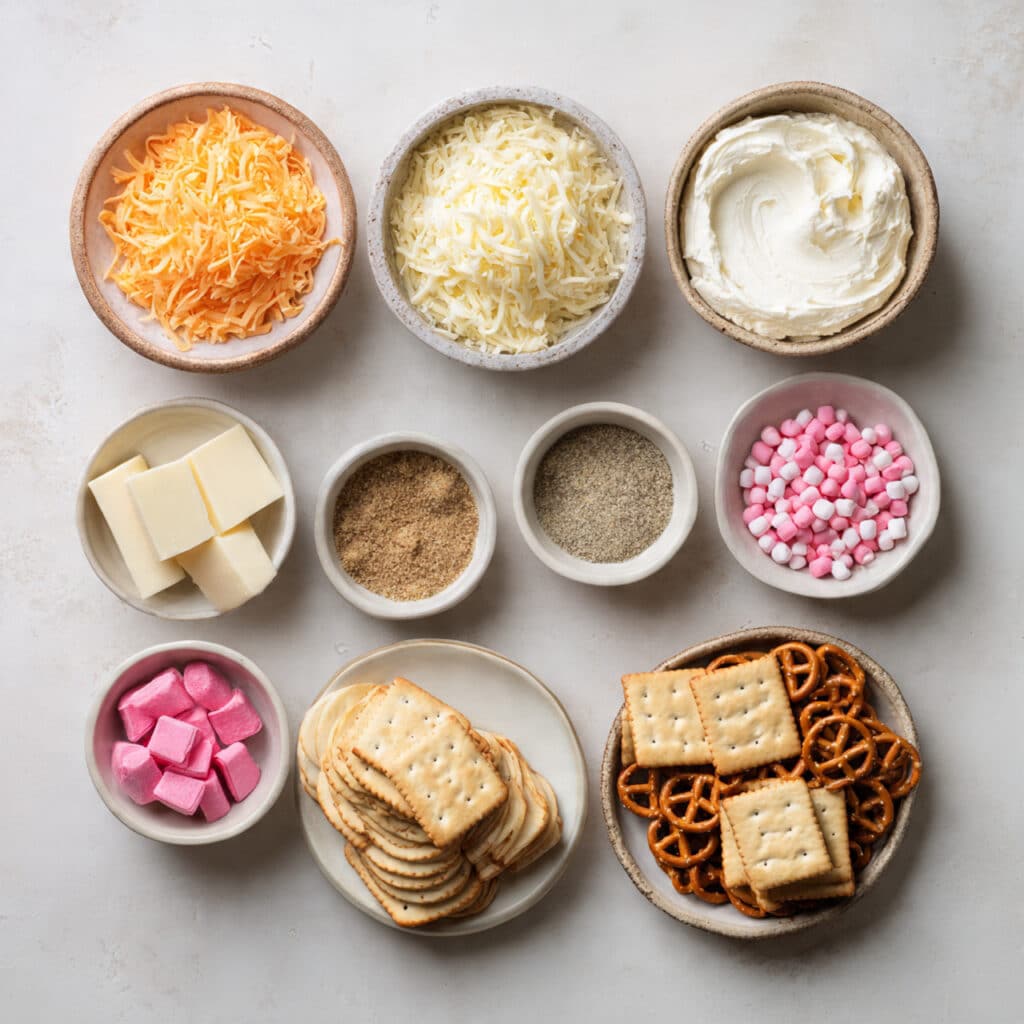
Ingredients You Will Need for Bunny Cheese Ball with Crackers
The beauty of this recipe is how a handful of simple ingredients come together in harmony.
- Cream Cheese: 16 ounces, softened, forms the rich and creamy base.
- Sharp Cheddar Cheese: 2 cups, finely shredded, adds bold flavor and structure.
- Garlic Powder: 1 teaspoon, enhances the savory depth.
- Onion Powder: 1 teaspoon, adds subtle sweetness and balance.
- Salt: 1/2 teaspoon, sharpens the overall flavor.
- Black Pepper: 1/4 teaspoon, freshly ground for gentle warmth.
- Finely Shredded Mozzarella Cheese: 1 1/2 cups, for coating and creating the fluffy bunny look.
- Pink Candy Pieces: 1/4 cup, for decorating the paws and ears.
- Round Crackers: 1 cup, for serving.
- Square Crackers: 1 cup, for serving.
- Mini Pretzels: 1 cup, for serving.
Easy Ingredient Swaps If Needed
Sometimes you need flexibility, and this recipe allows it.
Sharp Cheddar Cheese: Mild cheddar or Colby cheese.
Mozzarella Cheese: Monterey Jack for coating.
Garlic Powder: Finely minced fresh garlic, used lightly.
Round Crackers: Whole grain or gluten free crackers.
Spotlight on the Creamy Core
Cream Cheese: This is the heart of the recipe. It creates that smooth, spreadable texture that holds everything together beautifully.
Sharp Cheddar Cheese: It brings a bold, tangy flavor that balances the richness and prevents the spread from tasting flat.
Let’s Shape and Assemble the Bunny
Now let dive into the fun part. Here are the steps you are going to follow.
- Preheat Your Equipment: No oven required, simply clear space in your refrigerator for chilling.
- Combine Ingredients: In a large mixing bowl, blend the softened cream cheese, sharp cheddar cheese, garlic powder, onion powder, salt, and black pepper until smooth and fully combined.
- Prepare Your Cooking Vessel: Line your work surface with plastic wrap to help shape the mixture cleanly.
- Assemble the Dish: Form one larger oval for the body and a smaller round ball for the head. Press them together gently to create the bunny shape.
- Cook to Perfection: Since this is a no bake dish, chilling is the key step. Refrigerate the shaped bunny for at least 1 hour to firm up.
- Finishing Touches: Roll and press the finely shredded mozzarella over the entire surface. Decorate with pink candy pieces to form paws and ear details.
- Serve and Enjoy: Arrange round crackers, square crackers, and mini pretzels neatly around the bunny on a large serving plate.
Texture and Flavor That Keep You Coming Back
The inside is creamy and smooth, with a sharp cheesy bite that melts on your tongue. The outer shredded mozzarella adds a light, delicate texture that feels almost fluffy. Then come the crackers and pretzels, which provide that crisp snap and salty crunch. It is a beautiful contrast that makes each bite exciting.
Smart Tips for the Best Results
If you want to nail it every time, keep these in mind.
- Chill longer if your kitchen is warm to keep the shape firm.
- Finely shred the coating cheese for the softest appearance.
- Taste the mixture before shaping and adjust seasoning if needed.
Common Mistakes and How to Avoid Them
It is simple, but a few things can trip you up.
- Skipping the chill time, which can cause the shape to slump.
- Using cold cream cheese straight from the fridge, which creates lumps.
- Over handling the coating, which can flatten the bunny shape.
Nutrition Snapshot
Servings: 10
Calories per serving: 320
Note: These are approximate values.
Time Breakdown at a Glance
Prep Time: 20 minutes
Cook Time: 0 minutes
Total Time: 1 hour 20 minutes
Make Ahead and Storage Guide
You can prepare the bunny up to 24 hours in advance and keep it tightly wrapped in the refrigerator. Store leftovers in an airtight container for up to 4 days. Freezing is not recommended because the texture may change. To serve again, let it sit at room temperature for about 15 minutes so it softens slightly.
Serving Ideas That Make It Shine
Place it at the center of a brunch table with fresh vegetables like carrot sticks and cucumber slices. You can also pair it with toasted baguette slices or use it as a spread in wraps for a fun lunch twist.
Creative Leftover Transformations
Spread it on toasted bread for a savory breakfast bite. Stir a spoonful into warm pasta for a quick creamy sauce. Use it inside a grilled sandwich for an extra cheesy layer.
Extra Tips for Even Better Flavor
Add a pinch of paprika for subtle warmth. Mix in finely chopped fresh herbs for a fresh twist. Always allow it to soften slightly before serving for the best spreadable texture.
Make It a Showstopper
Use sliced almonds for bunny ears if you want more texture. Arrange crackers in a circular pattern for a clean presentation. A white platter really highlights the fluffy coating.
Fun Variations to Try
- Add finely chopped chives to the cheese mixture.
- Mix in a tablespoon of Dijon mustard for tang.
- Roll the outside in crushed nuts instead of mozzarella.
- Create mini bunny shapes for individual servings.
FAQ’s
Q1: Can I make this two days ahead?
Yes, just keep it tightly wrapped and refrigerated.
Q2: Can I freeze it?
Freezing is not recommended because the texture may change.
Q3: Can I use low fat cream cheese?
Yes, but the texture may be slightly less rich.
Q4: How long can it sit out?
About 2 hours safely at room temperature.
Q5: Can I add herbs?
Absolutely, chopped parsley or chives work well.
Q6: What crackers pair best?
Buttery round crackers and sturdy square ones hold up nicely.
Q7: Can I make it spicy?
Add a pinch of cayenne pepper for heat.
Q8: Is it vegetarian?
Yes, it contains no meat ingredients.
Q9: Can kids help decorate?
Yes, shaping and decorating is fun and simple.
Q10: Can I double the recipe?
Definitely, just scale all ingredients evenly.
Conclusion
This Bunny Cheese Ball with Crackers is creamy, playful, and full of flavor. It brings people together and makes any gathering feel a little more special. Give it a try at your next celebration and watch it disappear. Trust me, it is one of those recipes you will come back to again and again.
Print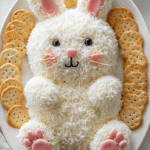
Bunny Cheese Ball with Crackers
- Total Time: 1 hour 20 minutes
- Yield: 10 servings
- Diet: Vegetarian
Description
A playful and creamy Bunny Cheese Ball coated in shredded mozzarella and served with crackers and pretzels, perfect for parties and spring gatherings.
Ingredients
- 16 ounces cream cheese, softened
- 2 cups sharp cheddar cheese, finely shredded
- 1 teaspoon garlic powder
- 1 teaspoon onion powder
- 1/2 teaspoon salt
- 1/4 teaspoon black pepper
- 1 1/2 cups finely shredded mozzarella cheese
- 1/4 cup pink candy pieces
- 1 cup round crackers
- 1 cup square crackers
- 1 cup mini pretzels
Instructions
- In a large bowl, blend softened cream cheese, sharp cheddar cheese, garlic powder, onion powder, salt, and black pepper until smooth.
- Shape the mixture into one large oval for the body and one smaller ball for the head, pressing them together to form a bunny.
- Wrap and refrigerate for at least 1 hour until firm.
- Coat the entire surface with finely shredded mozzarella cheese.
- Decorate with pink candy pieces to create paw and ear details.
- Arrange round crackers, square crackers, and mini pretzels around the bunny on a serving platter.
Notes
- Chill longer if needed for a firmer shape.
- Let sit at room temperature for 15 minutes before serving.
- Store leftovers in an airtight container for up to 4 days.
- Prep Time: 20 minutes
- Cook Time: 0 minutes
- Category: Appetizer
- Method: No Bake
- Cuisine: American
Nutrition
- Serving Size: 1 serving
- Calories: 320
- Sugar: 4g
- Sodium: 420mg
- Fat: 26g
- Saturated Fat: 15g
- Unsaturated Fat: 9g
- Trans Fat: 0g
- Carbohydrates: 12g
- Fiber: 1g
- Protein: 10g
- Cholesterol: 75mg