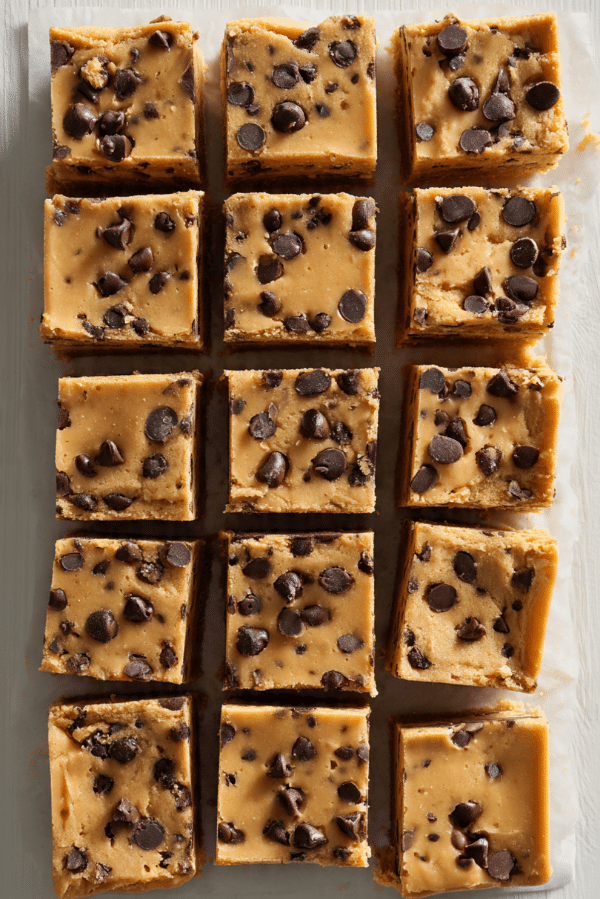
COOKIE DOUGH BARS
There is something deeply comforting about cookie dough, that sweet buttery aroma, the soft texture, and the little pops of chocolate that make you sneak just one more bite. These cookie dough bars take that nostalgic joy and turn it into a sliceable, shareable treat that feels both playful and indulgent. Trust me, you’re going to love this, it is rich, chewy, and completely satisfying from the first bite to the last.
Behind the Recipe
This recipe was born from those moments when standing in the kitchen, spoon in hand, tasting cookie dough before it ever reaches the oven. I wanted to capture that exact feeling but make it safe, simple, and perfect for serving to friends. Over time, it turned into these bars, which feel like a warm memory baked into every square.
Recipe Origin or Trivia
Cookie dough desserts became popular as home bakers started experimenting with no bake treats that delivered big flavor without turning on the oven. Bars like these are especially loved in American kitchens, where they often show up at bake sales, parties, and family gatherings because they are easy to make and even easier to enjoy.
Why You’ll Love COOKIE DOUGH BARS
These bars have a way of winning people over fast, and now let’s dive into exactly why they deserve a spot in your recipe collection.
Versatile: These bars work for casual snacks, parties, or even dressed up with a drizzle for dessert plates.
Budget-Friendly: Simple pantry staples come together without the need for anything fancy or expensive.
Quick and Easy: No complicated steps here, just mix, press, and chill.
Customizable: You can easily swap mix ins or toppings to match your mood.
Crowd-Pleasing: Everyone loves cookie dough, and these bars disappear fast.
Make-Ahead Friendly: They set beautifully in the fridge, making them perfect for planning ahead.
Great for Leftovers: If you somehow have leftovers, they keep well and taste just as good later.
Chef’s Pro Tips for Perfect Results
Before you start mixing, here are a few insider tips that make all the difference.
Make sure your butter is properly softened so it blends smoothly. Use heat treated flour so the dough is safe and silky. Press the mixture firmly into the pan so the bars hold together when sliced. Let them chill fully before cutting for clean, neat squares.
Kitchen Tools You’ll Need
Having the right tools makes the process smooth and enjoyable.
Mixing bowl: For bringing all the ingredients together evenly.
Hand mixer or spatula: To achieve a creamy, well mixed dough.
Baking pan: An 8×8 inch pan works perfectly for thick bars.
Parchment paper: Makes lifting and slicing effortless.
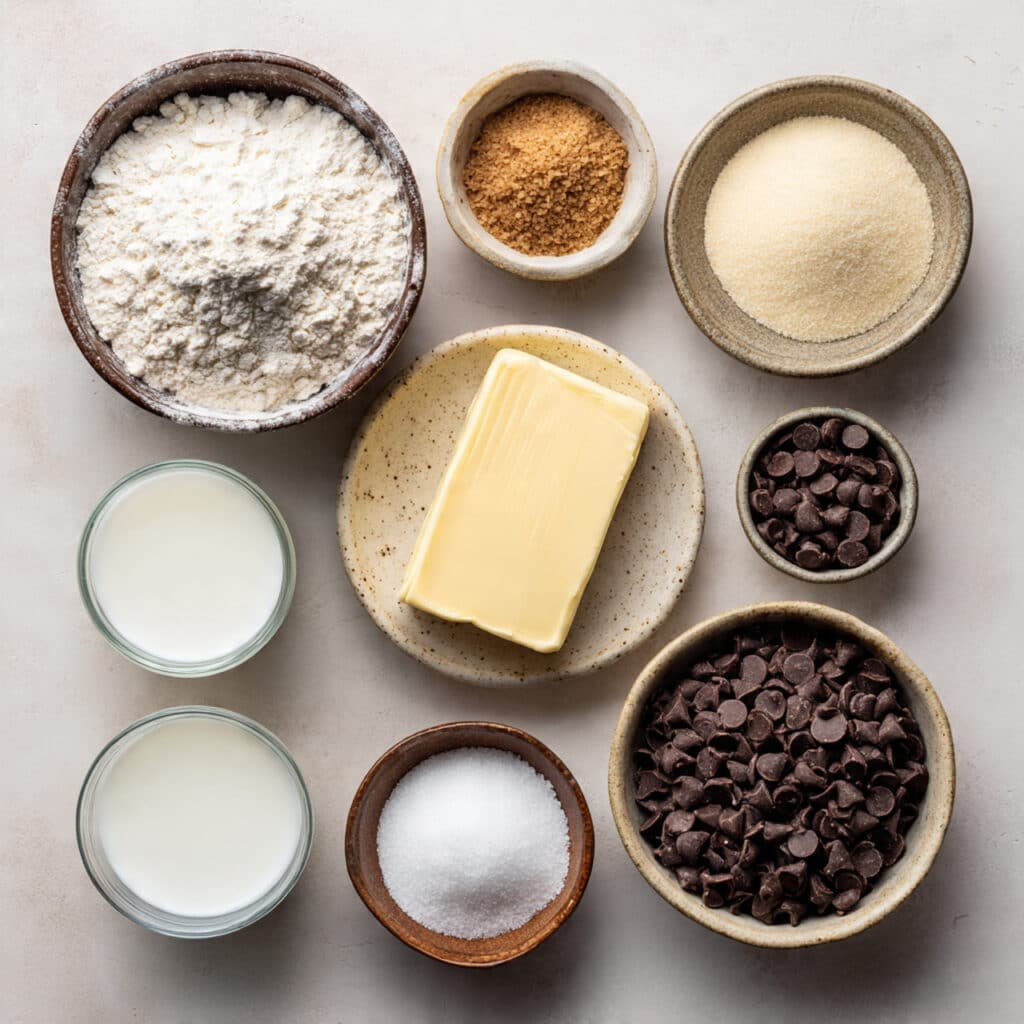
Ingredients in COOKIE DOUGH BARS
Every ingredient plays a role in creating that classic cookie dough flavor and texture we all crave.
1. All purpose flour: 1 1/2 cups, heat treated, this provides structure while keeping the bars soft.
2. Unsalted butter: 3/4 cup, softened, adds richness and a smooth mouthfeel.
3. Brown sugar: 3/4 cup, packed, brings deep sweetness and chewiness.
4. Granulated sugar: 1/4 cup, balances the flavor and lightens the texture.
5. Milk: 2 tablespoons, helps bind everything into a soft dough.
6. Vanilla extract: 2 teaspoons, enhances the classic cookie flavor.
7. Salt: 1/4 teaspoon, sharpens and balances the sweetness.
8. Chocolate chips: 1 cup, for those irresistible chocolate bursts.
Ingredient Substitutions
Sometimes you need flexibility, and these swaps work beautifully.
All purpose flour: Use oat flour that has been heat treated for a slightly nutty note.
Butter: Plant based butter works well for a dairy free option.
Chocolate chips: Try dark chocolate chips or mini chips for a different texture.
Ingredient Spotlight
Brown Sugar: This ingredient brings moisture and that signature caramel like depth that makes the bars taste like true cookie dough.
Chocolate Chips: They add contrast and texture, melting slightly as you bite into the bar.
Instructions for Making COOKIE DOUGH BARS
Now let’s dive into the fun part, bringing everything together step by step.
1. Preheat Your Equipment:
Preheat your oven to 350°F and spread the flour on a baking sheet. Bake it for 5 minutes to heat treat, then let it cool completely.
2. Combine Ingredients:
In a mixing bowl, beat the softened butter, brown sugar, and granulated sugar until creamy and smooth.
3. Prepare Your Cooking Vessel:
Line an 8×8 inch pan with parchment paper, leaving a bit of overhang for easy removal later.
4. Assemble the Dish:
Mix in the vanilla, milk, and salt, then slowly add the cooled flour. Fold in the chocolate chips until evenly distributed.
5. Cook to Perfection:
Press the dough firmly into the prepared pan, smoothing the top with a spatula.
6. Finishing Touches:
Chill the pan in the refrigerator for at least 2 hours so the bars can fully set.
7. Serve and Enjoy:
Lift the dough out using the parchment, slice into bars, and enjoy every bite.
Texture & Flavor Secrets
The magic here is in the contrast. The bars are soft and chewy with just enough firmness to hold their shape. The buttery sweetness hits first, followed by rich chocolate and a gentle vanilla finish that lingers pleasantly.
Cooking Tips & Tricks
A few extra tips to make things even smoother.
- Chill longer for cleaner slices.
- Use mini chocolate chips for more even distribution.
- Lightly grease your spatula to smooth the top easily.
What to Avoid
Even simple recipes have a few pitfalls.
- Do not skip heat treating the flour.
- Avoid over mixing once the flour is added.
- Do not rush the chilling time.
Nutrition Facts
Servings: 12
Calories per serving: 320
Note: These are approximate values.
Preparation Time
Prep Time: 20 minutes
Cook Time: 5 minutes
Total Time: 25 minutes plus chilling
Make-Ahead and Storage Tips
These bars are perfect for planning ahead. You can make them a day in advance and keep them covered in the fridge. Store leftovers in an airtight container for up to five days. They can also be frozen, just thaw in the fridge before serving.
How to Serve COOKIE DOUGH BARS
Serve them chilled for clean edges or slightly softened for a melt in your mouth bite. They pair beautifully with a glass of milk or a warm cup of coffee.
Creative Leftover Transformations
Crumble leftover bars over ice cream for a decadent topping. You can also press small pieces into mini dessert cups for a layered treat.
Additional Tips
If you want extra indulgence, drizzle melted chocolate over the top before chilling. A pinch of flaky salt on top can also elevate the sweetness beautifully.
Make It a Showstopper
For presentation, cut the bars evenly and arrange them on a simple platter. A neat stack instantly makes them look bakery worthy.
Variations to Try
Add chopped nuts for crunch.
Swirl in peanut butter for richness.
Top with a thin chocolate layer for extra indulgence.
Mix in white chocolate chips for a sweeter twist.
FAQ’s
Q1: Are cookie dough bars safe to eat?
Yes, the flour is heat treated and there are no raw eggs.
Q2: Can I freeze these bars?
Absolutely, they freeze well for up to two months.
Q3: Do they need to stay refrigerated?
They hold best in the fridge, especially in warm weather.
Q4: Can I use dark chocolate chips?
Yes, dark chocolate works beautifully here.
Q5: How thick should the bars be?
About one inch thick is ideal for the best texture.
Q6: Can I double the recipe?
Yes, just use a larger pan and press evenly.
Q7: Are these very sweet?
They are rich but balanced, not overpowering.
Q8: Can kids help make this recipe?
Definitely, it is a great no bake style project.
Q9: How do I get clean slices?
Use a sharp knife and wipe it between cuts.
Q10: Can I add sprinkles?
Yes, sprinkles add fun color and crunch.
Conclusion
These cookie dough bars are pure comfort in every square. They are easy, nostalgic, and incredibly satisfying, and let me tell you, it’s worth every bite. Once you make them, they are sure to become a go to favorite in your kitchen.
Print
COOKIE DOUGH BARS
Description
Rich, chewy cookie dough bars loaded with chocolate chips and made safe to eat by heat treating the flour. These no bake style bars are sweet, buttery, and perfect for sharing or snacking.
Ingredients
- 1 1/2 cups all purpose flour (heat treated)
- 3/4 cup unsalted butter, softened
- 3/4 cup brown sugar, packed
- 1/4 cup granulated sugar
- 2 tablespoons milk
- 2 teaspoons vanilla extract
- 1/4 teaspoon salt
- 1 cup chocolate chips
Instructions
- Preheat the oven to 350°F and spread the flour evenly on a baking sheet. Bake for 5 minutes to heat treat, then allow it to cool completely.
- In a large mixing bowl, beat the softened butter, brown sugar, and granulated sugar until creamy and smooth.
- Add the milk, vanilla extract, and salt, and mix until fully combined.
- Gradually mix in the cooled flour until a soft dough forms.
- Fold in the chocolate chips evenly throughout the dough.
- Line an 8×8 inch pan with parchment paper and press the dough firmly into the pan.
- Refrigerate for at least 2 hours until fully set.
- Lift from the pan, slice into bars, and serve.
Notes
- Chill longer for firmer bars and cleaner slices.
- Mini chocolate chips can be used for more even distribution.
- Store chilled for best texture.