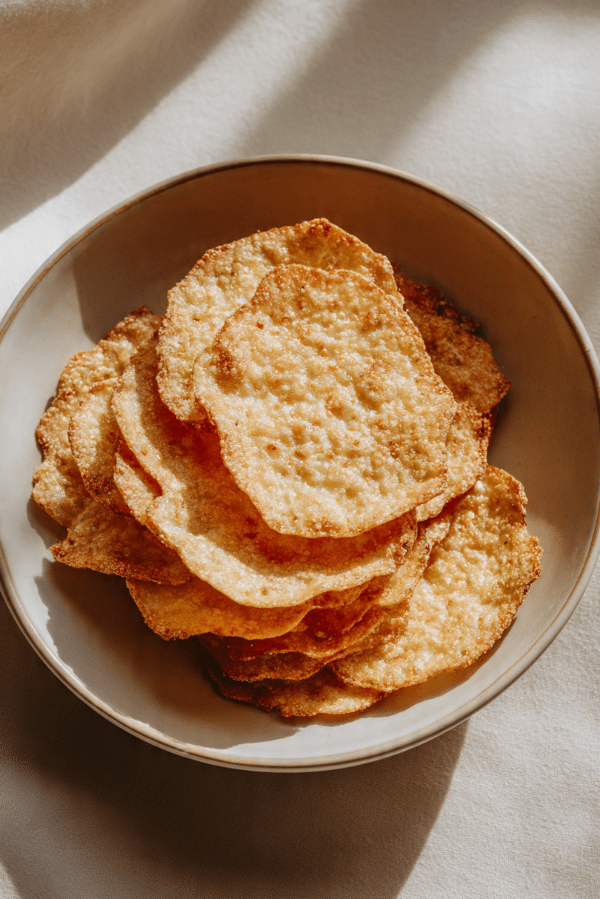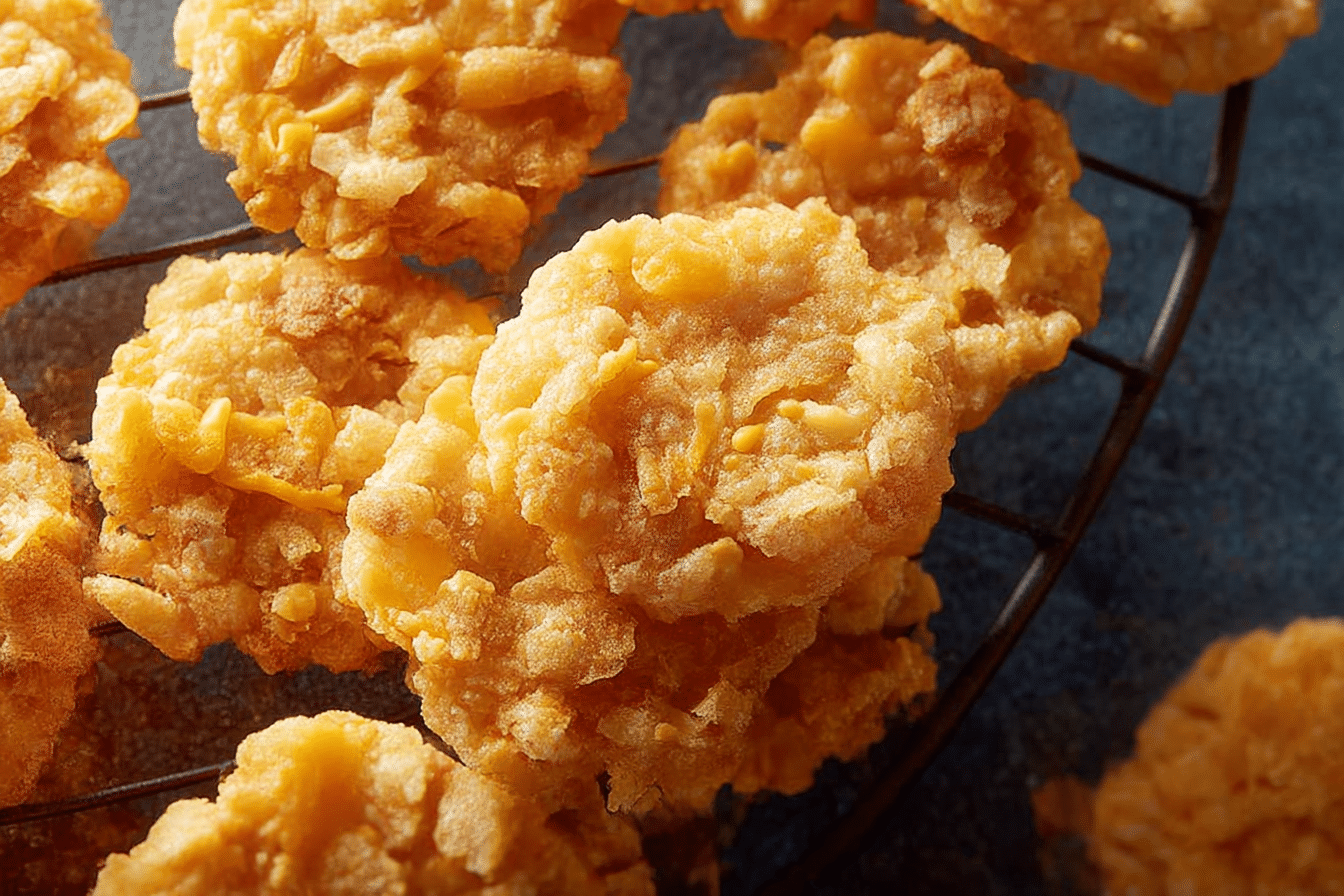
Crunchy Cheesy Crisps
Imagine biting into something golden, cheesy, and outrageously crunchy — a snack that shatters between your teeth and melts into savory bliss on your tongue. These Crunchy Cheesy Crisps are just that: an irresistible, bite-sized explosion of cheese and crisp perfection. Whether you’re hosting game night, prepping school snacks, or craving a salty, satisfying crunch, this easy recipe has you covered.
Behind the Recipe
It all started with leftover cheese and a craving for something crispy. One afternoon, with a tray, an oven, and curiosity as my sous-chefs, these cheesy crisps were born. They instantly vanished off the baking sheet, and from that moment, I knew I had struck snack gold. Now, they’re a staple — crunchy, quick, and gloriously cheesy.
Recipe Origin or Trivia
Crispy cheese snacks aren’t new — parmesan crisps (or frico) hail from Italy, where aged cheese is baked into delicate wafers. Our version takes inspiration from this, adding a modern twist with blended cheeses and seasoning. These little discs of delight have become a popular low-carb, gluten-free snack for good reason: they’re insanely simple and endlessly craveable.
Why You’ll Love Crunchy Cheesy Crisps
Versatile: Serve them as snacks, toppers for soups or salads, or a low-carb side for dips.
Budget-Friendly: Just a few ingredients, mostly cheese you likely already have.
Quick and Easy: From prep to crunch in under 20 minutes.
Customizable: Change the cheese, spice it up, or add herbs.
Crowd-Pleasing: They disappear fast — you might want to double the batch.
Make-Ahead Friendly: Store them for later without losing crunch.
Great for Leftovers: Use up random cheese bits from the fridge.
Chef’s Pro Tips for Perfect Results
The secret to perfect crisps is all in the prep and bake — here’s how to nail it every time:
- Use Shredded Cheese: Uniformly shredded cheese melts and spreads evenly.
- Line Your Tray: Use parchment or a silicone baking mat to avoid sticking.
- Leave Space Between Mounds: They spread while baking, so give them room.
- Let Them Cool: They crisp up as they cool, so don’t rush the process.
- Experiment with Cheese Mixes: Combine sharp cheddar, parmesan, or gouda for deeper flavor.
Kitchen Tools You’ll Need
Making cheesy crisps is refreshingly low-tech — here’s what you need:
Baking Sheet: A sturdy one ensures even heat.
Parchment Paper or Silicone Mat: Nonstick success every time.
Grater: If you’re shredding cheese yourself, a box grater works best.
Measuring Spoon: For making evenly sized crisps.
Cooling Rack: Optional but helps keep the underside crisp.
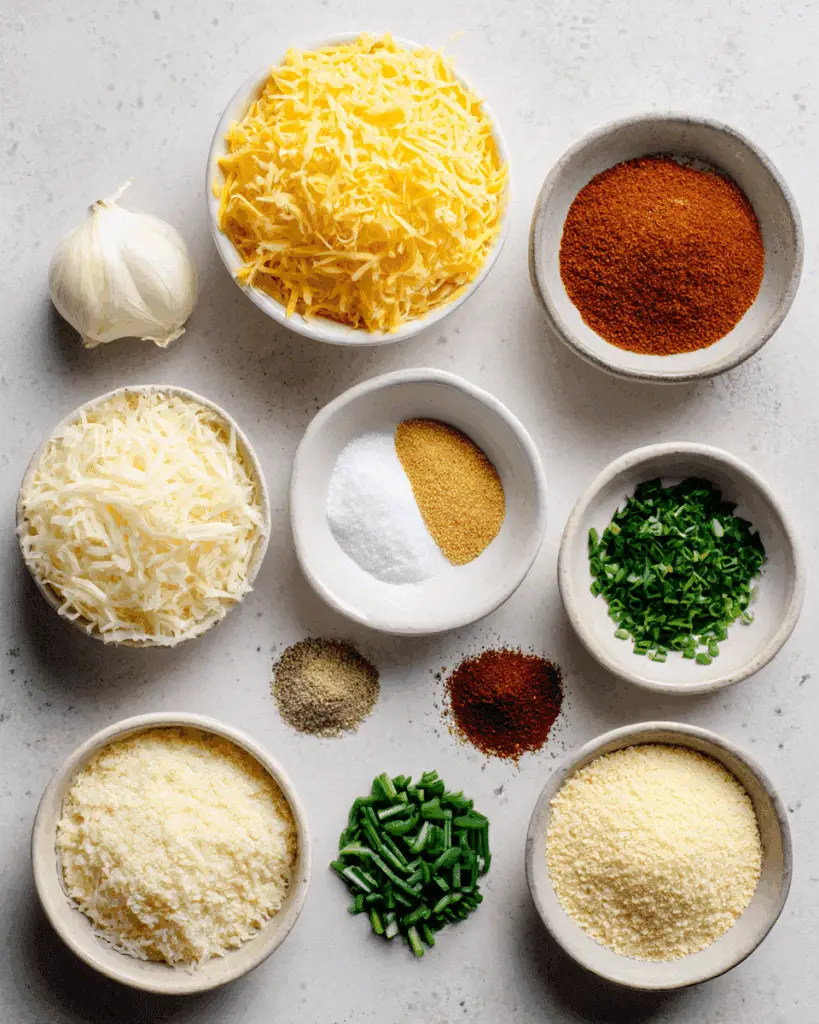
Ingredients in Crunchy Cheesy Crisps
Few ingredients, major payoff. Each plays its part in delivering maximum crunch and flavor.
- Shredded Sharp Cheddar Cheese: 1 cup (aged cheese works best for crispy texture)
- Grated Parmesan Cheese: ½ cup (adds sharpness and extra crisp factor)
- Garlic Powder: ½ teaspoon (infuses a savory depth)
- Paprika: ¼ teaspoon (adds color and mild warmth)
- Dried Oregano: ½ teaspoon (for a subtle herbal kick)
- Black Pepper: ¼ teaspoon (for a light touch of spice)
Ingredient Substitutions
Got different cheese or spices? Here’s how to mix it up:
Cheddar Cheese: Use gouda, mozzarella, or pepper jack.
Parmesan Cheese: Swap with asiago or pecorino.
Garlic Powder: Use onion powder instead.
Paprika: Smoked paprika for a smoky flavor.
Oregano: Try thyme or Italian seasoning.
Ingredient Spotlight
Sharp Cheddar Cheese: Aged cheddar brings a bolder flavor and better crisping, thanks to lower moisture.
Parmesan Cheese: The MVP of crispiness, it browns beautifully and adds umami punch.
Instructions for Making Crunchy Cheesy Crisps
These bake fast, so prep everything and watch the magic happen.
-
Preheat Your Equipment:
Preheat oven to 400°F (200°C) and line a baking sheet with parchment or a silicone mat. -
Combine Ingredients:
In a bowl, mix cheddar, parmesan, garlic powder, paprika, oregano, and black pepper until evenly combined. -
Prepare Your Cooking Vessel:
Scoop 1 tablespoon of cheese mixture and place in mounds on the baking sheet, spacing at least 2 inches apart. -
Assemble the Dish:
Lightly flatten each mound with the back of the spoon for even spreading. -
Cook to Perfection:
Bake for 7–9 minutes or until golden and bubbling with crispy edges. -
Finishing Touches:
Remove from oven and let cool on the tray for 5 minutes. Then transfer to a wire rack to finish crisping. -
Serve and Enjoy:
Enjoy immediately or store in an airtight container for snacking anytime.
Texture & Flavor Secrets
These crisps are everything you want in a snack — crispy on the outside, lacy and delicate in texture, yet packed with punchy, cheesy flavor. The edges brown beautifully while the centers remain thin and melt-in-your-mouth tender. The blend of cheddar and parmesan gives them a sharp, nutty complexity that lingers deliciously.
Cooking Tips & Tricks
Here’s how to make your crisps restaurant-worthy:
- Use pre-shredded cheese only if it doesn’t contain anti-caking agents.
- Let them cool completely before moving — that’s when the crisp magic happens.
- Sprinkle with sesame seeds or chili flakes before baking for flair.
What to Avoid
These crisps are simple, but a few hiccups can happen:
- Don’t overbake — they can go from golden to burnt fast.
- Avoid overcrowding the tray — they’ll merge into a cheesy blob.
- Don’t skip the cooling step — they need it to firm up.
Nutrition Facts
Servings: 4
Calories per serving: 150
Note: These are approximate values.
Preparation Time
Prep Time: 5 minutes
Cook Time: 10 minutes
Total Time: 15 minutes
Make-Ahead and Storage Tips
These crisps are perfect for making ahead. Once cooled, store them in an airtight container at room temperature for up to 3 days. To revive their crispiness, pop them in a low oven (300°F) for 2–3 minutes.
How to Serve Crunchy Cheesy Crisps
Snack on them solo, dunk into salsa or hummus, crumble over soups for crunch, or serve alongside a charcuterie board. They also make a fun keto-friendly alternative to crackers or chips.
Creative Leftover Transformations
Leftovers? Transform them into something new:
- Crush into crumbs and use as a crunchy topping for casseroles.
- Sprinkle over pasta for a salty crunch.
- Add to grilled cheese sandwiches for double-cheese delight.
Additional Tips
Little tweaks can elevate these even more:
- Add a pinch of cayenne for heat.
- Mix in dried rosemary or basil for Italian flair.
- Shape into sticks or stars using molds for kid-friendly snacks.
Make It a Showstopper
Presentation can take these from tasty to trendy. Serve them stacked in a small bowl or fan them on a platter with dip in the center. Garnish with microgreens or sprinkle with edible gold dust for a touch of drama.
Variations to Try
- Spicy Jalapeño Crisps: Add minced jalapeños to the cheese mix.
- Everything Bagel Crisps: Top with everything seasoning before baking.
- Pesto Crisps: Add a small swirl of pesto on top pre-baking.
- Italian Blend Crisps: Use mozzarella, provolone, and parmesan.
- Tex-Mex Crisps: Mix in taco seasoning and a pinch of cumin.
FAQ’s
Q1: Can I use vegan cheese?
A1: Yes, but make sure it melts well and has minimal moisture.
Q2: Are these keto-friendly?
A2: Absolutely! They’re naturally low-carb and high in fat.
Q3: Can I make them in the microwave?
A3: Yes, on parchment for 1–2 minutes per crisp, but they may be softer.
Q4: Do I need to refrigerate them?
A4: No, keep them in an airtight container at room temp.
Q5: Can I freeze them?
A5: Not recommended, as they lose crispiness.
Q6: What cheese works best?
A6: Aged cheeses like cheddar, parmesan, or asiago crisp best.
Q7: How do I make them spicier?
A7: Add chili flakes or cayenne to the mix.
Q8: Why didn’t mine get crunchy?
A8: Likely underbaked or too much moisture in the cheese.
Q9: Can I use a mini muffin tin?
A9: Yes! It helps keep them evenly shaped.
Q10: How do I prevent sticking?
A10: Always use parchment or a silicone baking mat.
Conclusion
Whether you’re looking for a savory snack, a party-ready finger food, or a crunchy topping that takes your dishes to the next level, these Crunchy Cheesy Crisps are here to deliver. Bold in flavor, rich in texture, and surprisingly simple, they’ll become your new go-to whenever a salty craving hits. So grab your cheese, heat that oven, and let the crisping begin!
Print
Crunchy Cheesy Crisps
Description
Crispy, cheesy, and completely addictive — these Crunchy Cheesy Crisps are the ultimate snack made from simple ingredients and bold flavor. Perfect for low-carb lovers and cheese fans alike.
Ingredients
- Shredded Sharp Cheddar Cheese: 1 cup
- Grated Parmesan Cheese: ½ cup
- Garlic Powder: ½ teaspoon
- Paprika: ¼ teaspoon
- Dried Oregano: ½ teaspoon
- Black Pepper: ¼ teaspoon
Instructions
- Preheat Your Equipment: Preheat oven to 400°F (200°C) and line a baking sheet with parchment or a silicone mat.
- Combine Ingredients: In a bowl, mix cheddar, parmesan, garlic powder, paprika, oregano, and black pepper until evenly combined.
- Prepare Your Cooking Vessel: Scoop 1 tablespoon of cheese mixture and place in mounds on the baking sheet, spacing at least 2 inches apart.
- Assemble the Dish: Lightly flatten each mound with the back of the spoon for even spreading.
- Cook to Perfection: Bake for 7–9 minutes or until golden and bubbling with crispy edges.
- Finishing Touches: Remove from oven and let cool on the tray for 5 minutes. Then transfer to a wire rack to finish crisping.
- Serve and Enjoy: Enjoy immediately or store in an airtight container for snacking anytime.
Notes
- Let crisps cool fully to achieve maximum crunch.
- Use aged cheese for best texture and flavor.
- Line tray with parchment or silicone to prevent sticking.
- Add herbs or seeds before baking for variety.