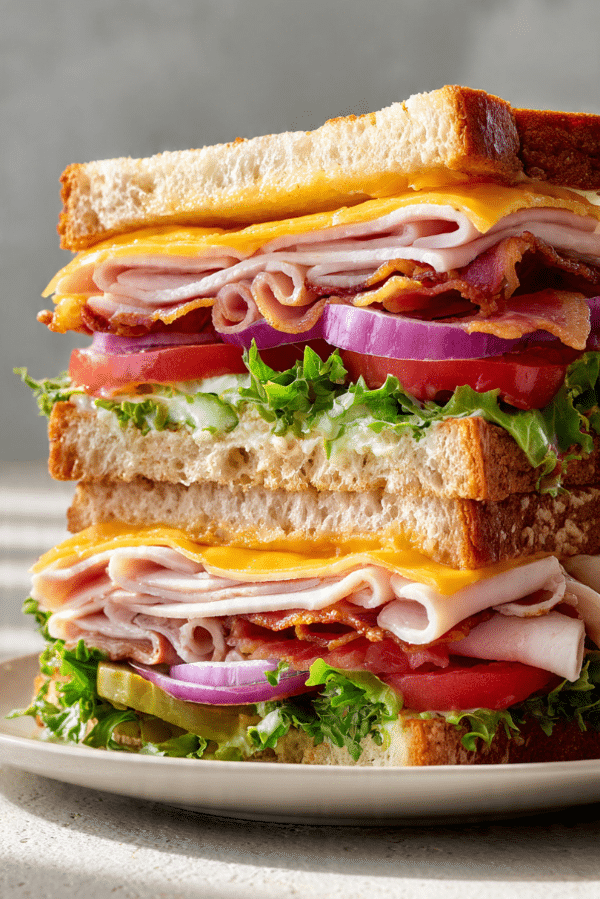
Giant Layered Sandwich
There is something deeply satisfying about bringing a towering sandwich to the table, especially one packed with colorful layers, creamy spread, crisp vegetables, and savory slices tucked between golden toasted bread. This is the kind of meal that feels a little playful and a little over the top in the best way, and trust me, you’re going to love this.
Why This Towering Sandwich Wins Every Time
Some lunches are simple, and then there are lunches that feel like an event. This one lands right in that sweet spot. It is hearty, stacked high, full of texture, and built to impress whether you are making it for yourself, your family, or a hungry group that wants something more exciting than the usual midday bite.
Each layer brings something to the table. The lettuce adds that cool snap, the tomato gives juiciness, the cheeses melt just enough against the warm toast, and the creamy mayo mustard spread ties everything together. Let me tell you, it’s worth every bite.
A Deli Classic with Big Personality
Layered sandwiches have long been part of deli culture, especially in American lunch counters where generous portions and bold combinations are part of the charm. The beauty of this style of sandwich is that it takes familiar ingredients and turns them into something memorable just by the way they are stacked and balanced.
Over time, these tall sandwiches became a bit of a comfort food icon. They are casual enough for a weekday lunch, but impressive enough to feel special. And now that we have that little bit of delicious backstory in mind, let’s dive into what makes this one so reliable in a real kitchen.
Why You’ll Keep Coming Back to This One
This sandwich is not just big, it is smart. Every ingredient has a purpose, and the whole thing comes together in a way that feels dependable and craveable every single time.
Versatile: It works for lunch, casual dinners, game day platters, and even picnic spreads. You can cut it into halves or quarters and serve it however the moment calls for.
Budget-Friendly: Most of the ingredients are easy to find and familiar, which means you can build something impressive without chasing specialty items. It looks fancy, but it is made from simple deli staples.
Quick and Easy: Once the ingredients are prepped, the assembly moves fast. Toast the bread, layer everything neatly, slice, and you are done.
Customizable: You can swap meats, cheeses, spreads, or vegetables depending on what you have on hand. It is one of those recipes that bends easily without losing its charm.
Crowd-Pleasing: This one’s a total game-changer when you need something that feels fun and generous. Big layers and bold textures always get attention.
Make-Ahead Friendly: You can prep the spread, wash the lettuce, and slice the vegetables ahead of time. That makes final assembly much easier when you are ready to eat.
Great for Leftovers: Extra fillings can be turned into wraps, chopped sandwich salads, or smaller lunchbox sandwiches the next day.
Smart Tips from the Kitchen Before You Start
A stacked sandwich sounds simple, and it is, but a few small tricks make a huge difference once you start building.
- Toast the bread just enough to create structure, but do not take it so far that it scratches the roof of your mouth.
- Pat the tomato slices dry before layering so the bread stays pleasantly firm.
- Spread the mayo mustard mixture all the way to the edges because that little bit of creaminess helps hold the layers together.
- Stack the sturdier ingredients, like cheese and meat, closer to the bread for support.
- Chill the assembled sandwich for 5 to 10 minutes before slicing if you want especially clean layers.
The Kitchen Essentials That Make It Easier
Before the layering begins, it helps to gather a few simple tools that keep everything neat and stress-free.
Toaster or skillet: This gives the bread a lightly crisp texture, which helps support the tall filling.
Small mixing bowl: You will use this to stir together the mayo mustard spread until it is smooth and evenly blended.
Chef’s knife or serrated knife: A sharp knife is key for clean slicing, especially once the sandwich is fully stacked.
Cutting board: This gives you a steady surface for assembling and slicing without crushing the layers.
Spatula or sandwich pick: Either one can help stabilize the sandwich when moving it or serving it.
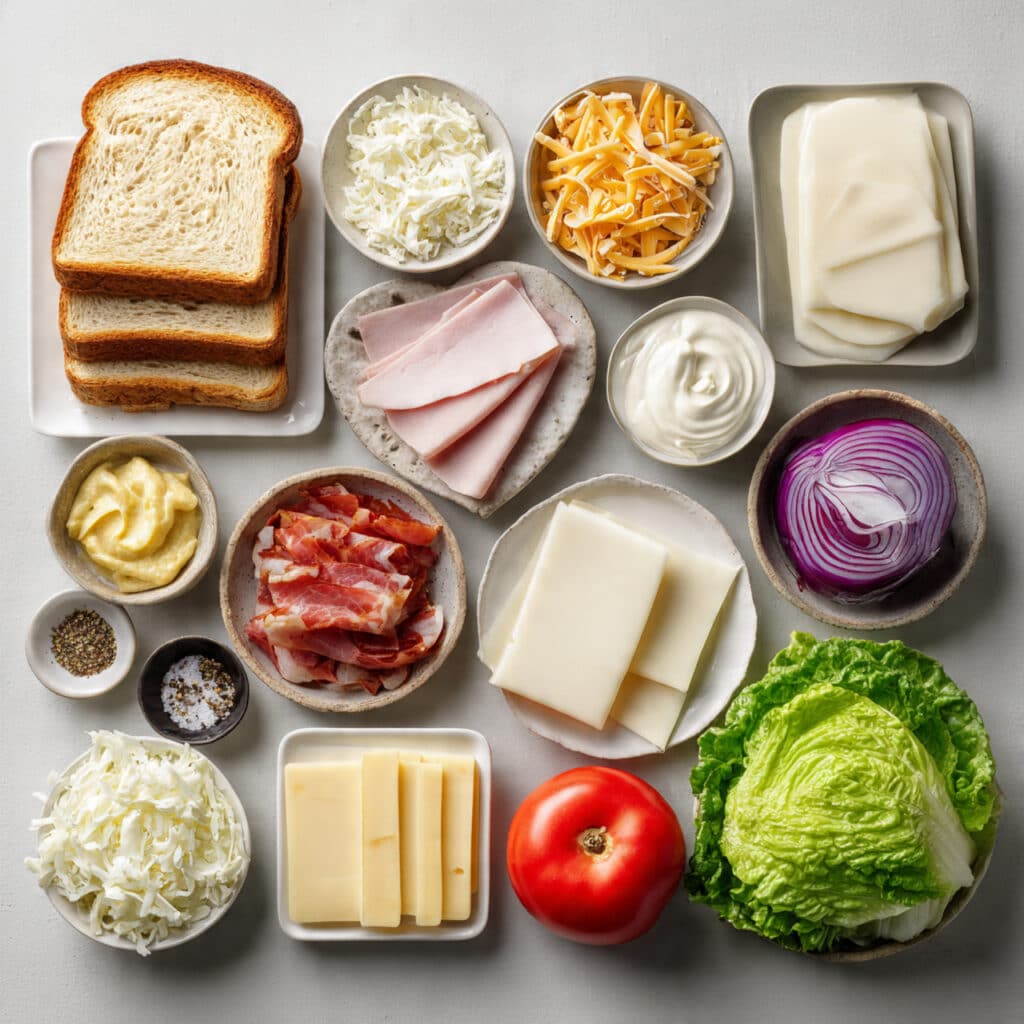
Everything You Need to Build Those Delicious Layers
Now that the tools are ready, let’s talk ingredients. This combination is rich, crisp, creamy, and balanced, which is exactly what a good stacked sandwich should be.
- Sandwich bread: 6 slices toasted white or sourdough bread, this creates the sturdy structure and gives each layer something warm and lightly crisp to rest on.
- Turkey deli slices: 6 ounces, this brings a tender, savory base that keeps the sandwich hearty without feeling too heavy.
- Ham deli slices: 4 ounces, this adds a slightly smoky, salty note that deepens the flavor.
- Turkey bacon: 6 cooked slices, this gives the sandwich a crisp bite and extra savory contrast.
- Cheddar cheese: 4 slices, this adds a rich sharpness that stands out beautifully against the fresh vegetables.
- Swiss cheese: 4 slices, this brings a mellow creaminess and rounds out the stronger flavors.
- Romaine lettuce: 6 large leaves, this provides crunch and a cool fresh layer that keeps each bite lively.
- Tomato: 1 large tomato, sliced into 6 even slices, this adds juicy sweetness and bright color.
- Red onion: 1/4 small red onion, thinly sliced, this gives the sandwich a little bite and a crisp finish.
- Mayonnaise: 1/3 cup, this forms the creamy base of the spread and helps the layers hold together.
- Dijon mustard: 1 tablespoon, this lifts the spread with gentle tang and keeps the flavor from feeling flat.
- Black pepper: 1/4 teaspoon, this adds subtle warmth through the spread.
- Salt: 1/8 teaspoon, this sharpens the overall flavor, especially in the vegetables.
Easy Swaps When You Want to Change It Up
One of the nicest things about this sandwich is how flexible it is, so you can make it work with what is already in your fridge.
Turkey deli slices: Roast chicken slices.
Ham deli slices: Extra turkey or thin roast beef.
Turkey bacon: Crispy smoked turkey strips or simply leave it out.
Cheddar cheese: Provolone.
Swiss cheese: Mozzarella slices.
Romaine lettuce: Iceberg lettuce or butter lettuce.
Dijon mustard: Yellow mustard or a light honey mustard.
White or sourdough bread: Whole wheat bread or seeded sandwich bread.
The Star Ingredients Doing the Heavy Lifting
Even in a sandwich loaded with good things, a couple of ingredients really define the final bite.
Turkey bacon: This is the crunchy layer that keeps the texture exciting. Without it, the sandwich is still tasty, but with it, every bite gets that savory snap that makes the stack feel complete.
Mayo mustard spread: This creamy mixture quietly does a lot of work. It adds moisture, flavor, and cohesion, making the layers taste connected instead of separate.
Let’s Build It, One Layer at a Time
This is where the fun really begins. Once everything is sliced, toasted, and ready, the assembly feels almost like building an edible tower, and now let’s dive into the steps you’re going to follow.
- Preheat Your Equipment: Toast the 6 slices of bread until lightly golden and just crisp around the edges. If you prefer, you can toast them in a dry skillet over medium heat for a little extra warmth.
- Combine Ingredients: In a small bowl, stir together the 1/3 cup mayonnaise, 1 tablespoon Dijon mustard, 1/4 teaspoon black pepper, and 1/8 teaspoon salt until smooth and creamy.
- Prepare Your Cooking Vessel: Set a cutting board or clean work surface in front of you and arrange the toasted bread, deli meats, cheeses, lettuce, tomato slices, onion, turkey bacon, and spread so assembly feels easy and organized.
- Assemble the Dish: Lay down the first slice of toasted bread and spread it generously with the mayo mustard mixture. Add 2 slices cheddar, 3 ounces turkey, 2 tomato slices, and 2 lettuce leaves. Place the second bread slice on top, spread both sides with the mayo mustard mixture, then layer 2 slices Swiss, 4 ounces ham, 6 cooked slices turkey bacon, the red onion, and 2 more tomato slices. Add the third bread slice, spread the inside with more sauce, then finish with the remaining 3 ounces turkey, remaining 2 lettuce leaves, and final 2 tomato slices. Cap with the last slice if making a double-decker stack from two sandwich halves, or compress gently and secure before slicing as a giant layered build.
- Cook to Perfection: There is no further cooking needed here, but gently press the sandwich so the layers settle slightly and hold together without squeezing out the fillings.
- Finishing Touches: Use a sharp serrated knife to slice the sandwich in halves or quarters. Wipe the blade between cuts if you want those extra clean, dramatic layers.
- Serve and Enjoy: Serve right away while the bread is still lightly crisp and the fillings are cool, creamy, and fresh. This is the moment where all those layers really shine.
The Best Part, Texture and Flavor in Every Bite
What makes this sandwich so satisfying is the contrast. You get crisp toast against soft deli slices, juicy tomato against rich cheese, and cool lettuce against the creamy spread. The red onion cuts through the richness with a little sharpness, while the mustard adds brightness that keeps every bite from feeling too heavy.
As you eat, the flavors build in waves. First comes the toasted bread and creamy spread, then the savory meats and cheese, and finally the fresh crunch of vegetables. It is layered in more ways than one, which is exactly why it feels so complete.
Little Tricks That Make a Big Difference
Once you have made it once, a few easy habits can make the next one even better.
- Dry the lettuce and tomato well so the bread stays crisp.
- Slice the sandwich with a serrated knife using gentle sawing motions instead of pressing straight down.
- Let the toast cool slightly before assembly so the lettuce stays fresh and snappy.
- Chill the stacked sandwich for a few minutes before slicing if you want a cleaner presentation.
Common Mistakes That Can Mess with the Layers
Even a simple sandwich has a few trouble spots, but they are easy to avoid once you know what to watch for.
- Using overly soft bread can make the stack collapse, so choose sandwich bread with enough structure to support the fillings.
- Adding too much spread can cause the layers to slide, so keep it generous but controlled.
- Wet tomato slices can make the sandwich soggy, so pat them dry before assembling.
- Pressing too hard while slicing can squash the layers, so use a steady hand and a sharp serrated knife.
A Quick Look at the Nutrition
This sandwich is hearty and satisfying, so it makes a filling meal all on its own.
Servings: 2
Calories per serving: 690
Note: These are approximate values.
Time Breakdown Before You Get Started
It comes together fast, which makes it even more lovable on busy days.
Prep Time: 15 minutes
Cook Time: 5 minutes
Total Time: 20 minutes
Prep Ahead, Store Smart, and Reheat the Right Way
If you want to get ahead, you can mix the spread, cook the turkey bacon, wash the lettuce, and slice the vegetables a few hours in advance. Store each component separately in the fridge so everything stays fresh and crisp.
Once assembled, this sandwich is best eaten the same day, but tightly wrapped halves can be refrigerated for up to 24 hours. For longer freshness, keep the tomatoes separate and add them just before serving. Freezing is not ideal because the vegetables and spread lose their texture, but cooked turkey bacon and sliced meats can be frozen separately if needed. For reheating, only warm the bread or meat components, then assemble fresh.
The Best Ways to Serve It
This sandwich already feels generous, so it pairs nicely with lighter sides that let the layers stay center stage. A crisp pickle, kettle chips, fresh fruit, or a simple salad all work beautifully.
For a more filling spread, serve it with tomato soup, roasted potatoes, or a crunchy slaw. Cut into quarters, it also makes a great platter option for parties or casual brunch tables.
Leftovers Can Turn Into Something New
If you happen to have leftover fillings, do not let them go to waste because they are surprisingly easy to reinvent.
Chop the meats, lettuce, onion, and tomato into a quick deli-style salad for lunch the next day. Tuck the ingredients into wraps for an easier grab-and-go meal. You can even pile the leftovers onto toasted English muffins or small rolls for mini stacked sandwiches that feel just as fun.
Extra Details That Make It Even Better
The best sandwiches are all about balance, so keep an eye on how each layer contributes. Too much meat and it gets heavy, too much lettuce and it can feel loose. Aim for even distribution so every bite has crunch, creaminess, and savory flavor.
A light spread on both sides of the middle bread slice helps lock the center together. Also, slicing the onion very thinly makes a huge difference because you get flavor without overwhelming the rest of the stack.
Turn It Into the Star of the Table
Presentation matters, especially with something tall and layered. Slice it cleanly so the cross-section is visible, then stand the halves slightly apart on the plate so all those colorful layers show off.
A simple plate works best because it lets the sandwich steal the spotlight. Add a few pickles or chips on the side if you want, but keep the arrangement clean and not too crowded.
Fun Variations Worth Trying
You can keep the structure and play with the flavor in some really tasty ways.
Spicy version: Add sliced pickled jalapeños and a little chili sauce to the mayo mustard spread.
Fresh garden version: Add cucumber ribbons and swap in mozzarella for an extra cool and juicy bite.
Roast chicken version: Replace the deli meats with sliced cooked roast chicken for a slightly more homemade feel.
Avocado version: Add thin avocado slices between the lettuce and tomato for extra creaminess.
Breakfast style: Add a cooked egg layer and use cheddar only for a rich brunch twist.
FAQ’s
Q1: Can I make this ahead for lunch?
Yes, but for the best texture, keep the tomato separate until you are ready to eat. That helps prevent the bread from getting soft.
A1:
You can fully prep the ingredients in advance and assemble in the morning. Wrapping it tightly also helps hold the layers together.
Q2: What kind of bread works best?
Sturdy sandwich bread, sourdough, or thick white bread all work well. The key is using something that can support the fillings without tearing.
A2:
Lightly toasted bread is even better because it adds structure and a pleasant crunch.
Q3: Can I use only one type of meat?
Absolutely. Turkey alone or ham alone both work well.
A3:
Just keep the total amount close to 10 ounces so the sandwich still feels full and balanced.
Q4: Is there a way to make it lighter?
Yes, you can reduce the cheese slightly and use a lighter mayonnaise if that suits your preference.
A4:
You can also add more lettuce for extra bulk without making it feel too heavy.
Q5: How do I keep the layers from sliding?
Dry ingredients well, do not overdo the spread, and press gently after assembling.
A5:
A short chill in the fridge before slicing can also help everything set.
Q6: Can I make it without onion?
Of course. The onion adds bite, but the sandwich is still delicious without it.
A6:
You could swap it for thin cucumber slices if you want a milder crunch.
Q7: What cheese melts best here?
Cheddar and Swiss are both great choices because they are flavorful and soft enough to blend nicely with the other layers.
A7:
If you want a stretchier texture, provolone is another good option.
Q8: Can kids eat this easily?
Yes, especially if you cut it into smaller pieces.
A8:
You can leave out the onion and mustard for a milder, more kid-friendly version.
Q9: What can I serve with it for a party?
Chips, pickles, slaw, fruit salad, or a simple pasta salad all pair nicely.
A9:
Cutting the sandwich into quarters makes it easier for guests to grab and enjoy.
Q10: Can I turn this into mini sandwiches?
Yes, and it works really well.
A10:
Use rolls or smaller bread slices and keep the same filling ratios so each mini version still has those satisfying layers.
Conclusion
Big, stacked, crisp, creamy, and packed with flavor, this sandwich brings a little deli magic right into your kitchen. It is easy enough for a busy day, fun enough for sharing, and satisfying enough to make again and again. Trust me, once you slice into those gorgeous layers and take that first bite, you will know exactly why this one deserves a spot in your regular rotation.
Print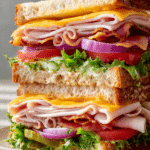
Giant Layered Sandwich
Description
A hearty double-decker sandwich stacked with toasted bread, turkey, ham, turkey bacon, cheddar, Swiss, crisp romaine, tomato, red onion, and a creamy Dijon mayo spread.
Ingredients
- 6 slices toasted white or sourdough bread
- 6 ounces turkey deli slices
- 4 ounces ham deli slices
- 6 cooked slices turkey bacon
- 4 slices cheddar cheese
- 4 slices Swiss cheese
- 6 large leaves romaine lettuce
- 1 large tomato, sliced into 6 even slices
- 1/4 small red onion, thinly sliced
- 1/3 cup mayonnaise
- 1 tablespoon Dijon mustard
- 1/4 teaspoon black pepper
- 1/8 teaspoon salt
Instructions
- Toast the 6 slices of bread until lightly golden and just crisp around the edges.
- In a small bowl, stir together the mayonnaise, Dijon mustard, black pepper, and salt until smooth.
- Arrange the toasted bread, deli meats, cheeses, lettuce, tomato slices, onion, turkey bacon, and spread on a clean work surface.
- Lay down the first slice of toasted bread and spread it generously with the mayo mustard mixture. Add 2 slices cheddar, 3 ounces turkey, 2 tomato slices, and 2 lettuce leaves.
- Place the second bread slice on top and spread both sides with the mayo mustard mixture. Layer with 2 slices Swiss, 4 ounces ham, 6 cooked slices turkey bacon, the red onion, and 2 more tomato slices.
- Add the third bread slice and spread the inside with more sauce. Finish with the remaining 3 ounces turkey, remaining 2 lettuce leaves, and final 2 tomato slices. Cap and gently press the sandwich to settle the layers.
- Slice with a sharp serrated knife into halves or quarters and serve immediately.
Notes
- Pat the tomato slices dry before layering so the bread stays crisp.
- Use a serrated knife and gentle sawing motions for clean slices.
- Chill the assembled sandwich for 5 to 10 minutes before slicing if you want neater layers.
- For make-ahead prep, store sliced vegetables and spread separately, then assemble just before serving.