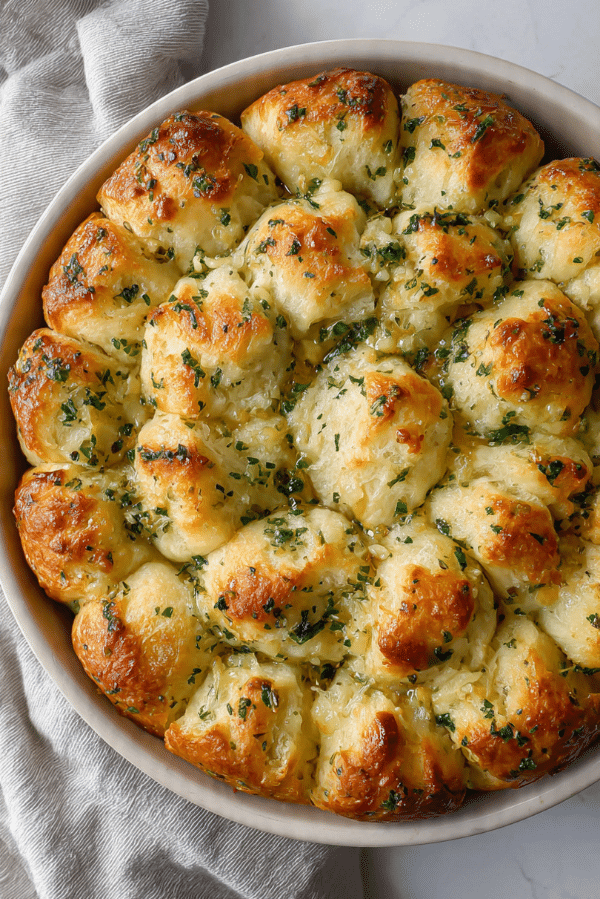
Pull-Apart Garlic Bread
Warm bread fresh from the oven has a way of gathering everyone in the kitchen, and this Pull-Apart Garlic Bread is exactly that kind of recipe. Imagine a golden loaf baked until the edges are crisp, the center soft and fluffy, and every crack filled with buttery garlic and herbs. As it bakes, the aroma slowly fills the room, and trust me, you’re going to love this moment when the dish finally comes out of the oven.
The best part is how fun it is to eat. Each piece pulls away effortlessly, revealing melted cheese and buttery garlic tucked between the layers. It is simple, comforting, and honestly a little addictive. Let me tell you, it is worth every bite.
Why This Bread Always Disappears First
There is something magical about warm garlic bread, but this version takes things to another level. Instead of slicing and serving, the bread is baked so every piece becomes its own little buttery pocket.
Each pull reveals fluffy bread soaked with garlic butter, fresh herbs, and gooey cheese. It is the kind of dish people hover around at the table because they simply cannot stop reaching for another piece.
And now let’s dive a little deeper into where this irresistible idea came from.
A Little Story Behind This Comforting Classic
Garlic bread itself has roots in Italian cooking traditions where bread is often paired with olive oil, garlic, and herbs. Over time, the concept evolved, especially in home kitchens across North America where cooks began experimenting with stuffed breads and shareable dishes.
The pull apart style became popular because it turns something simple into a fun, interactive experience. Instead of cutting slices, the bread is prepared so every piece separates naturally. It brings people together around the table, which honestly is what great food is all about.
Reasons Home Cooks Keep Coming Back to This Recipe
Before we jump into the ingredients, let me share why this recipe has become a favorite in so many kitchens.
Versatile: This bread fits almost any occasion, from weeknight dinners to game day spreads.
Budget-Friendly: The ingredients are simple pantry staples that come together beautifully.
Quick and Easy: The preparation takes just minutes before the oven does the rest of the work.
Customizable: You can adjust herbs, cheese, or even add a little spice if you like heat.
Crowd-Pleasing: Few things disappear faster than warm garlic bread at the table.
Make-Ahead Friendly: You can assemble everything earlier in the day and bake it when needed.
Great for Leftovers: If any survives, it reheats beautifully the next day.
And now that you know why it works so well, let’s look at a few helpful cooking insights.
Chef Tips That Make This Bread Extra Special
Making great garlic bread is simple, but a few small tricks can make a big difference.
- Use softened butter so it spreads easily into every cut.
- Cut deep into the loaf but avoid slicing completely through the base.
- Fresh garlic delivers the strongest flavor.
- Wrap loosely with foil for the first half of baking to keep the bread soft before crisping the top.
Kitchen Tools That Make Preparation Easy
Before we start cooking, it helps to gather a few simple tools.
Bread Knife: A serrated knife allows you to slice through the loaf cleanly without squashing it.
Mixing Bowl: Used to combine the garlic butter mixture.
Pastry Brush or Spoon: Helps distribute butter evenly between the cuts.
Baking Dish: Keeps the loaf stable during baking and catches melted butter.
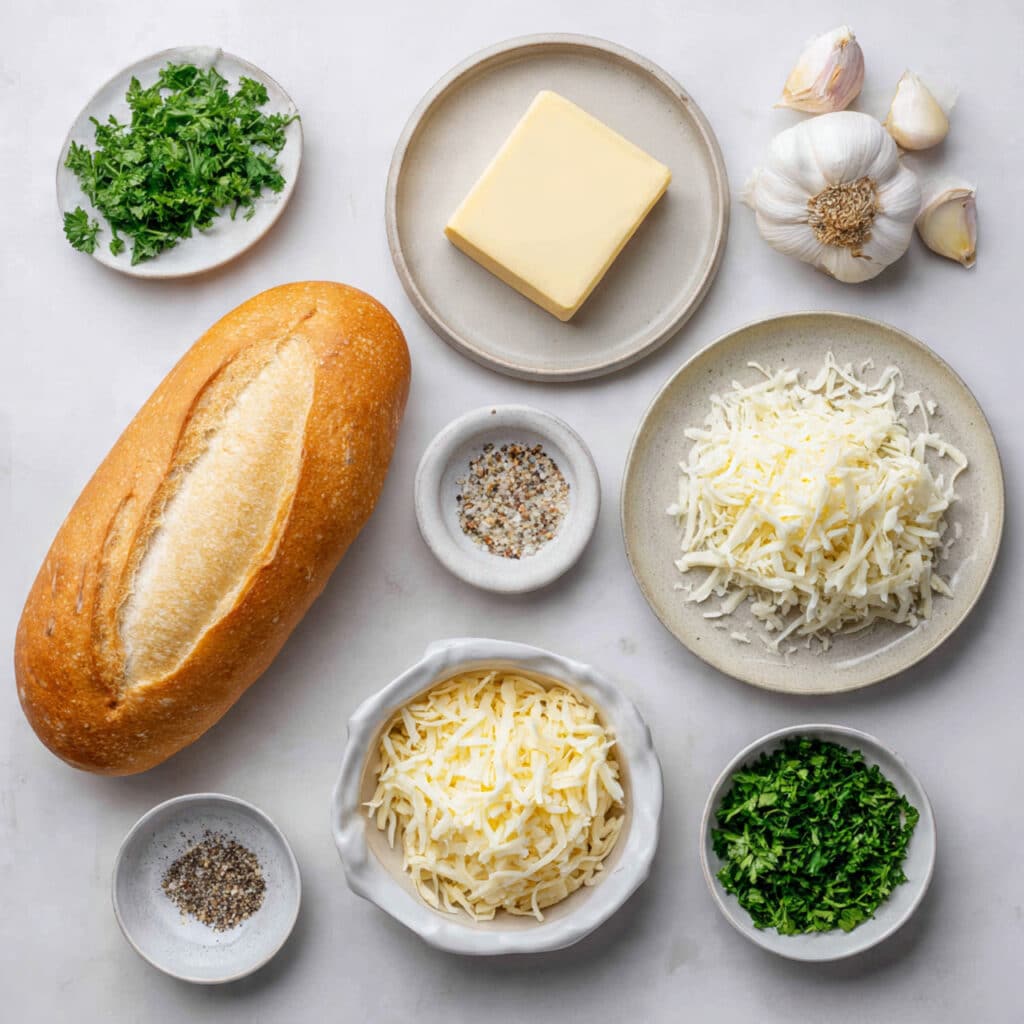
Ingredients You Will Need
The magic of this dish comes from simple ingredients working together.
- Italian Bread Loaf: 1 large loaf, about 16 ounces. A sturdy loaf holds its shape while absorbing butter.
- Unsalted Butter: ½ cup, melted. This creates the rich base for the garlic mixture.
- Garlic: 4 cloves, finely minced. Provides bold flavor and aroma.
- Mozzarella Cheese: 1 cup shredded. Adds melty, stretchy texture between the bread pieces.
- Fresh Parsley: 2 tablespoons chopped. Brings color and a fresh herbal note.
- Salt: ¼ teaspoon. Enhances all the flavors.
- Black Pepper: ¼ teaspoon. Adds a subtle warmth.
Easy Ingredient Swaps If You Need Them
Cooking should feel flexible, so here are a few simple swaps.
Mozzarella Cheese: Provolone or another mild white cheese works well.
Fresh Parsley: Dried parsley can be used if fresh herbs are unavailable.
Italian Bread: A round sourdough loaf can also work beautifully.
The Ingredient That Makes the Magic Happen
Garlic: Fresh garlic is the heart of this recipe. As it bakes with butter, the flavor softens slightly and becomes rich and aromatic while still delivering that classic garlic punch.
Let’s Start Cooking Together
Now the fun part begins. Here are the steps you’re going to follow.
-
Preheat Your Equipment:
Preheat your oven to 375°F so it is ready when the bread is assembled. -
Combine Ingredients:
In a bowl, mix melted butter, minced garlic, chopped parsley, salt, and pepper until fully blended. -
Prepare Your Cooking Vessel:
Place the loaf in a baking dish to keep it steady during preparation. -
Assemble the Dish:
Using a bread knife, cut the loaf in a crosshatch pattern without slicing through the bottom. Spoon the garlic butter into each crack and sprinkle mozzarella between the cuts. -
Cook to Perfection:
Bake for about 20 minutes until the cheese melts and the bread edges turn golden. -
Finishing Touches:
Remove from the oven and sprinkle a little extra parsley for freshness. -
Serve and Enjoy:
Place the dish at the center of the table and let everyone pull pieces apart.
Texture and Flavor That Make Every Bite Irresistible
When baked properly, the outside develops a light crispness while the inside stays soft and fluffy. The garlic butter seeps into the bread so every piece is flavorful, while the cheese adds a stretchy, creamy element.
The combination of buttery richness, garlicky aroma, and soft bread creates that perfect balance that keeps everyone reaching for one more piece.
Helpful Cooking Tips
- Use a good quality loaf with a firm crust.
- Spread butter evenly so every bite gets flavor.
- Bake uncovered for the last few minutes to lightly crisp the top.
Common Mistakes to Avoid
- Cutting all the way through the loaf. Leave the base intact so the bread holds together.
- Using cold butter which does not distribute well.
- Overbaking which can dry the bread.
Nutrition Overview
Servings: 8
Calories per serving: 230
Note: These values are approximate.
Time Needed to Prepare
Prep Time: 10 minutes
Cook Time: 20 minutes
Total Time: 30 minutes
Make Ahead and Storage Tips
You can prepare the bread several hours ahead by slicing and filling it with garlic butter and cheese. Cover and refrigerate until ready to bake.
Leftovers should be stored in an airtight container in the refrigerator for up to three days. Reheat in the oven at 350°F for about 10 minutes to restore crispness.
Freezing is also possible. Wrap tightly and freeze for up to one month before reheating.
Delicious Ways to Serve It
This bread pairs wonderfully with pasta, soups, or hearty salads. It also works as a centerpiece appetizer during gatherings where everyone can share and pull pieces apart.
Fun Ideas for Leftovers
If you have leftover pieces, try turning them into garlic croutons for salads or serve them alongside scrambled eggs for a savory breakfast twist.
Extra Tips for Even Better Flavor
Allow the bread to rest for two minutes after baking. This helps the cheese settle slightly and makes the pieces easier to pull apart.
Make It Look Bakery Worthy
Serve the bread in a rustic baking dish with fresh parsley sprinkled on top. The golden crust and melted cheese make a beautiful presentation straight from the oven.
Variations to Try
Garlic Cheese Deluxe, add shredded cheddar with the mozzarella.
Spicy Garlic Version, mix in a pinch of chili flakes.
Herb Lover Style, add thyme and oregano to the butter.
Extra Cheesy Version, combine mozzarella and parmesan for deeper flavor.
FAQ’s
1. Can I prepare it ahead of time?
Yes. Assemble the loaf earlier and bake just before serving.
2. Can I use garlic powder?
Fresh garlic tastes best, but garlic powder works if needed.
3. What bread works best?
A sturdy Italian or sourdough loaf works well.
4. Can I make it without cheese?
Yes. The garlic butter alone still creates delicious flavor.
5. How do I keep it soft?
Cover loosely with foil during part of the baking time.
6. Can I freeze it?
Yes. Wrap tightly and freeze before baking.
7. How do I reheat leftovers?
Warm in the oven for the best texture.
8. Can I add vegetables?
Small pieces of roasted peppers or herbs can work well.
9. Is it good for parties?
Absolutely. It is one of the easiest shareable appetizers.
10. How do I prevent soggy bread?
Use a firm loaf and avoid adding too much butter.
Conclusion
Pull-Apart Garlic Bread is one of those recipes that feels special even though it is incredibly simple. The golden crust, buttery garlic aroma, and soft interior create a dish that people gather around instantly.
Whether it is served alongside a cozy dinner or as the star of a party table, this recipe always delivers comfort and flavor in every pull. Give it a try and watch how quickly it disappears.
Print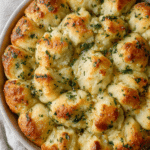
Pull-Apart Garlic Bread
Description
A warm, shareable garlic bread baked until golden and filled with buttery garlic, herbs, and melted cheese between soft pull-apart pieces.
Ingredients
- 1 large Italian bread loaf (about 16 oz)
- 1/2 cup unsalted butter, melted
- 4 garlic cloves, minced
- 1 cup shredded mozzarella cheese
- 2 tablespoons fresh parsley, chopped
- 1/4 teaspoon salt
- 1/4 teaspoon black pepper
Instructions
- Preheat oven to 375°F.
- In a bowl combine melted butter, garlic, parsley, salt and pepper.
- Place bread loaf in baking dish and slice in a crosshatch pattern without cutting through the bottom.
- Spoon garlic butter mixture into the cuts and sprinkle mozzarella between the slices.
- Bake for 20 minutes until cheese melts and bread becomes golden.
- Remove from oven and sprinkle extra parsley.
- Serve warm and pull apart pieces to enjoy.
Notes
- Use fresh garlic for best flavor.
- A sturdy loaf helps hold the bread together.
- Bake uncovered during the last minutes for crisp edges.