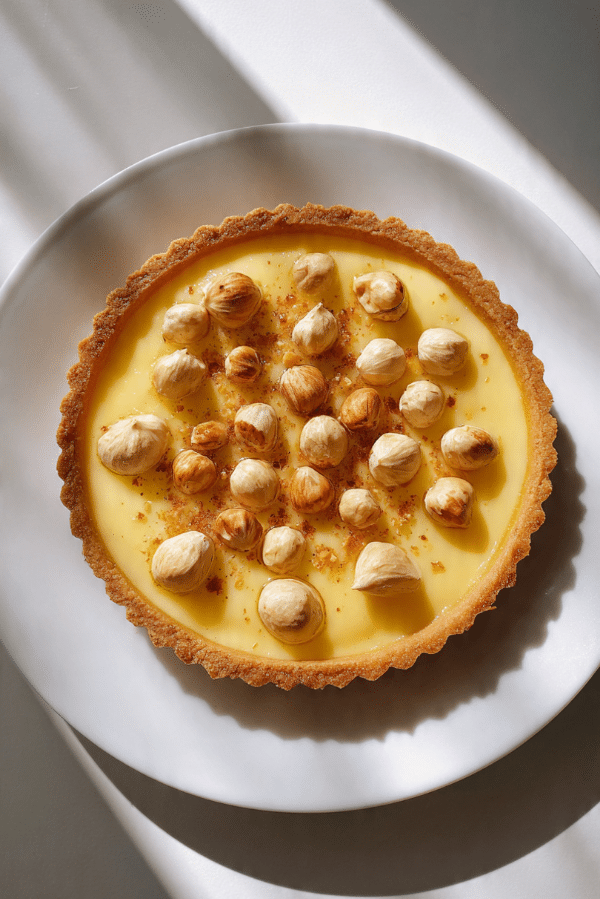
Tarte citron noisettes
There is something about the mix of bright lemon and warm hazelnut that feels instantly special. The filling is silky and fresh, the crust has that buttery crumb you hope for in every good tart, and the toasted nuts on top bring just enough crunch to make every bite feel layered and memorable. Trust me, you’re going to love this, because it tastes elegant without feeling fussy, and it brings that little pâtisserie magic straight into your kitchen.
Why this tart wins people over from the very first slice
Some desserts are sweet and comforting, while others wake up your whole palate. This one does both. The citrus keeps things lively, the hazelnut adds a gentle roasted depth, and the contrast between creamy filling and crisp shell makes it feel like a bakery treat worth slowing down for.
It is the kind of dessert that looks refined on the table, yet the flavors feel familiar and welcoming. Let me tell you, it’s worth every bite, especially when the lemon cream settles into that soft, glossy texture and the toasted hazelnuts bring a little extra personality on top.
A little French pastry charm behind every slice
Before you even take the first forkful, this dessert already carries a lovely bit of French pastry spirit. Lemon tart has long been part of classic French pâtisserie, and adding hazelnut gives it a richer, nuttier twist that feels both rustic and polished at the same time.
That balance is what makes it so appealing. You get the brightness people expect from a lemon tart, but the hazelnut brings warmth and roundness, which softens the sharp edges and makes the whole thing feel deeper and more luxurious.
Reasons this dessert is always a smart choice
This tart has a way of making you feel like a very confident baker, even if you are just having fun in the kitchen. And now let’s dive into exactly why it deserves a spot in your dessert rotation.
Versatile: It works beautifully for brunch, afternoon coffee, dinner parties, or a quiet weekend bake. You can dress it up with extra hazelnuts or keep it simple and still get a stunning result.
Budget-Friendly: Most of the ingredients are pantry and refrigerator basics. Lemons, eggs, sugar, butter, and flour do a lot of the heavy lifting here.
Quick and Easy: It looks elegant, but the process is very approachable. Once the crust is baked, the filling comes together with a few simple steps.
Customizable: You can make the lemon flavor sharper or softer, toast the hazelnuts a little darker, or even add a touch of lemon zest on top for extra fragrance.
Crowd-Pleasing: People love the contrast of creamy, tart, buttery, and crunchy. It feels balanced, which means it disappears fast.
Make-Ahead Friendly: The tart chills beautifully, so it is perfect when you want dessert ready before guests arrive.
Great for Leftovers: A slice the next day is still delicious, and the flavors feel even more settled and harmonious.
Smart pastry tips that make a real difference
A tart like this is simple at heart, but a few little choices make the final result look and taste much better.
- Chill the dough before baking so the crust keeps a neat shape and stays nicely tender.
- Use freshly squeezed lemon juice for the cleanest, brightest flavor.
- Stir the filling gently over medium to low heat so it thickens smoothly without scrambling the eggs.
- Toast the hazelnuts before topping the tart, because that deeper nutty aroma changes everything.
- Let the tart cool fully before slicing, which helps the filling set beautifully.
Kitchen tools that make the process easier
Before we get into ingredients, it helps to gather the few tools that make everything feel smooth and relaxed.
Tart pan: A 9 inch tart pan with a removable bottom makes unmolding much easier and gives you those clean fluted edges.
Mixing bowls: You will need a couple of bowls for the dough and the filling, which keeps the workflow tidy.
Saucepan: This is essential for cooking the lemon filling gently and evenly.
Whisk: A whisk helps you keep the filling smooth and lump free.
Rolling pin: This makes shaping the crust much easier and helps you get an even thickness.
Fine grater or zester: Fresh zest adds so much fragrance, so this tool is absolutely worth having ready.
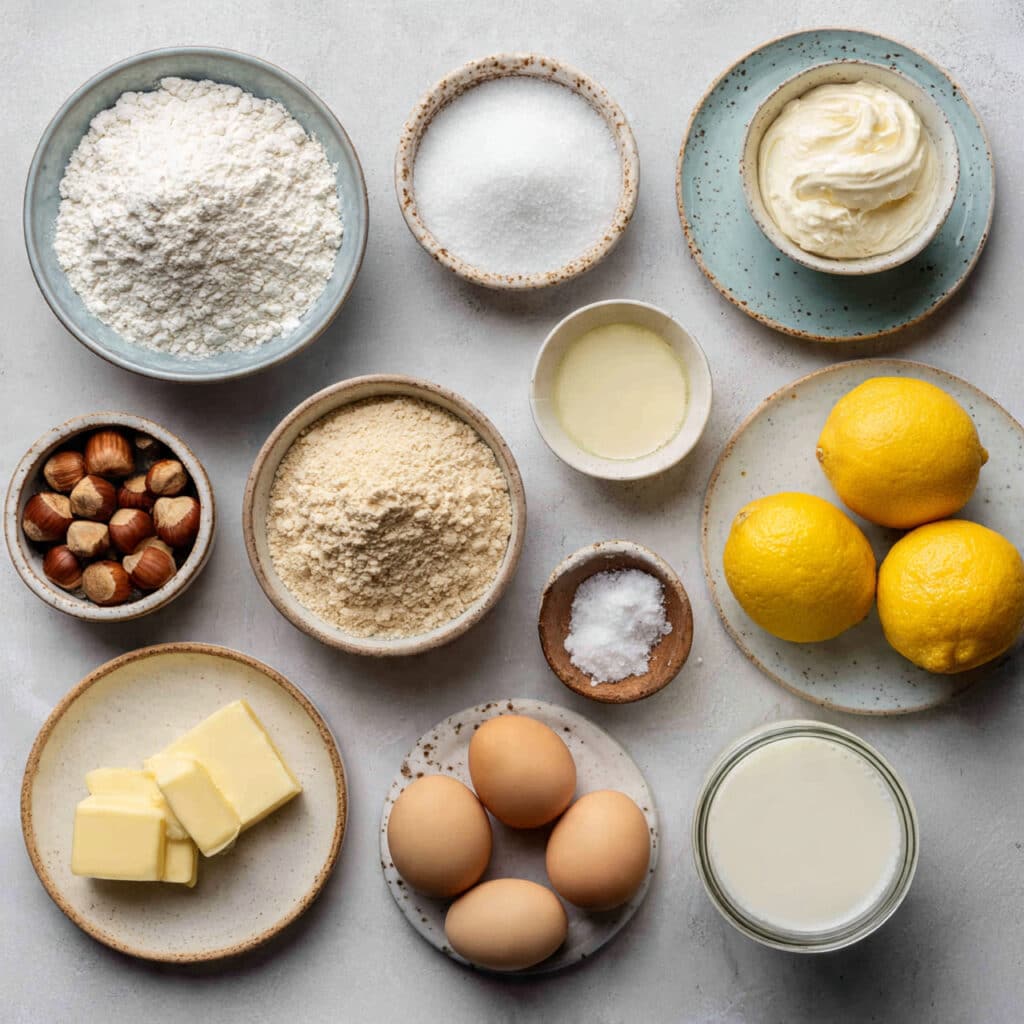
The ingredients that bring it all together
This is where the magic starts to feel real. Every ingredient has a job here, and together they create that lovely balance of buttery crust, bright filling, and toasted nutty finish.
- All-purpose flour: 180 g, this forms the base of the crust and gives it structure without making it heavy.
- Hazelnut flour: 50 g, this adds a delicate nutty richness that makes the crust taste more special.
- Powdered sugar: 60 g, it sweetens the crust gently and helps create a finer, more tender texture.
- Fine salt: 1 pinch, this sharpens the flavor of both the crust and filling in a subtle but important way.
- Unsalted butter: 120 g, cold and cubed for the crust, plus 80 g for the filling, this brings richness and that classic melt-in-the-mouth feel.
- Egg: 1 large, this helps bind the crust dough so it rolls out more easily.
- Granulated sugar: 150 g, this sweetens the lemon filling and balances its bright tartness.
- Lemons: 4 medium, for 120 ml fresh juice and 2 tablespoons zest, these are the heart of the dessert and give it its bold, fresh character.
- Eggs: 3 large, these thicken the filling and give it that silky custard-like finish.
- Heavy cream: 60 ml, this softens the lemon edge just enough and makes the filling extra smooth.
- Whole hazelnuts: 60 g, toasted and roughly chopped, these bring crunch and a roasted aroma that ties everything together.
Easy swaps if you need a flexible version
Sometimes you want the same beautiful result with a few pantry adjustments, and thankfully this tart is very adaptable.
Hazelnut flour: Almond flour.
Powdered sugar: Fine caster sugar for the crust, though the texture will be slightly less delicate.
Heavy cream: Crème fraîche or full-fat coconut cream for a different finish.
Whole hazelnuts: Sliced almonds or pistachios.
All-purpose flour: A good 1 to 1 gluten-free baking blend, if needed.
The ingredients that truly shape the flavor
A couple of ingredients really define the soul of this dessert, and they are worth a closer look.
Lemon: This is what gives the filling its sparkle. It brings sharpness, fragrance, and that clean finish that keeps the tart from feeling too rich.
Hazelnut: This adds warmth, toastiness, and a soft buttery nuttiness that makes the whole tart feel rounder and more complex.
Let’s bake it step by step
Now the fun part begins. Once you move through each stage, the tart comes together in a way that feels very satisfying, and each step builds on the one before it.
- Preheat Your Equipment: Preheat the oven to 180°C. Lightly grease a 9 inch tart pan with removable bottom and set it aside.
- Combine Ingredients: In a mixing bowl, combine the all-purpose flour, hazelnut flour, powdered sugar, and salt. Rub in 120 g cold cubed butter until the mixture looks like soft crumbs. Add 1 egg and mix just until a dough forms.
- Prepare Your Cooking Vessel: Roll the dough out between two sheets of parchment, then line the tart pan. Trim the edges neatly and chill the shell for 20 minutes. Prick the base with a fork, line with parchment, add baking weights, and blind bake for 15 minutes. Remove the weights and bake for 10 more minutes until lightly golden.
- Assemble the Dish: In a saucepan, whisk together the granulated sugar, lemon juice, lemon zest, 3 eggs, and heavy cream. Cook over medium to low heat, stirring constantly, until the mixture thickens enough to coat the back of a spoon.
- Cook to Perfection: Remove the pan from the heat and whisk in the remaining 80 g butter a little at a time until smooth and glossy. Pour the filling into the baked crust, then bake for 8 to 10 minutes, just until the filling is set with a slight wobble in the center.
- Finishing Touches: Let the tart cool completely, then chill for at least 2 hours. Top with toasted chopped hazelnuts just before serving for the best crunch.
- Serve and Enjoy: Slice cleanly with a sharp knife and serve chilled or lightly cool. Each bite should give you creamy lemon, crisp crust, and little bursts of toasted hazelnut.
The texture and flavor story in every bite
What makes this dessert feel so good is the contrast. The crust is buttery and slightly sandy in the best way, with the hazelnut flour giving it a soft nutty depth. Then the filling comes in silky and bright, with a citrus flavor that feels clean and lively rather than heavy.
As it chills, the flavors settle and become even more balanced. The lemon loses its sharp edge just enough, the butter rounds everything out, and the toasted hazelnuts bring a final crackly finish that keeps the whole tart interesting from first bite to last.
Helpful tricks for an even better bake
A few simple habits can make the process feel easier and the result even prettier.
- Chill the crust well: This helps prevent shrinking and keeps the edges neat.
- Strain the filling if needed: If you want an extra smooth finish, pass the lemon mixture through a fine sieve before pouring it into the shell.
- Toast the nuts carefully: Keep an eye on them, because hazelnuts go from golden to too dark very quickly.
- Slice with a warm knife: It gives you cleaner edges and a more polished look.
Mistakes worth avoiding for the best result
Even a lovely tart can run into little problems, but they are easy to prevent once you know what to watch for.
- Overworking the dough: This can make the crust tougher instead of tender. Mix just until it comes together.
- Cooking the filling on high heat: That can lead to scrambled bits instead of a smooth cream. Keep the heat gentle.
- Skipping the chill time: The tart needs time to set fully, so patience really pays off here.
- Adding hazelnuts too early: If they sit on the tart too long before serving, they can lose some crunch.
A quick look at the nutrition details
It is always nice to know what you are serving, especially when a dessert feels rich but balanced.
Servings: 8
Calories per serving: 365
Note: These are approximate values.
Timing so you can plan with ease
This is one of those desserts that feels very manageable once you see the timing laid out clearly.
Prep Time: 35 minutes
Cook Time: 35 minutes
Total Time: 1 hour 10 minutes, plus chilling time
Make-ahead and storage notes you will be glad to know
One of the nicest things about this tart is how well it fits into real life. You can make the crust a day ahead and keep it wrapped in the refrigerator, or you can bake the whole tart in advance and chill it overnight.
For storage, keep it covered in the refrigerator for up to 3 days. Add the toasted hazelnuts close to serving time if you want them to stay crisp. You can freeze the baked tart without the nut topping for up to 1 month, then thaw it in the refrigerator and finish it fresh.
Best ways to serve it beautifully
By the time this tart is chilled and ready, it already looks elegant, so serving can stay simple. A small slice goes wonderfully with coffee, black tea, or a softly whipped spoonful of cream on the side.
It also pairs beautifully with fresh berries if you want a little extra color on the plate. For a more polished dessert moment, a fine grating of lemon zest over the top right before serving makes it look bright and smell amazing.
Clever ideas for the leftovers
Leftovers rarely last long, but when they do, they can still feel exciting. A chilled slice with coffee the next day is honestly a treat all on its own.
You can also turn leftover slices into mini plated desserts by adding a spoonful of whipped cream and a few berries. Another fun idea is to crumble a small piece into a dessert glass with yogurt for a more casual, spoonable finish.
Extra details that make this recipe easier
Sometimes the little things are what make a bake feel smooth and successful from start to finish.
Use room temperature eggs for the filling so they blend more evenly. Zest the lemons before juicing them, because it is much easier that way. And when the filling thickens, keep whisking calmly and steadily rather than rushing, which helps it stay glossy and smooth.
Simple ways to make it look stunning
Presentation matters, especially with a tart this pretty. The glossy lemon surface already does a lot of the work, so you really only need a few finishing touches.
Scatter the toasted hazelnuts with a light hand so the top still looks refined. Keep the slices clean, and serve them on simple plates that let the pale yellow filling stand out. This one’s a total game-changer when it is served with a little confidence and a clean, sharp slice.
Variations that are worth trying next time
Once you make the base version, it becomes very tempting to play with the details.
- Add a meringue topping: Pipe or spoon a light meringue over the chilled tart and toast it gently for a more classic pâtisserie feel.
- Use lime instead of lemon: This gives the filling a slightly sharper, greener citrus note.
- Add orange zest: A little orange zest softens the lemon and makes the filling smell even more fragrant.
- Make mini tartlets: Divide the dough and filling into smaller tart pans for individual desserts.
- Fold praline into the topping: A spoonful of crushed praline mixed with the toasted hazelnuts adds extra crunch and sweetness.
FAQ’s
1. Can I make the crust ahead of time?
Yes, absolutely. You can prepare the dough a day in advance and keep it wrapped in the refrigerator until you are ready to roll and bake.
2. Can I use bottled lemon juice?
Fresh lemon juice is much better here. The flavor is brighter, cleaner, and more fragrant.
3. How do I know when the filling is set?
The center should still have a slight wobble when you remove it from the oven. It will continue to set as it cools and chills.
4. Can I use store-bought tart dough?
Yes, you can, especially if you are short on time. The homemade hazelnut crust adds more character, but a ready-made shell will still work.
5. Do I need to toast the hazelnuts?
It is highly recommended. Toasting deepens the flavor and makes the topping much more aromatic.
6. Can I freeze the tart?
Yes, freeze it without the hazelnut topping if possible. Thaw it in the refrigerator before serving.
7. Why did my filling turn grainy?
That usually happens when the heat is too high. Gentle cooking and constant stirring help keep it smooth.
8. Can I make it less tart?
Yes. Reduce the lemon juice slightly and increase the cream a little for a softer citrus flavor.
9. What is the best way to slice it cleanly?
Use a sharp knife dipped in warm water, then wipe it between cuts.
10. Can I serve it the same day?
Yes, but it is best after a full chill so the filling has time to firm up and the flavors can settle.
Conclusion
This tart brings together everything a good dessert should have, brightness, richness, texture, and that little bit of elegance that makes people pause after the first bite. It feels special without being difficult, and once you see how beautifully lemon and hazelnut work together, it is easy to come back to again and again. Trust me, you’re going to be very glad you made this one.
Print
Tarte citron noisettes
Description
A bright and elegant French-style tart with a buttery hazelnut crust, silky lemon filling, and a crisp topping of toasted hazelnuts.
Ingredients
- 180 g all-purpose flour
- 50 g hazelnut flour
- 60 g powdered sugar
- 1 pinch fine salt
- 200 g unsalted butter, divided
- 1 large egg
- 150 g granulated sugar
- 4 medium lemons, for 120 ml fresh juice and 2 tablespoons zest
- 3 large eggs
- 60 ml heavy cream
- 60 g whole hazelnuts, toasted and roughly chopped
Instructions
- Preheat the oven to 180°C and lightly grease a 9 inch tart pan with removable bottom.
- In a mixing bowl, combine the all-purpose flour, hazelnut flour, powdered sugar, and salt. Rub in 120 g cold cubed butter until the mixture resembles soft crumbs. Add 1 large egg and mix just until a dough forms.
- Roll the dough between two sheets of parchment, line the tart pan, trim the edges, and chill for 20 minutes. Prick the base with a fork, line with parchment, add baking weights, and blind bake for 15 minutes. Remove the weights and bake for 10 more minutes until lightly golden.
- In a saucepan, whisk together the granulated sugar, lemon juice, lemon zest, 3 large eggs, and heavy cream. Cook over medium to low heat, stirring constantly, until the mixture thickens enough to coat the back of a spoon.
- Remove from the heat and whisk in the remaining 80 g butter a little at a time until smooth and glossy.
- Pour the filling into the baked tart shell and bake for 8 to 10 minutes, just until the filling is set with a slight wobble in the center.
- Cool completely, then chill for at least 2 hours. Top with toasted chopped hazelnuts just before serving.
- Slice and serve chilled or lightly cool.
Notes
- Chill the dough well before baking to reduce shrinking.
- Use freshly squeezed lemon juice for the brightest flavor.
- Strain the filling before baking if you want an extra smooth texture.
- Add the hazelnuts close to serving time to keep them crunchy.