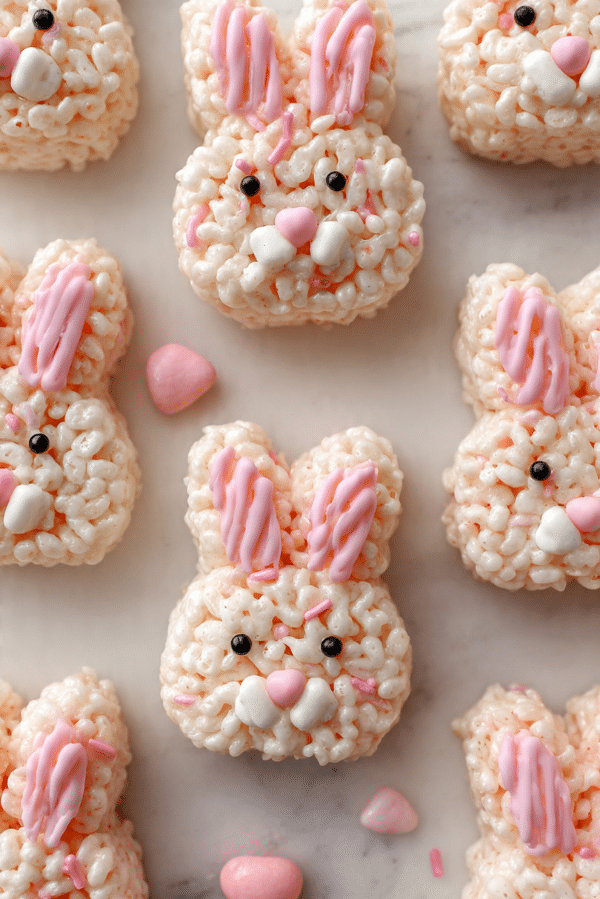
Bunny Rice Krispie Treats
There is something oddly comforting about the moment marshmallows start to melt, the whole kitchen smells like warm vanilla sugar, and you already know everyone is going to hover near the counter asking for “just one.” These bunny shaped treats are that kind of fun, simple, a little messy in the best way, and honestly pretty hard to stop eating once you start.
The kind of Easter treat that disappears fast
These are the treats I make when I want something cute without committing to baking, frosting, and washing a mountain of dishes. You get that classic chewy crisp bite, plus a quick candy melt drizzle that makes them look like they came from a fancy party table. Trust me, you’re going to love this, it is sweet, nostalgic, and just plain happy.
A little backstory behind marshmallow cereal treats
Marshmallow cereal treats have been a go to snack for decades because they are easy, dependable, and made with pantry staples. They really took off as a home kitchen favorite in the mid 1900s, and since then people have been cutting, shaping, dipping, and decorating them for every holiday you can think of. And now let’s dive into the bunny version, because turning a classic into something playful is half the fun.
Why you can count on this recipe every time
Versatile: You can keep them simple or go full craft mode with extra drizzle and sprinkles, and they still taste great.
Budget-Friendly: The base is just cereal, butter, and marshmallows, then a few decorations to make them pop.
Quick and Easy: No oven needed, just a quick melt and mix, then a short set time.
Customizable: Change the colors, swap sprinkles, or add a different face, and it still works.
Crowd-Pleasing: Kids love the bunny shapes, and adults secretly love them too.
Make-Ahead Friendly: They hold up well for parties, lunchboxes, and gifting.
Great for Leftovers: Extra shapes and scraps turn into snack bites fast.
Little chef tricks that make a big difference
Once you have the vibe of these down, they feel almost impossible to mess up, but a few small moves make them extra good.
- Keep the heat low: Marshmallows melt best gently, too much heat makes them stiff and sticky in a weird way.
- Butter your spoon and hands: A little butter on your spatula and fingertips keeps everything from clinging to you.
- Press lightly: Pack them enough to hold shape, but do not mash them flat, gentle pressing keeps them chewy.
- Cut when slightly warm: If you cut shapes while the slab is still a bit warm, your edges look cleaner.
- Let the drizzle set fully: Give the candy melts time to firm up so the decorations do not smear.
Kitchen tools that keep it simple
You do not need much, which is part of the charm, and now let’s get your setup ready.
Large pot or deep saucepan: Big enough to stir without cereal flying out.
Rubber spatula: Helps fold the cereal in gently and scrape every bit.
9×13 inch pan: Makes a nice even slab for cutting bunny shapes.
Parchment paper: Lifts out cleanly and makes shaping easier.
Bunny cookie cutter (about 3 inches): The easiest way to get that cute bunny outline.
Microwave safe bowls: For melting candy melts in quick bursts.
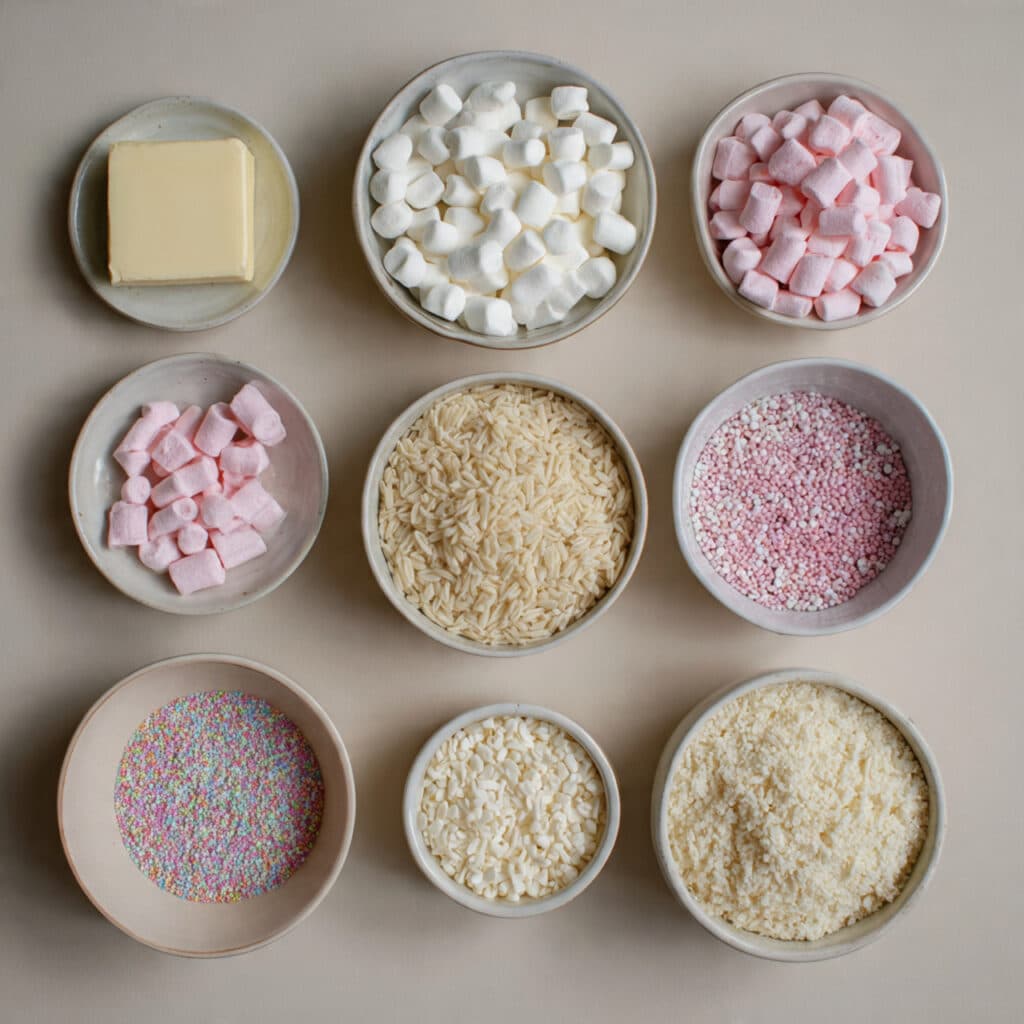
Ingredients you will need to make these bunnies
This is one of those ingredient lists that feels almost too simple, but the magic is in how they come together, buttery and toasty, sweet and crisp, with a little candy snap on top.
- Unsalted butter: 3 tablespoons, this gives richness and keeps the mixture soft.
- Mini vegetarian marshmallows: 10 ounces, they melt into the glue that makes everything chewy and sweet.
- Crispy rice cereal: 6 cups, this is the crunch that makes each bite light and snappy.
- White candy melts: 8 ounces, this becomes the glossy base drizzle and helps the eyes stick.
- Pink candy melts: 4 ounces, for a soft pastel drizzle that gives bunny energy fast.
- Candy eyes: 24 pieces, two per bunny, instantly adorable.
- Pastel sprinkles: 2 tablespoons, just enough sparkle and crunch without taking over.
Easy swaps if you need them
Sometimes you are working with what you have, and that is totally fine.
Unsalted butter: Use salted butter, then skip adding any extra salt anywhere else.
Mini vegetarian marshmallows: Any mini marshmallows work, but vegetarian labeled ones match the diet preference here.
Crispy rice cereal: Use any crisped rice cereal with a similar texture.
White candy melts: White chocolate chips can work, melt gently and stir often.
Pink candy melts: Use more white melts and tint with a tiny bit of pink oil based candy coloring.
Candy eyes: Tiny dots of set white candy melt with a dot of melted dark chocolate can stand in.
Pastel sprinkles: Swap in sanding sugar or nonpareils.
The ingredients that do the heavy lifting
Mini vegetarian marshmallows: They control the chew, the stretch, and the classic vanilla sweetness that makes these feel nostalgic.
Crispy rice cereal: This is where the light crunch comes from, and it keeps the treats from tasting too dense.
Let’s turn that gooey mix into bunny shapes
This is the part where it starts to feel like a little kitchen craft session, and let me tell you, it’s worth every bite.
- Preheat Your Equipment: Line a 9×13 inch pan with parchment paper and lightly butter the parchment. Set out your cookie cutter, and lightly butter the cutter too.
- Combine Ingredients: In a large pot over low heat, melt unsalted butter until it looks glossy. Add mini vegetarian marshmallows and stir until smooth and fully melted.
- Prepare Your Cooking Vessel: Turn off the heat. Add crispy rice cereal and fold gently until every piece is coated and shiny.
- Assemble the Dish: Scoop the mixture into the prepared pan. With lightly buttered hands or a buttered spatula, press it into an even layer, firm but not smashed.
- Cook to Perfection: Let the slab rest at room temperature for about 10 to 15 minutes, just until it is set enough to hold shape but still a little warm.
- Finishing Touches: Cut out 12 bunny shapes. Re press and cut scraps as needed. Melt white candy melts and pink candy melts in separate microwave safe bowls in 20 second bursts, stirring each time until smooth. Drizzle over the bunnies, then add candy eyes and a pinch of pastel sprinkles while the drizzle is still tacky.
- Serve and Enjoy: Let the decorations set for about 10 minutes, then serve on a platter and watch them vanish.
How the texture and flavor come together
The first bite is all about contrast, a soft chewy pull from the marshmallow layer, then that crisp snap from the cereal that keeps it light. The butter adds a gentle richness, almost like a toasted note, and the candy melt drizzle gives a sweet little crackle on top. When you add sprinkles, you get tiny pops of crunch that make each bite feel playful instead of plain.
Helpful tips that make it even easier
You are already set up for success, but these little tweaks help on busy days.
- Warm cutter trick: If your cookie cutter sticks, dip it in warm water, dry it, and butter it lightly again.
- Cleaner drizzles: Use a spoon or a small zip bag with the corner snipped for neat lines.
- Even set time: Let them set in a cool room, not the fridge, so they stay soft instead of turning tough.
What to avoid so they stay soft and cute
A few common mistakes can make them harder than you want, but they are easy to dodge.
- Overheating the marshmallows: Keep heat low, high heat makes the texture rubbery.
- Pressing too hard: Heavy pressing packs out the air, and the treats get dense.
- Decorating too late: Add eyes and sprinkles while the candy drizzle is still wet, otherwise they will not stick well.
- Letting the slab fully cool before cutting: If it gets too firm, the shapes can crack around the edges.
Nutrition Facts that help you plan
Servings: 12
Calories per serving: 190
Note: These are approximate values.
Preparation Time
Prep Time: 25 minutes
Cook Time: 10 minutes
Total Time: 35 minutes
Make-Ahead and Storage Tips
These are great for making ahead because they hold their shape and stay fun. If you are prepping for a party, decorate them, let them set, then store them in a single layer in an airtight container.
To store, keep at room temperature for up to 3 days, with parchment between layers so the drizzle does not stick. For freezing, wrap each bunny tightly, then place in a freezer safe container for up to 6 weeks. To thaw, leave at room temperature for about an hour, no microwave needed unless you want them slightly softer.
How to serve them so they look extra festive
Pile them on a platter with pastel napkins, or tuck them into little treat bags for gifting. They are also adorable on top of a dessert table next to fruit, hot chocolate, or a bowl of jelly beans for color. If you want a cute brunch moment, serve them after a simple breakfast and watch everyone smile.
Creative leftover transformations
If you have scraps from cutting shapes, do not toss them. Roll them into bite size balls and drizzle with leftover candy melts. You can also press scraps into mini muffin cups for quick snack bites, then top with sprinkles.
Additional Tips
If your candy melts feel thick, warm them again in short bursts and stir well, patience is the secret. Also, keep a damp towel nearby, quick wipe ups save your counter from becoming a sticky candy zone. And now let’s talk about making them look like a bakery display.
Make It a Showstopper
Use two drizzle colors and let them overlap slightly for that layered look. Add eyes in the same spot on every bunny so the tray looks tidy and intentional. If you want extra detail without extra work, sprinkle a tiny line of pastel sprinkles across the drizzle, it looks fancy but takes seconds.
Variations to Try
- Coconut bunny sprinkle: Add 1 tablespoon extra sprinkles and swap half the sprinkles for shredded coconut on top.
- Chocolate ear drizzle: Keep the base drizzle white, then add a thin chocolate tinted drizzle just on the ears.
- Confetti party bunnies: Use rainbow sprinkles instead of pastel, perfect for birthdays.
- Strawberry vibe: Add a drop of strawberry flavoring to the melted pink candy melts for a candy shop aroma.
- Mini bunny bites: Skip the cutter, roll small ovals by hand, then pinch the tops into tiny ears.
FAQ’s
1. Can I make these without a cookie cutter?
Yes, you can shape ovals by hand, then pinch two little ear bumps at the top while the mixture is still warm.
2. Why did my treats turn out hard?
Usually it is from overheating the marshmallows or pressing the mixture too firmly into the pan.
3. Can I use regular marshmallows instead of mini?
Yes, use the same weight, 10 ounces, and just give them a little more time to melt.
4. Do I have to use vegetarian marshmallows?
No, but if you want to keep the recipe vegetarian, choose marshmallows labeled vegetarian.
5. How do I keep the cutter from sticking?
Butter it lightly, and if needed, dip it in warm water, dry it, and butter again.
6. Can I tint the white candy melts pink instead of buying pink?
Yes, use oil based candy coloring, and add a tiny amount at a time until you like the shade.
7. How far ahead can I make them for a party?
They are best within 1 to 2 days, but they stay good up to 3 days in an airtight container.
8. Can I freeze them after decorating?
Yes, wrap each one well and freeze up to 6 weeks, then thaw at room temperature.
9. What if my candy melt drizzle looks clumpy?
It usually needs a bit more gentle warming and stirring, microwave in short bursts and mix well.
10. How many does this recipe make?
You should get about 12 bunnies with a 3 inch cutter, depending on how efficiently you re cut the scraps.
Conclusion
If you want a sweet little project that feels festive without being fussy, this is the one. You get that classic chewy crunch, a cute bunny shape, and a drizzle that makes them look party ready. This one’s a total game-changer for spring gatherings, and once you see how easy it is, you will want to make them again and again.
Print
Bunny Rice Krispie Treats
- Total Time: 35 minutes
- Yield: 12 bunnies
- Diet: Vegetarian
Description
Chewy, nostalgic cereal treats cut into bunny shapes and finished with a simple candy melt drizzle, candy eyes, and pastel sprinkles for an easy spring themed dessert.
Ingredients
- Unsalted butter, 3 tablespoons
- Mini vegetarian marshmallows, 10 ounces
- Crispy rice cereal, 6 cups
- White candy melts, 8 ounces
- Pink candy melts, 4 ounces
- Candy eyes, 24 pieces
- Pastel sprinkles, 2 tablespoons
Instructions
- Line a 9×13 inch pan with parchment paper and lightly butter the parchment. Lightly butter a bunny cookie cutter.
- Melt the butter in a large pot over low heat until glossy.
- Add the mini vegetarian marshmallows and stir until completely melted and smooth.
- Turn off the heat, add the crispy rice cereal, and fold gently until evenly coated.
- Press the mixture into the prepared pan in an even layer, firm but not packed.
- Let set at room temperature for 10 to 15 minutes until it holds shape but is still slightly warm.
- Cut out about 12 bunny shapes, then re press and cut scraps as needed.
- Melt the white candy melts and pink candy melts in separate microwave safe bowls in 20 second bursts, stirring each time until smooth.
- Drizzle the melted candy over the bunnies, then add candy eyes and pastel sprinkles while the drizzle is still wet.
- Let set for about 10 minutes, then serve.
Notes
- Keep heat low when melting marshmallows so the treats stay soft and chewy.
- Butter your spatula and hands to prevent sticking when pressing the mixture into the pan.
- Add eyes and sprinkles right after drizzling so they stick before the candy sets.
- Store in an airtight container at room temperature for up to 3 days with parchment between layers.
- Prep Time: 25 minutes
- Cook Time: 10 minutes
- Category: Dessert
- Method: No-Bake
- Cuisine: American
Nutrition
- Serving Size: 1 bunny
- Calories: 190
- Sugar: 18 g
- Sodium: 95 mg
- Fat: 6 g
- Saturated Fat: 4 g
- Unsaturated Fat: 2 g
- Trans Fat: 0 g
- Carbohydrates: 32 g
- Fiber: 0 g
- Protein: 1 g
- Cholesterol: 15 mg