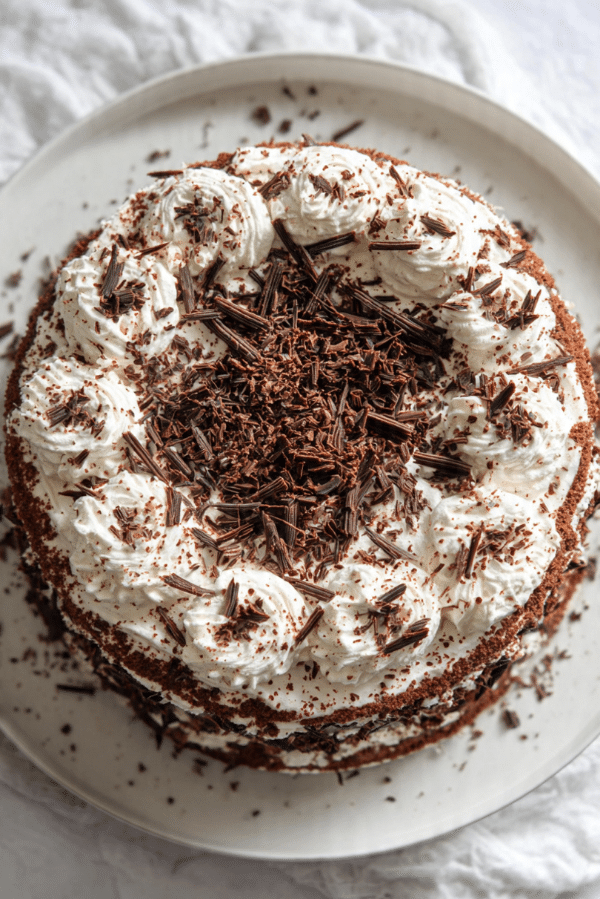
Choc Ripple Cake
There’s something undeniably magical about a dessert that looks fancy but takes barely any effort. That’s where the beloved Choc Ripple Cake comes in. This Aussie favorite is a no-bake wonder that transforms humble ingredients into something that tastes like you spent hours in the kitchen. With every bite, you get creamy whipped goodness soaked into chocolate biscuits, finished off with a sprinkle of chocolate shavings. Trust me, you’re going to love this one.
Behind the Recipe
This cake takes me straight back to hot summer afternoons at my grandmother’s house. She’d whip it up early in the day, slide it into the fridge, and by dessert time, it was soft, sweet perfection. It’s one of those nostalgic treats that brings everyone to the table with a smile, no matter how old you are. And the best part? It’s impossible to mess up.
Recipe Origin or Trivia
The Choc Ripple Cake is a true Australian classic, known for its simplicity and no-bake style. It first gained popularity when Arnott’s released their iconic Choc Ripple biscuits, and it’s been a holiday and party staple ever since. It’s actually a riff on the classic American icebox cake, which uses layered cookies and cream that chill into a soft, cake-like texture.
Why You’ll Love Choc Ripple Cake
This cake checks all the boxes, and here’s why:
Versatile: Dress it up with berries, nuts, or flavored liqueur-free syrups.
Budget-Friendly: Just a handful of ingredients you can grab at any supermarket.
Quick and Easy: No baking, no fuss. Just layer, chill, and serve.
Customizable: Add a twist with caramel drizzle or a flavored whipped cream.
Crowd-Pleasing: Everyone loves it. Kids and adults alike.
Make-Ahead Friendly: It’s actually better the next day after chilling overnight.
Great for Leftovers: Stores beautifully and tastes even better on day two.
Chef’s Pro Tips for Perfect Results
If you want your Choc Ripple Cake to turn out dreamy every time, here are a few of my go-to tips:
- Use cold thickened cream so it whips up faster and holds its shape better.
- Don’t skip the overnight chill — it’s what gives the biscuits that cake-like texture.
- Add a little vanilla extract to the cream for a subtle boost of flavor.
- Line the serving platter with a smear of cream to hold the biscuits in place.
- Use a serrated knife for the cleanest slice without squishing the layers.
Kitchen Tools You’ll Need
Making this beauty doesn’t require much. Just a few basics:
Mixing bowl: For whipping up your cream.
Electric hand mixer or stand mixer: Makes whipping cream a breeze.
Spatula: For smooth and even layering.
Serving platter: Flat and long is ideal for assembling the log shape.
Knife: For slicing clean portions.
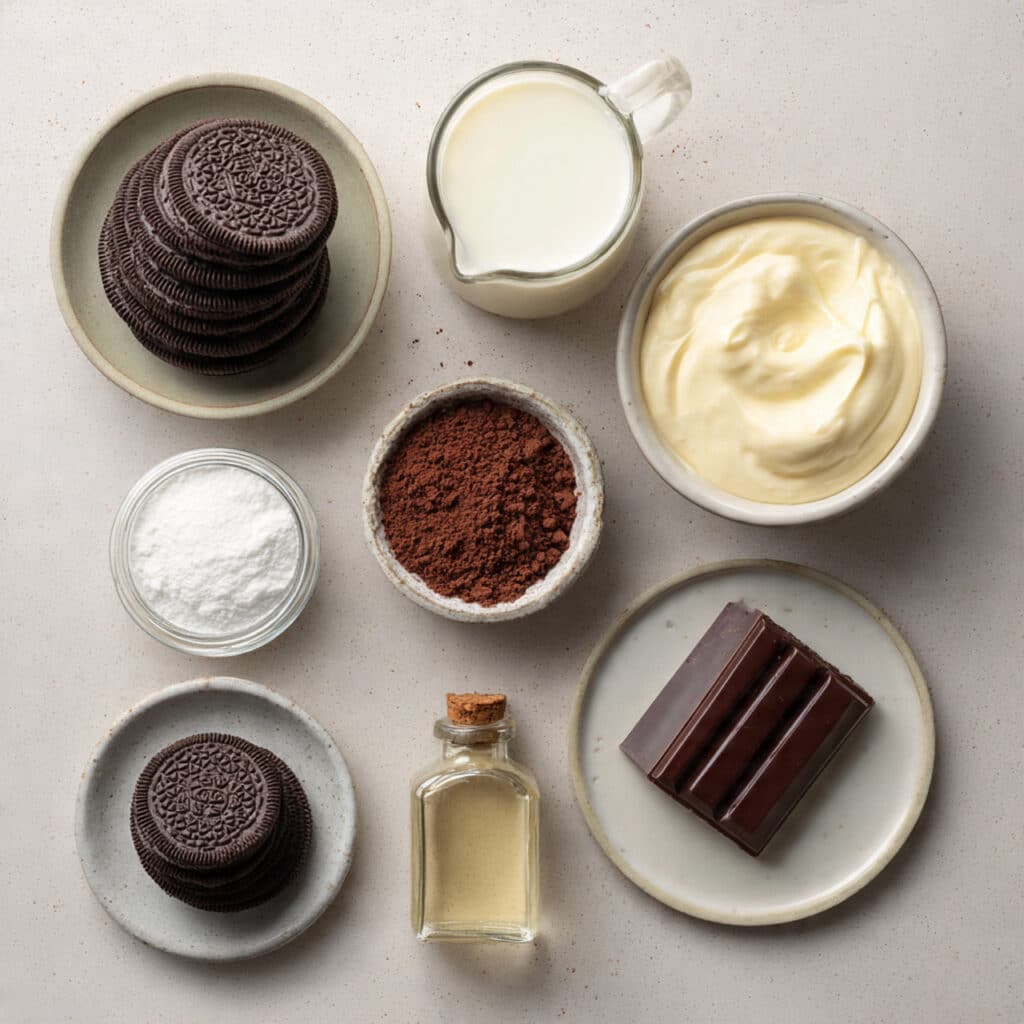
Ingredients in Choc Ripple Cake
This recipe is all about making magic with just a few simple ingredients that come together beautifully.
- Choc Ripple Biscuits: 250g – These are the star of the show. Their crisp texture softens into a cake-like consistency.
- Thickened Cream: 600ml – Whipped until soft peaks form. It holds everything together and adds that luscious creaminess.
- Powdered Sugar: 2 tablespoons – Sweetens the whipped cream just enough.
- Vanilla Extract: 1 teaspoon – Adds a warm, aromatic note to the cream.
- Dark Chocolate Shavings: To garnish – For that elegant, chocolatey finish.
Ingredient Substitutions
Want to switch it up a bit? No problem.
Choc Ripple Biscuits: Use any crisp chocolate cookie you like.
Thickened Cream: Heavy whipping cream works just as well.
Powdered Sugar: Swap with honey or maple syrup for a natural touch.
Vanilla Extract: Try almond or orange extract for a twist.
Chocolate Shavings: Use crushed chocolate bars or cocoa powder.
Ingredient Spotlight
Choc Ripple Biscuits: These crunchy, cocoa-rich biscuits are the heart of the cake. They soften into layers of cakey goodness when paired with whipped cream.
Thickened Cream: The rich, velvety glue that brings the whole dessert together. Whipped to perfection, it turns the cake into a cloud of sweet indulgence.
Instructions for Making Choc Ripple Cake
Here’s where the fun begins. This cake is as easy as it is rewarding. Just follow the steps and let the fridge do the magic.
-
Preheat Your Equipment:
Chill your mixing bowl and beaters in the fridge for 10–15 minutes to help the cream whip faster. -
Combine Ingredients:
In the chilled bowl, beat the thickened cream, powdered sugar, and vanilla extract until soft peaks form. -
Prepare Your Cooking Vessel:
Choose a flat serving platter and smear a little whipped cream down the center to act as a base. -
Assemble the Dish:
Spread a spoonful of whipped cream between each biscuit and stack them upright to form a log. Cover the entire log generously with the remaining whipped cream. -
Cook to Perfection:
No cooking needed, but this step is crucial — refrigerate the cake overnight (at least 6 hours) to allow the biscuits to soften. -
Finishing Touches:
Just before serving, top with dark chocolate shavings for a touch of flair and extra decadence. -
Serve and Enjoy:
Slice the cake at a diagonal angle to reveal those beautiful layers, and watch everyone’s eyes light up.
Texture & Flavor Secrets
This cake is all about contrast. The biscuits, once crunchy, soak up the cream and become soft and cake-like. The whipped cream stays light and fluffy, wrapping each bite in rich, velvety comfort. Add a sprinkle of chocolate shavings, and you’ve got melt-in-your-mouth bliss.
Cooking Tips & Tricks
Here are a few things to keep in mind:
- Don’t overwhip the cream. Stop at soft peaks to keep the texture light.
- Chill longer for better flavor and structure.
- Add a swirl of caramel or chocolate sauce to the cream if you’re feeling fancy.
What to Avoid
A little care goes a long way. Here’s what to steer clear of:
- Overwhipping the cream, which can turn it grainy.
- Using cookies that are too soft to start with — they won’t hold the structure.
- Skipping the chill time. This dessert needs time to come together.
Nutrition Facts
Servings: 8
Calories per serving: 360
Note: These are approximate values.
Preparation Time
Prep Time: 20 minutes
Cook Time: 0 minutes
Total Time: 6 hours 20 minutes (including chill time)
Make-Ahead and Storage Tips
This dessert was made for prepping ahead. In fact, the longer it chills, the better it gets. Store leftovers in the fridge, covered, for up to 3 days. It also freezes surprisingly well. Just wrap slices tightly and freeze for up to 2 weeks. Thaw in the fridge overnight before serving.
How to Serve Choc Ripple Cake
Cut diagonally to show off the ripple effect. Add fresh raspberries or strawberries on top for a fruity pop. Pair with a cup of coffee, or if you’re feeling indulgent, a scoop of vanilla ice cream.
Creative Leftover Transformations
Have a bit left over? Don’t waste it.
- Crumble slices into a parfait glass with berries and extra cream.
- Blend into a milkshake for a chocolaty, creamy treat.
- Serve over pancakes for a dessert-style brunch twist.
Additional Tips
- Add a dusting of cocoa or instant coffee powder for extra depth.
- Use flavored cream or add a little citrus zest to brighten it up.
- Chill your platter too — helps the cake stay cool longer when serving.
Make It a Showstopper
Use a cake stand or long serving board to give it that bakery-style look. Garnish with fresh berries, mint leaves, or even edible flowers. A drizzle of dark chocolate on top adds drama and elegance.
Variations to Try
- Berry Ripple Cake: Add sliced strawberries or raspberries between layers.
- Caramel Swirl: Drizzle caramel sauce through the whipped cream.
- Mint Choc Version: Use peppermint extract and a sprinkle of crushed mint chocolate.
- Nutty Delight: Add crushed hazelnuts or almonds for crunch.
- Tiramisu Style: Use coffee-soaked biscuits and mascarpone cream.
FAQ’s
Q1: Can I make this without Choc Ripple biscuits?
Yes, you can substitute with any firm chocolate cookies that soften well.
Q2: How long does it need to chill?
At least 6 hours, but overnight is best for full flavor and texture.
Q3: Can I use store-bought whipped cream?
Freshly whipped is better, but store-bought works in a pinch.
Q4: Can this be made gluten-free?
Yes, just use gluten-free chocolate biscuits.
Q5: Can I add fruits inside the cake?
Definitely. Thinly sliced strawberries or raspberries work great.
Q6: Is this cake freezer-friendly?
Yes. Wrap tightly and freeze slices for up to 2 weeks.
Q7: What’s the best way to cut the cake?
Use a serrated knife and slice diagonally to show the layers.
Q8: Can I make it ahead of time?
Absolutely. It’s even better the next day.
Q9: What cream should I use?
Thickened cream or heavy whipping cream is ideal.
Q10: Can kids help make this?
Yes! It’s a perfect, mess-friendly recipe for little hands.
Conclusion
If you’re looking for a no-fuss dessert that looks impressive, tastes amazing, and makes everyone happy, Choc Ripple Cake is it. With just a few ingredients and a little chill time, you’ll have a sweet, creamy showstopper ready to wow. Give it a go and let this timeless favorite become part of your family’s dessert story too.
Print
Choc Ripple Cake
Description
A no-bake Australian classic made with whipped cream and chocolate ripple biscuits. Choc Ripple Cake is a chilled dessert that softens into layers of creamy, chocolatey delight.
Ingredients
- 250g Choc Ripple Biscuits
- 600ml Thickened Cream
- 2 tablespoons Powdered Sugar
- 1 teaspoon Vanilla Extract
- Dark Chocolate Shavings (to garnish)
Instructions
- Chill your mixing bowl and beaters in the fridge for 10–15 minutes.
- In the chilled bowl, whip the thickened cream with powdered sugar and vanilla extract until soft peaks form.
- Spread a small amount of cream on your serving platter to secure the base.
- Spread cream between each biscuit and stack upright into a log shape on the platter.
- Cover the entire log with the remaining whipped cream.
- Refrigerate the cake for at least 6 hours or overnight for best results.
- Before serving, garnish with chocolate shavings and slice diagonally to reveal the ripple effect.
Notes
- Use cold cream for faster whipping and better structure.
- Chill overnight to allow biscuits to soften perfectly.
- Add fresh berries or flavored extracts for a unique twist.