Greek Yogurt Japanese Cheesecake Ice Cream
The first spoonful of this dessert feels like something between a cloud-like cheesecake and the creamiest frozen treat you keep sneaking out of the freezer. It has that gentle tang from Greek yogurt, the rich silkiness of cream cheese, and the bright little lift of lemon that makes every bite feel light even though it tastes wonderfully indulgent. Trust me, you’re going to love this, because it gives you that bakery-style cheesecake feeling in a cold, scoopable form that feels special without being fussy.
Why This Frozen Dessert Feels So Special
There is something instantly charming about a dessert that tastes elegant but is secretly very easy to make. This one brings together a soft cheesecake flavor and the refreshing finish of homemade ice cream, which makes it the kind of recipe you remember after the first bite.
The texture is what really wins people over. It is creamy, light, and smooth, with a gentle melt that feels almost mousse-like on the tongue. Let me tell you, it’s worth every bite, especially when you want something sweet that feels homemade and a little different from the usual freezer dessert.
A Little Story Behind the Flavor Inspiration
Before we get into the practical side, it helps to know why this dessert tastes the way it does. Japanese cheesecake is known for its delicate texture, subtle richness, and soft tang rather than the dense heaviness of some classic cheesecakes. That is exactly the mood this frozen version borrows.
Instead of baking a tall cake, we turn those familiar flavors into a no-churn scoopable dessert. Greek yogurt brings brightness and body, cream cheese gives that unmistakable cheesecake character, and lemon adds the gentle freshness that keeps everything tasting balanced. So while this is not the traditional baked cake itself, it absolutely captures the spirit that makes that style so lovable.
Why This Recipe Earns a Spot in Your Freezer
This is where the charm of the recipe becomes even clearer. Once you see how flexible and friendly it is, you will want to keep it in your back pocket all year long.
Versatile: You can serve it in bowls, scoop it onto cones, or dress it up with berries for a dinner-party dessert that looks far fancier than the effort involved.
Budget-Friendly: The ingredient list is short and built from easy-to-find staples, which means you get a luxurious result without chasing specialty items.
Quick and Easy: The actual hands-on prep is simple and straightforward, and the freezer does most of the work for you.
Customizable: A little extra lemon zest, a touch more vanilla, or even a berry swirl can make the final flavor feel a little more personal.
Crowd-Pleasing: It has that familiar cheesecake comfort, but the frozen texture makes it feel fresh and exciting for nearly everyone at the table.
Make-Ahead Friendly: This one is a total game-changer when you want dessert ready before guests arrive, because it waits patiently in the freezer until serving time.
Great for Leftovers: The flavor stays lovely for days, and even a small scoop is satisfying enough to feel like a real treat.
Smart Tips Before You Start Scooping and Folding
A few little choices make a big difference here, and now let dive to the details that help this dessert turn out beautifully the first time.
- Use full-fat dairy: The richer the yogurt and cream cheese, the smoother and creamier the final texture will be.
- Soften the cream cheese properly: If it is still cold and firm, it will not blend as smoothly and can leave tiny lumps behind.
- Whip the cream to soft peaks: You want structure and air, but not a stiff grainy texture.
- Chill the container before filling it: A cold loaf pan or freezer-safe tub helps the mixture begin setting faster.
- Press parchment against the surface if needed: This helps reduce ice crystals and keeps the top looking neat.
Kitchen Tools That Make It Easy
You really do not need a complicated setup here, which is one more reason this recipe feels so approachable.
Mixing bowl: You will need at least two, one for the cheesecake base and one for whipping the cream.
Hand mixer or stand mixer: This gives the mixture the smoothness and lightness that makes the texture feel so luxurious.
Rubber spatula: Perfect for folding the whipped cream gently into the base without knocking out all that lovely air.
Microplane or fine grater: This helps you get delicate lemon zest without any bitter white pith.
Freezer-safe loaf pan or container: A loaf pan works beautifully for freezing and scooping, especially when lined with parchment.
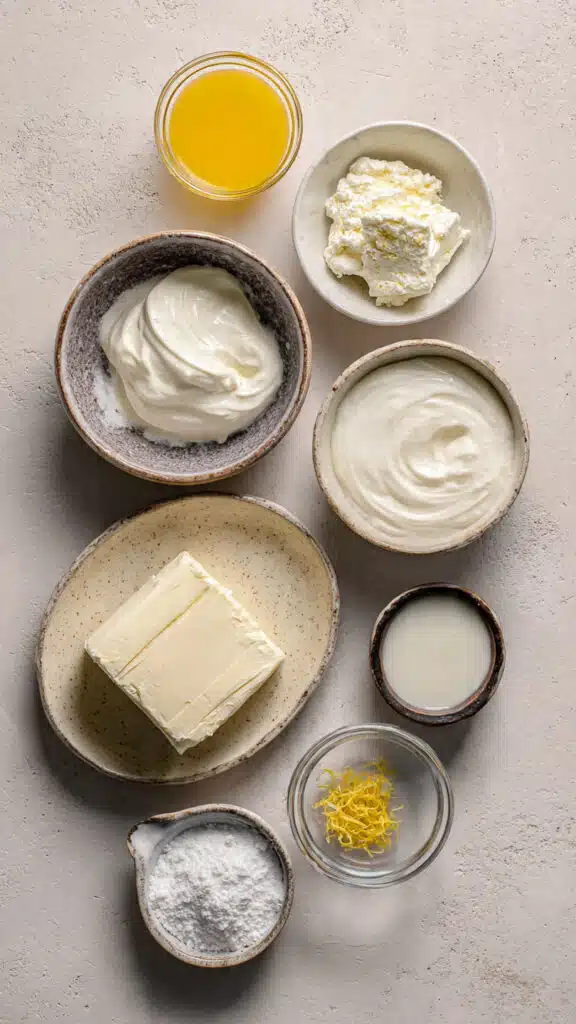
The Ingredients That Build All That Creamy Magic
Now the fun part begins, because each ingredient has a very clear role in creating that soft cheesecake flavor and velvety frozen finish.
- Plain full-fat Greek yogurt: 2 cups. This brings tang, creaminess, and that fresh cheesecake-style brightness.
- Cream cheese: 8 ounces, softened. This gives the dessert its rich body and unmistakable cheesecake character.
- Sweetened condensed milk: 3/4 cup. It sweetens the base while helping the texture stay smoother in the freezer.
- Heavy cream: 1 cup, cold. This gets whipped and folded in, which adds airiness and creates that soft, dreamy scoop.
- Fresh lemon juice: 2 tablespoons. It sharpens the flavor and keeps the richness from feeling too heavy.
- Lemon zest: 1 teaspoon, finely grated. This adds fragrant citrus notes that echo the bright flavor of a delicate cheesecake.
- Vanilla extract: 1 teaspoon. A little vanilla rounds everything out and gives the dessert a warm, bakery-style finish.
- Fine salt: 1/4 teaspoon. Just enough to wake up the sweetness and deepen the dairy flavors.
Easy Swaps When You Need Them
Even with a simple ingredient list, it is nice to know you have options. Here are a few good substitutions that still keep the dessert balanced and delicious.
Greek yogurt: Mascarpone-style yogurt or another thick plain yogurt.
Cream cheese: Neufchâtel cheese.
Sweetened condensed milk: 1/2 cup granulated sugar plus 2 tablespoons whole milk, beaten in until dissolved.
Heavy cream: Whipping cream.
Lemon juice: Fresh yuzu juice or a mild lime juice for a slightly different citrus edge.
Vanilla extract: Vanilla bean paste.
The Ingredients That Truly Define the Flavor
A couple of ingredients do most of the personality work in this dessert, and they deserve a little spotlight.
Greek yogurt: This is what gives the dessert its clean tang and keeps the flavor from tasting flat or overly rich.
Cream cheese: This is the backbone of the cheesecake impression, adding depth, body, and that smooth luxurious finish.
Let’s Make It Step by Step
This part is simple, satisfying, and actually pretty fun. Once you see how quickly the mixture comes together, you will understand why this dessert feels so rewarding for such little effort.
- Preheat Your Equipment: Place your freezer-safe loaf pan or container in the freezer while you prepare the mixture. If you like, line it with parchment for easier scooping later.
- Combine Ingredients: In a large bowl, beat the softened cream cheese until smooth. Add the Greek yogurt, sweetened condensed milk, lemon juice, lemon zest, vanilla extract, and fine salt. Mix until the base looks glossy, creamy, and completely blended.
- Prepare Your Cooking Vessel: Take your chilled loaf pan or container out of the freezer and set it nearby so it is ready the moment your mixture is finished.
- Assemble the Dish: In a separate bowl, whip the cold heavy cream to soft peaks. Gently fold the whipped cream into the cheesecake mixture in two or three additions, using a spatula so you keep the texture light and airy.
- Cook to Perfection: Spoon the mixture into the chilled container and smooth the top. Cover well and freeze for 6 hours, or until firm but still scoopable.
- Finishing Touches: Let the container sit at room temperature for 5 to 8 minutes before scooping. This softens it just enough for that perfect creamy texture.
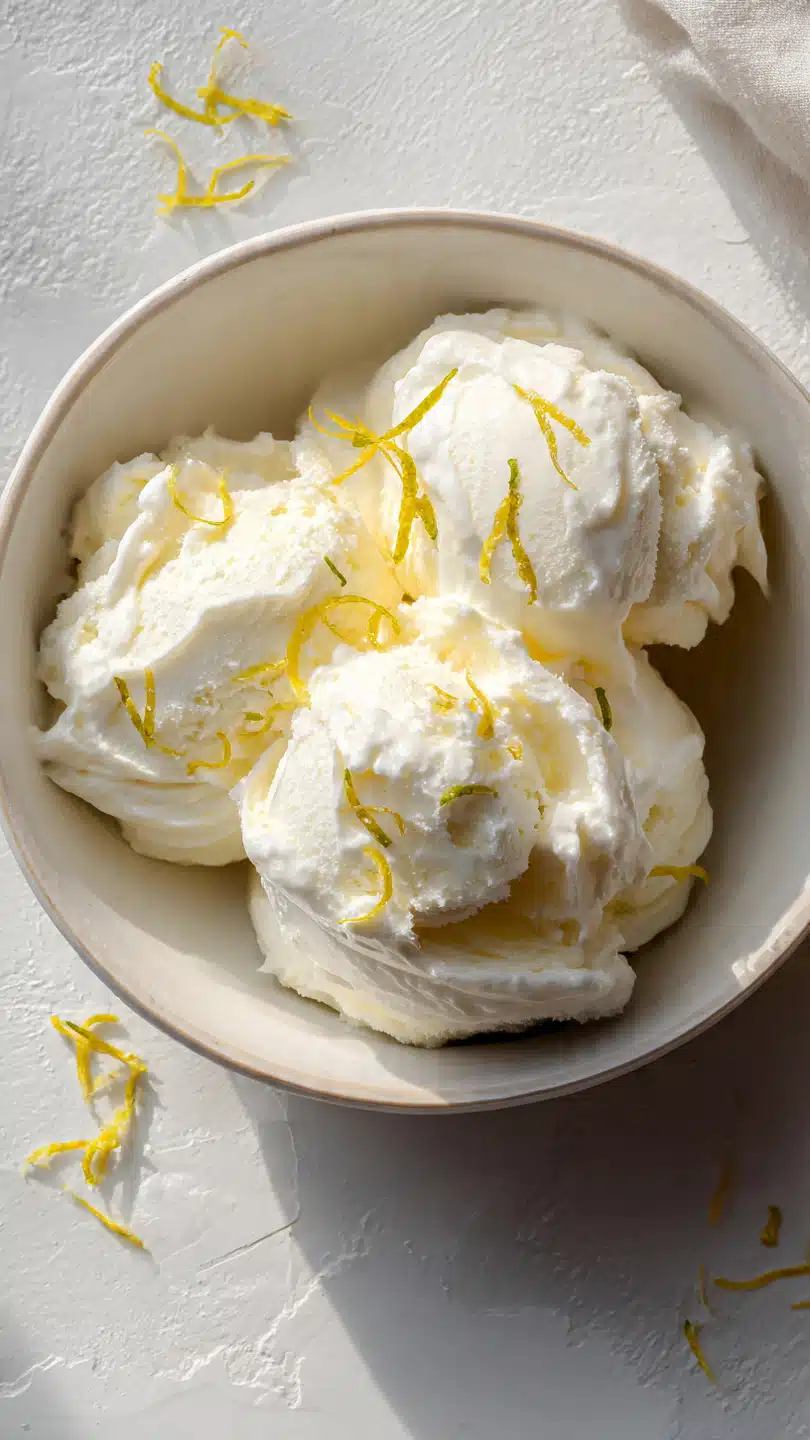
- Serve and Enjoy: Scoop into chilled bowls and finish with a tiny pinch of lemon zest if you want a fresh, elegant touch.
The Texture and Flavor Payoff
What makes this dessert so memorable is the way the texture changes as it melts. At first it feels firm and creamy, then it softens into something almost mousse-like, with a smooth finish that coats the spoon beautifully.
Flavor-wise, the cream cheese gives it richness, the yogurt adds a clean tang, and the lemon keeps the whole thing bright. Vanilla ties everything together so the final spoonful tastes delicate, balanced, and quietly luxurious rather than overly sweet.
A Few Tips That Make It Even Better
Once you have the basics down, these little tricks can make the result even more polished.
- Tip: Chill your mixing bowl before whipping the cream, because cold equipment helps it whip faster and hold better texture.
- Tip: Fold gently and patiently, which keeps the mixture airy instead of dense.
- Tip: Taste the base before freezing, so you can adjust the lemon or vanilla to match your preference.
- Tip: Use a warm scoop for extra smooth serving if the dessert has frozen a little more firmly overnight.
Common Slip-Ups and How to Avoid Them
Even easy desserts have a few tiny trouble spots, but luckily they are very easy to dodge.
- Too many lumps: This usually means the cream cheese was not soft enough. Let it warm up fully before mixing.
- Dense texture: Overmixing after adding whipped cream can knock out the air. Fold just until blended.
- Too icy: Using low-fat dairy can make the texture firmer and less creamy, so richer ingredients help a lot.
- Hard-to-scoop ice cream: Let it rest briefly at room temperature before serving instead of forcing the scoop through it.
Nutrition Snapshot at a Glance
This dessert feels indulgent, but the portions are satisfying and manageable, which is always nice when you want something rich without going overboard.
Servings: 8
Calories per serving: 255
Note: These are approximate values.
Time You’ll Want to Plan For
The active prep is refreshingly short, and then the freezer quietly takes over from there.
Prep Time: 20 minutes
Cook Time: 6 hours
Total Time: 6 hours 20 minutes
Make-Ahead and Storage Tips That Really Help
This recipe was practically made for planning ahead. You can prepare it the day before you need it, which makes entertaining or weekend dessert prep feel much easier.
Store it tightly covered in the freezer for up to 1 week for the freshest texture. If you want to freeze it longer, press a layer of parchment or plastic wrap directly against the surface before covering. For serving, let it sit out for a few minutes so it softens slightly. That little pause makes a big difference in scoopability and texture.
My Favorite Ways to Serve It
Serving is where you can make this feel casual or a little fancy, depending on the moment. A simple bowl and spoon already feels lovely, but a few small touches can make it feel restaurant-worthy.
Try it with fresh strawberries, blueberries, or thin slices of ripe peach. A few crushed plain cookies on top add contrast without overwhelming the delicate flavor. It is also wonderful beside a hot cup of coffee or green tea, which makes the creamy chill of the dessert stand out even more.
Clever Ways to Reinvent the Leftovers
If you happen to have leftovers, which is never guaranteed around a good dessert, you can turn them into something new very easily.
Scoop it between two soft cookies for quick ice cream sandwiches. Spread a softened scoop over a slice of pound cake for a frozen cheesecake-style dessert plate. You can also blend a scoop with a splash of milk for a thick milkshake that tastes like a creamy citrus cheesecake in a glass.
A Few Extra Notes for the Best Result
Sometimes it is the little things that turn a good dessert into one you genuinely crave again next week.
Use fresh lemon rather than bottled juice if possible, because the flavor comes through more clearly. Keep the zest fine and light, since large pieces can distract from the smoothness. And do not rush the softening step before scooping, because those few minutes give you the silkiest texture.
How to Make It Look Extra Beautiful
This dessert has a naturally elegant color and texture, so presentation does not need to be complicated. In fact, simple is often the prettiest choice.
Use chilled white bowls or shallow dessert cups so the pale creamy color stands out. Add the tiniest pinch of lemon zest right before serving for a fresh pop of color. If you want to dress it up more, place a few berries on the side rather than piling too much on top, which keeps the smooth surface looking clean and inviting.
Variations Worth Trying
Once you make the base once, you will probably start thinking of all kinds of little twists. Here are a few that work especially well.
- Berry Swirl: Fold in a few spoonfuls of thick raspberry or strawberry puree before freezing for a fruity cheesecake feel.
- Honey Vanilla Version: Replace part of the sweetened condensed milk with a little floral honey for a softer sweetness.
- Citrus Bright: Add extra lemon zest or a touch of orange zest for a fresher, more fragrant finish.
- Cookie Crumble Topping: Serve with crushed plain butter cookies for a little texture contrast at the table.
- Mini Bar Style: Freeze in a parchment-lined pan, slice into small squares, and serve as tiny frozen dessert bars.
FAQ’s
Q1: Can I make this without an ice cream machine?
Yes, absolutely. This recipe is designed to be no-churn, so the whipped cream and condensed milk help create a scoopable texture without special equipment.
Q2: Can I use low-fat Greek yogurt?
You can, but the final texture will usually be a bit icier and less creamy. Full-fat yogurt gives the best result.
Q3: How long does it need to freeze?
It usually needs about 6 hours to firm up properly, though overnight is also perfectly fine.
Q4: Does it taste strongly like yogurt?
Not really. The yogurt gives it a pleasant tang, but the cream cheese and vanilla keep the flavor balanced and dessert-like.
Q5: Can I add fruit into the mixture?
Yes, but use thick purees or small swirls rather than watery fruit pieces, which can create icy spots.
Q6: What if I do not have sweetened condensed milk?
You can sweeten the base with sugar and a little milk, but the condensed milk helps produce a smoother texture.
Q7: Why is lemon used here?
Lemon gives brightness and helps mimic that fresh, delicate cheesecake flavor that makes this dessert so lovely.
Q8: Can I make it ahead for guests?
Yes, and it is ideal for that. Make it a day ahead, keep it covered, and let it sit out briefly before serving.
Q9: How should I store leftovers?
Keep them in a tightly covered freezer-safe container and press wrap or parchment close to the surface for the best texture.
Q10: Can I turn this into popsicles?
Yes, you can pour the mixture into popsicle molds instead of a loaf pan, and the flavor works beautifully that way too.
Conclusion
There is something so satisfying about a dessert that tastes elegant, feels light and creamy, and still comes together with everyday ingredients. This chilled cheesecake-inspired treat brings together tangy yogurt, silky cream cheese, and bright lemon in a way that feels fresh, comforting, and just a little special. This one’s a total game-changer when you want a freezer dessert that feels homemade and impressive at the same time, so grab a spoon and enjoy every creamy bite.
Print
Greek Yogurt Japanese Cheesecake Ice Cream
Description
A creamy, no-churn frozen dessert inspired by the light tang and delicate flavor of Japanese cheesecake, made with Greek yogurt, cream cheese, lemon, and vanilla.
Ingredients
- 2 cups plain full-fat Greek yogurt
- 8 ounces cream cheese, softened
- 3/4 cup sweetened condensed milk
- 1 cup heavy cream, cold
- 2 tablespoons fresh lemon juice
- 1 teaspoon lemon zest, finely grated
- 1 teaspoon vanilla extract
- 1/4 teaspoon fine salt
Instructions
- Place a freezer-safe loaf pan or container in the freezer to chill.
- In a large bowl, beat the softened cream cheese until smooth.
- Add the Greek yogurt, sweetened condensed milk, lemon juice, lemon zest, vanilla extract, and fine salt. Mix until smooth and creamy.
- In a separate bowl, whip the cold heavy cream to soft peaks.
- Gently fold the whipped cream into the yogurt mixture in two or three additions until fully combined and airy.
- Transfer the mixture to the chilled container and smooth the top.
- Cover and freeze for 6 hours, or until firm but scoopable.
- Let sit at room temperature for 5 to 8 minutes before scooping and serving.
Notes
- Use full-fat Greek yogurt for the creamiest texture.
- Make sure the cream cheese is fully softened before mixing to avoid lumps.
- For a brighter flavor, add a little extra lemon zest right before serving.
- Store tightly covered in the freezer for up to 1 week.