Magic Bars
If you’re craving a dessert that hits every sweet tooth spot—chewy, crunchy, gooey, and rich—Magic Bars are here to steal the show. They’re one of those treats that come together effortlessly and vanish from the plate just as fast. Whether you’re making them for a bake sale, holiday tray, or just a cozy night in, these layered bars are pure nostalgic comfort in every bite.
Behind the Recipe
Growing up, there was always one dessert that disappeared before anything else at family gatherings—these irresistible Magic Bars. My mom would make a batch on the weekends, and by Sunday afternoon, there’d be nothing left but crumbs. I still remember sneaking a warm piece from the pan before it cooled, letting the gooey chocolate and coconut melt in my mouth. That memory is what inspired me to keep this recipe alive and pass it along.
Recipe Origin or Trivia
Magic Bars, also known as Seven Layer Bars, first gained popularity in the 1960s thanks to Eagle Brand sweetened condensed milk’s recipe pamphlets. Their charm lies in their simplicity. With no need for mixing bowls, frosting, or fancy techniques, these bars are a throwback to the golden age of pantry desserts. They’re a staple in American kitchens, especially during the holidays when cookie swaps and dessert trays shine.
Why You’ll Love Magic Bars
These bars may be simple, but don’t let that fool you—they deliver big on flavor and texture.
Versatile: Swap out the toppings or add your favorite mix-ins like dried fruit or white chocolate.
Budget-Friendly: Uses basic pantry ingredients and only a few specialty items.
Quick and Easy: Just layer, bake, and cool—no mixing required.
Customizable: From nuts to chips to different crusts, you can tailor these bars to fit any craving.
Crowd-Pleasing: Everyone loves them, from kids to adults. They’re the first to disappear at parties.
Make-Ahead Friendly: You can bake them a day or two in advance and they still taste amazing.
Great for Leftovers: They store well and taste even better the next day.
Chef’s Pro Tips for Perfect Results
To make sure your Magic Bars turn out perfectly every time, here are some insider tricks:
- Line your pan with parchment paper: This makes it easier to lift the bars out cleanly.
- Press the crust firmly: Use the bottom of a glass or measuring cup for an even, compact base.
- Let them cool completely before cutting: This helps the layers set and keeps them from crumbling.
- Use good-quality chocolate chips: Since they’re a key flavor, better chips make a better bar.
- Lightly toast the coconut beforehand: It adds extra flavor and texture.
Kitchen Tools You’ll Need
No fancy tools needed here—just a few basics:
9×13 Baking Pan: The perfect size for even baking and layered structure.
Parchment Paper: Makes for easy cleanup and helps lift the bars from the pan.
Measuring Cups and Spoons: Accuracy is key for that perfect balance.
Spatula or Spoon: For spreading the layers evenly.
Glass or Flat-bottomed Cup: To press the crust evenly into the pan.
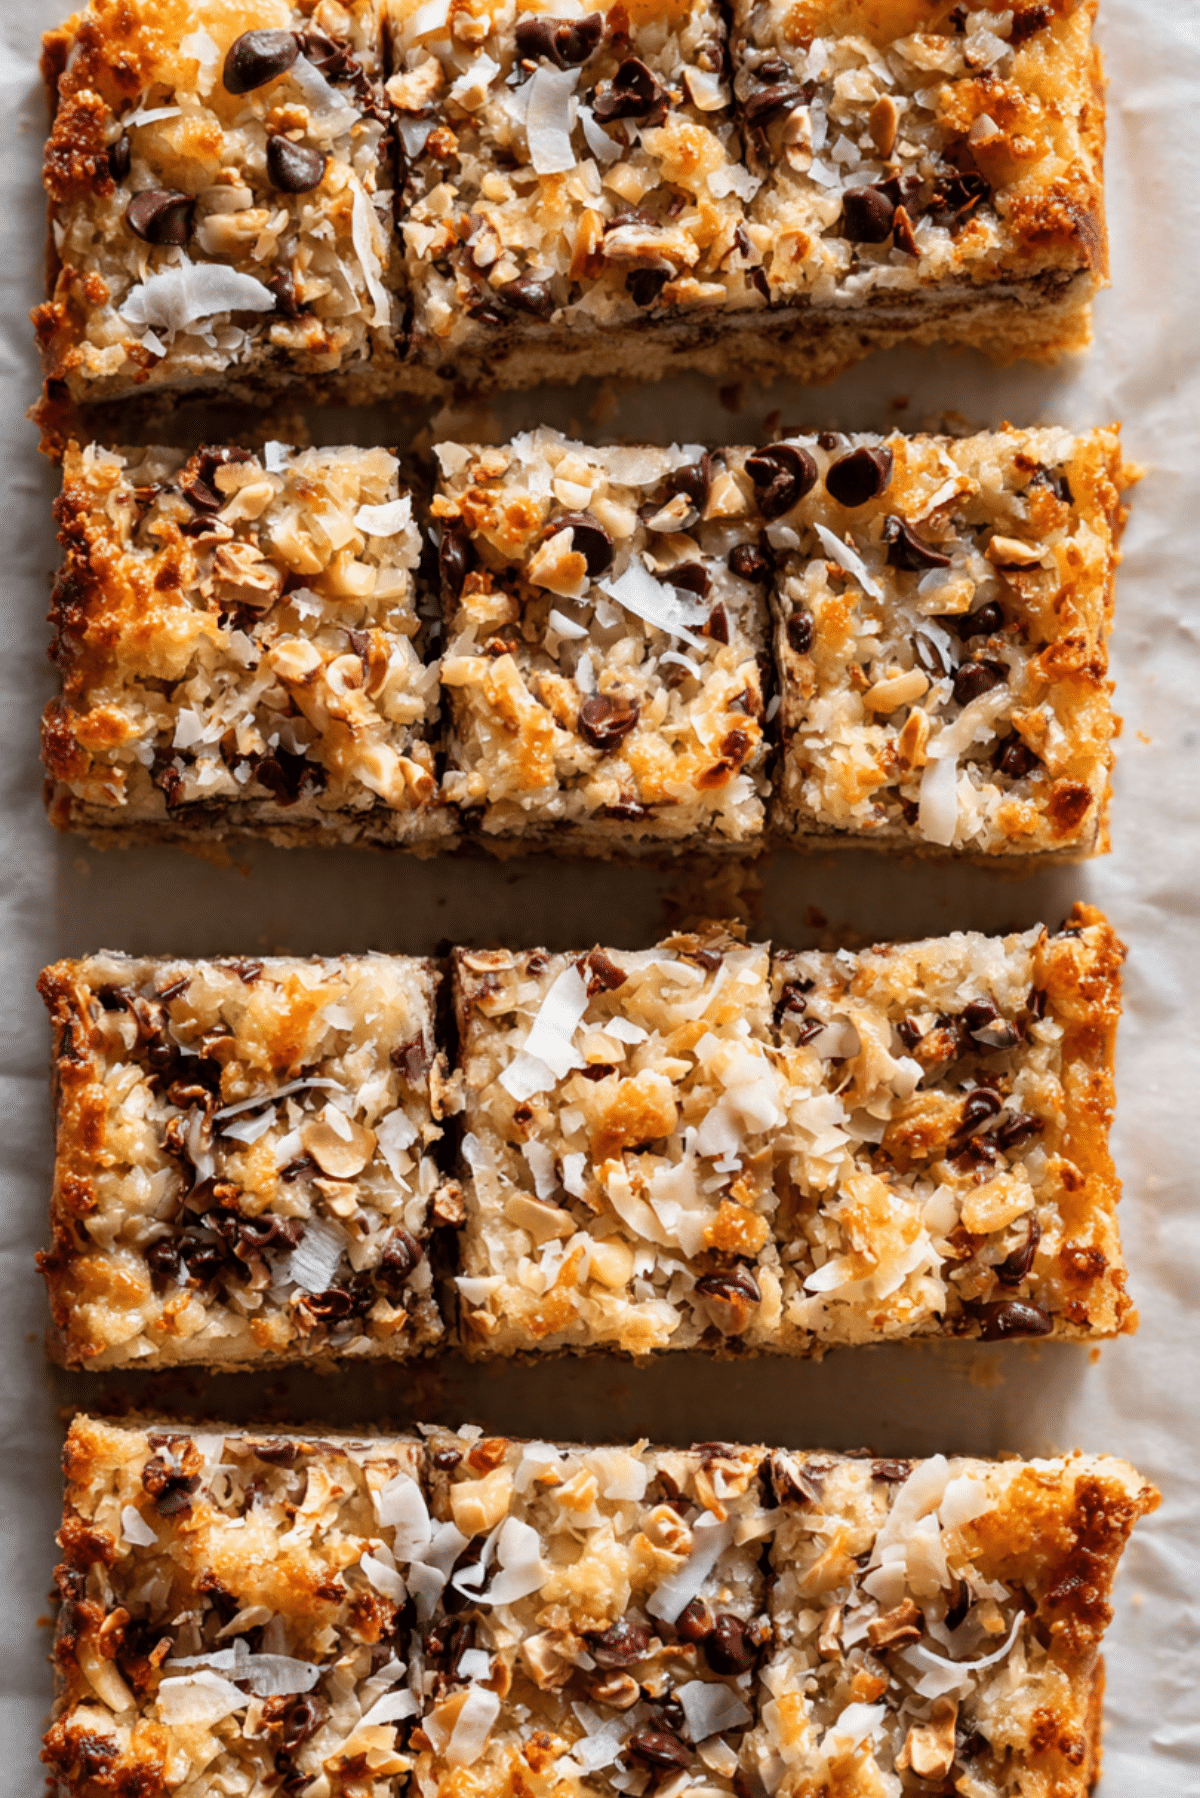
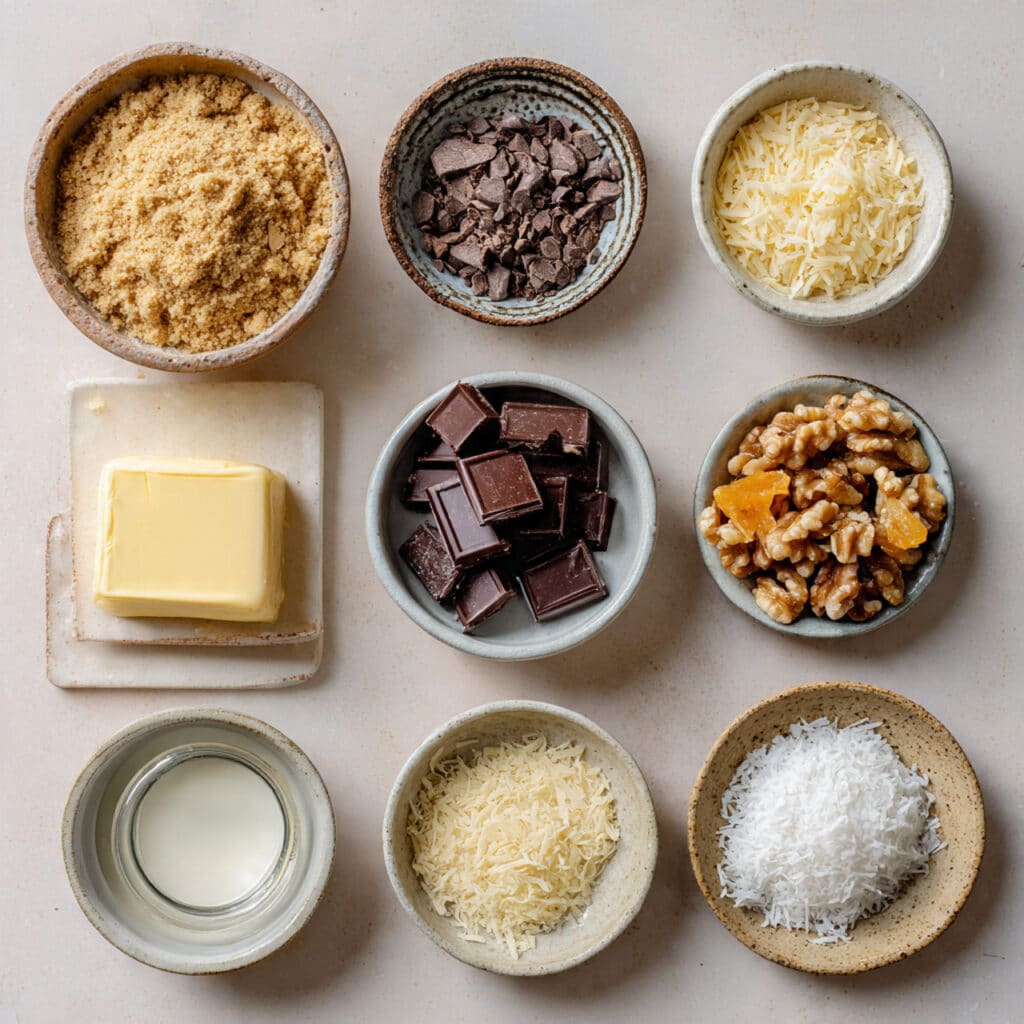
Ingredients in Magic Bars
The beauty of Magic Bars lies in the perfect balance of rich, sweet, and chewy textures. Here’s everything you’ll need:
- Graham Cracker Crumbs: 1 and 1/2 cups — Forms the sweet, slightly crunchy base layer.
- Unsalted Butter: 1/2 cup (melted) — Helps bind the crust and adds richness.
- Sweetened Condensed Milk: 1 (14-ounce) can — The glue that holds it all together, giving that luscious, chewy texture.
- Semi-Sweet Chocolate Chips: 1 cup — Adds deep chocolate flavor in every bite.
- Butterscotch Chips: 1 cup — Sweet and buttery, they add a unique twist.
- Chopped Walnuts or Pecans: 1 cup — Adds crunch and nutty depth.
- Sweetened Shredded Coconut: 1 and 1/3 cups — Toasty, chewy, and the finishing touch.
Ingredient Substitutions
If you’re missing something or need to switch it up, here are some easy swaps:
Graham Cracker Crumbs: Crushed digestive biscuits or vanilla wafers.
Unsalted Butter: Salted butter, but reduce any added salt in the recipe.
Sweetened Condensed Milk: Coconut condensed milk for a dairy-free version.
Semi-Sweet Chocolate Chips: Dark, milk, or white chocolate chips.
Butterscotch Chips: Peanut butter chips or caramel bits.
Chopped Walnuts or Pecans: Almonds, hazelnuts, or leave out for a nut-free version.
Shredded Coconut: Unsweetened coconut flakes or omit if preferred.
Ingredient Spotlight
Sweetened Condensed Milk: This thick, sticky milk sweetener is the magical element that binds everything. It caramelizes slightly during baking, adding a luscious chewiness and richness.
Shredded Coconut: It adds texture and toasty sweetness. When baked, the edges crisp up slightly, adding a delicate crunch.
Instructions for Making Magic Bars
Ready to bake up something truly magical? Here’s how to bring these bars to life:
-
Preheat Your Equipment:
Preheat your oven to 350°F (175°C). Line a 9×13-inch pan with parchment paper, letting it hang over the sides. -
Combine Ingredients:
Mix graham cracker crumbs and melted butter in a bowl until fully combined. -
Prepare Your Cooking Vessel:
Press the graham cracker mixture evenly into the bottom of the prepared pan using a flat-bottomed glass. -
Assemble the Dish:
Pour the sweetened condensed milk evenly over the crust. Then sprinkle chocolate chips, butterscotch chips, nuts, and shredded coconut on top, layering each ingredient one at a time. -
Cook to Perfection:
Bake for 25 to 30 minutes, or until the edges are golden and the top is slightly toasted. -
Finishing Touches:
Let cool completely in the pan. Lift out using parchment edges and cut into bars. -
Serve and Enjoy:
Enjoy them as-is or slightly warmed with a scoop of vanilla ice cream.
Texture & Flavor Secrets
The crust is buttery and just a little crisp. The sweetened condensed milk bakes into a gooey, almost caramel-like layer that holds together the nutty crunch and melty chips. Coconut on top adds a golden, toasted finish with a chewy bite. Every layer brings contrast and comfort.
Cooking Tips & Tricks
Here are a few helpful reminders:
- Let the bars cool fully to avoid crumbling.
- Don’t overbake or they’ll dry out.
- For cleaner cuts, refrigerate them before slicing.
- Use parchment paper for a stress-free lift out of the pan.
What to Avoid
Steer clear of these common mishaps:
- Overloading with toppings: Stick to the measurements for perfect balance.
- Using evaporated milk by mistake: Only sweetened condensed milk works.
- Cutting while warm: The layers need time to set for clean slices.
Nutrition Facts
Servings: 24
Calories per serving: Approximately 250
Note: These are approximate values.
Preparation Time
Prep Time: 10 minutes
Cook Time: 30 minutes
Total Time: 40 minutes
Make-Ahead and Storage Tips
Magic Bars are fantastic for planning ahead. You can bake them a couple of days before your event and they’ll still taste amazing. Store in an airtight container at room temperature for up to 5 days, or refrigerate for a firmer texture. They also freeze beautifully—just wrap tightly and freeze for up to 2 months.
How to Serve Magic Bars
These bars shine on dessert trays, potlucks, or as a sweet snack with coffee. You can drizzle melted chocolate on top or add a scoop of ice cream for an indulgent twist. They also work great cut into mini squares for bite-sized treats.
Creative Leftover Transformations
Have a few bars left? Try these fun ideas:
- Magic Bar Sundaes: Chop and sprinkle over ice cream.
- Magic Bar Truffles: Roll pieces into balls and dip in chocolate.
- Crumb Topping: Crumble over yogurt or fruit bowls.
Additional Tips
- Use high-quality chocolate and butter for best results.
- Toast the coconut for more depth of flavor.
- Chill before cutting for neater presentation.
Make It a Showstopper
To really wow your guests, serve Magic Bars on a rustic wooden board with parchment underneath. Add a dusting of powdered sugar or a light drizzle of caramel. Arrange a few ingredients around the board for a cozy, bakery-style vibe.
Variations to Try
- Peanut Butter Version: Swap butterscotch chips with peanut butter chips.
- Holiday Spice: Add a pinch of cinnamon to the crust.
- S’mores Style: Add mini marshmallows on top before baking.
- Tropical Twist: Add dried pineapple chunks and macadamia nuts.
- Mint Chocolate: Use mint chips and a chocolate cookie crust.
FAQ’s
Q1: Can I make these without nuts?
Yes, just leave them out or replace with extra chocolate or coconut.
Q2: What’s the best way to cut them cleanly?
Let them chill first, then use a sharp knife wiped clean between cuts.
Q3: Can I use unsweetened coconut?
Absolutely, though sweetened coconut gives a chewier texture.
Q4: Are they gluten-free?
Only if you use gluten-free graham crackers.
Q5: Can I double the recipe?
Yes, use a larger sheet pan and extend baking time slightly.
Q6: How long do they last?
Up to 5 days at room temp or 2 months in the freezer.
Q7: Do I need to toast the coconut first?
It’s optional, but it does bring out more flavor.
Q8: Can I use flavored sweetened condensed milk?
Vanilla or caramel-flavored versions work great.
Q9: Can I make them vegan?
Yes, use vegan butter, plant-based condensed milk, and dairy-free chips.
Q10: Can I use a food processor for the crust?
Definitely. Pulse the graham crackers and mix in butter right in the bowl.
Conclusion
These Magic Bars are proof that simple ingredients can make something truly irresistible. Every bite brings a mix of textures and flavors that comfort and delight. Whether it’s your first time making them or your fiftieth, trust me, they’re worth every bite.
Print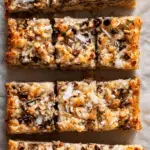
Magic Bars
Description
These gooey, crunchy, sweet Magic Bars are a nostalgic treat layered with chocolate chips, coconut, nuts, and a buttery graham cracker crust. Perfect for holidays or everyday cravings.
Ingredients
- 1 and 1/2 cups graham cracker crumbs
- 1/2 cup unsalted butter, melted
- 1 (14-ounce) can sweetened condensed milk
- 1 cup semi-sweet chocolate chips
- 1 cup butterscotch chips
- 1 cup chopped walnuts or pecans
- 1 and 1/3 cups sweetened shredded coconut
Instructions
- Preheat your oven to 350°F (175°C). Line a 9×13-inch baking pan with parchment paper.
- Mix graham cracker crumbs and melted butter until well combined.
- Press the mixture evenly into the bottom of the prepared pan.
- Pour sweetened condensed milk over the crust and spread evenly.
- Layer chocolate chips, butterscotch chips, nuts, and shredded coconut over the top.
- Bake for 25 to 30 minutes, until the edges are golden and top is slightly toasted.
- Cool completely before cutting into bars.
Notes
- For cleaner cuts, chill bars before slicing.
- You can toast the coconut beforehand for added flavor.
- Line the pan with parchment for easy removal.
- Store leftovers in an airtight container at room temperature or refrigerate for firmer texture.