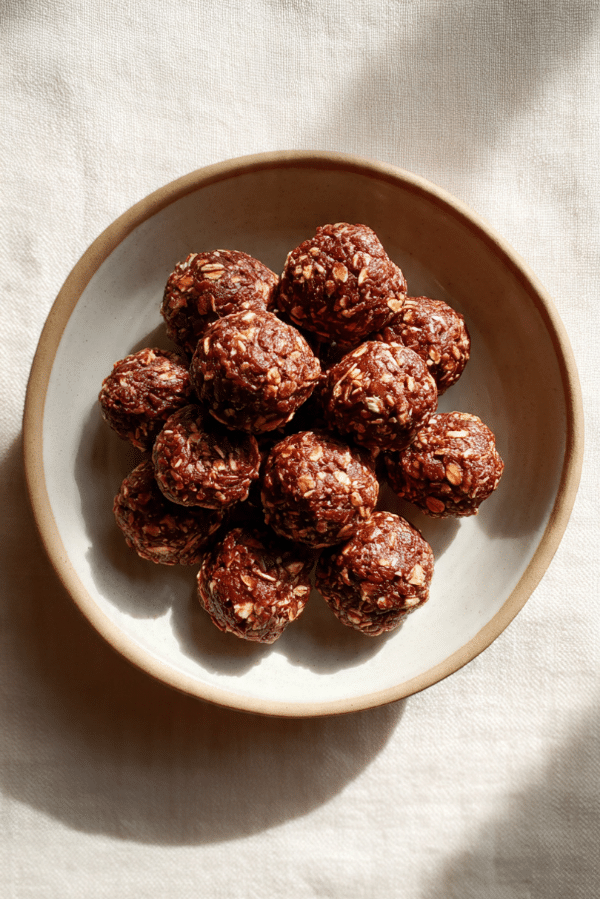
NO-BAKE CHOCOLATE BITES
There is something deeply comforting about a treat that comes together without turning on the oven, and these no-bake chocolate bites do exactly that. They are rich, chewy, slightly fudgy, and packed with cozy flavors that feel like a reward at the end of a long day. Trust me, you’re going to love this, because it tastes like dessert but feels effortless from the very first step.
Behind the Recipe
This recipe was born on one of those afternoons when the craving for chocolate hit hard, but patience was in short supply. I wanted something sweet, satisfying, and quick, something you could mix in a bowl and enjoy almost immediately. Over time, these little bites became a go-to, the kind of recipe you memorize without trying because it fits so naturally into everyday life.
Recipe Origin or Trivia
No-bake desserts have been around for generations, especially in home kitchens where ovens were precious or reserved for special occasions. Chocolate oat bites like these are often linked to classic refrigerator cookies and energy balls, which became popular for their simplicity and practicality. They are proof that great flavor does not always require heat, just a good balance of ingredients and a little know-how.
Why You’ll Love NO-BAKE CHOCOLATE BITES
These bites have a way of winning people over fast, and now let me tell you why they deserve a spot in your regular rotation.
Versatile: They work as a quick snack, an after-dinner treat, or even a grab-and-go breakfast bite on busy mornings.
Budget-Friendly: Made with pantry staples, this recipe keeps costs low while still delivering big chocolate flavor.
Quick and Easy: No oven, no waiting, and no complicated steps, this one’s a total game-changer when time is tight.
Customizable: You can easily adjust sweetness, texture, or mix-ins to suit your mood or dietary needs.
Crowd-Pleasing: Kids love them, adults crave them, and they disappear fast at parties or gatherings.
Make-Ahead Friendly: These bites store beautifully, which means dessert is always ready when you are.
Great for Leftovers: They stay delicious for days, so nothing goes to waste.
Chef’s Pro Tips for Perfect Results
A little guidance goes a long way with a simple recipe like this. Keep these tips in mind and you’ll nail it every time.
- Use creamy nut butter for the smoothest texture and easiest mixing.
- Slightly warm the honey before mixing if it feels too thick.
- Chill the mixture briefly if it feels too soft before shaping.
- Roll with lightly damp hands to prevent sticking.
Kitchen Tools You’ll Need
Before diving in, it helps to have everything ready on the counter, which keeps the process smooth and enjoyable.
Mixing Bowl: Large enough to combine everything evenly without spills.
Spatula or Spoon: For thorough mixing and scraping down the sides.
Measuring Cups and Spoons: Accuracy matters for balance and texture.
Baking Sheet: Used as a tray for chilling the bites.
Parchment Paper: Prevents sticking and makes cleanup easy.
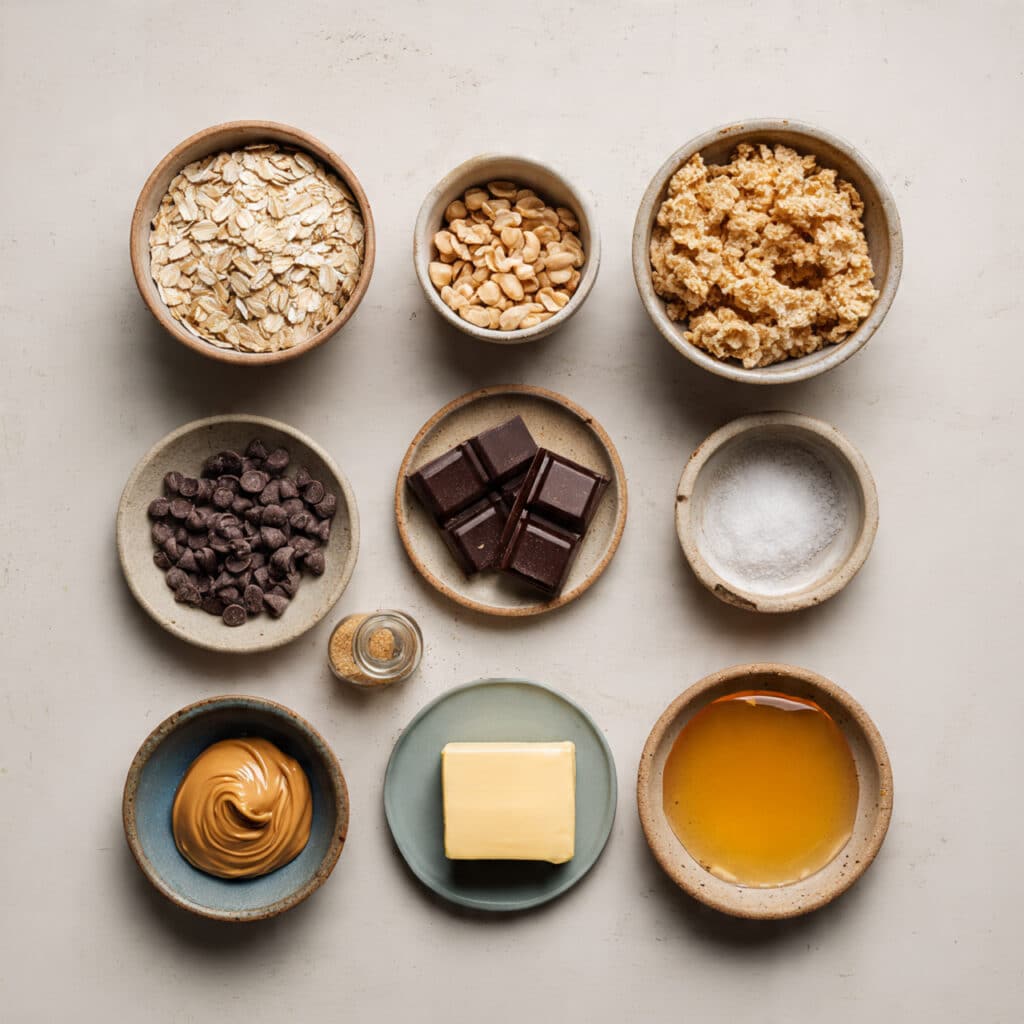
Ingredients in NO-BAKE CHOCOLATE BITES
Now let’s talk ingredients, because this is where the magic really starts. Each one plays an important role, coming together like a well-rehearsed team.
- Rolled Oats: 2 cups, they provide structure and a hearty, chewy base.
- Cocoa Powder: 1.4 cup, this brings deep chocolate flavor without heaviness.
- Creamy Peanut Butter: 1.2 cup, it binds everything together and adds richness.
- Honey: 1.3 cup, offering natural sweetness and a soft, fudgy texture.
- Vanilla Extract: 1 teaspoon, it rounds out the flavors and enhances the chocolate.
- Salt: 0.25 teaspoon, just enough to balance sweetness and intensify flavor.
Ingredient Substitutions
If you like to tweak recipes based on what you have, these swaps work beautifully.
Rolled Oats: Quick oats can be used for a softer texture.
Peanut Butter: Almond butter or sunflower seed butter are great alternatives.
Honey: Maple syrup works well for a slightly different sweetness.
Cocoa Powder: Carob powder can be used for a caffeine-free option.
Ingredient Spotlight
Let’s pause for a closer look at two stars of the recipe, because they really make these bites shine.
Rolled Oats: These add body and chew, turning a sweet treat into something satisfying and filling.
Cocoa Powder: This ingredient delivers intense chocolate flavor without extra fat, keeping the bites rich but balanced.
Instructions for Making NO-BAKE CHOCOLATE BITES
Alright, now let’s dive into the fun part. Here are the steps you’re going to follow, and you’ll see how quickly everything comes together.
- Preheat Your Equipment: There is no oven needed, but line a baking sheet with parchment paper and set it aside.
- Combine Ingredients: In a large bowl, add the rolled oats, cocoa powder, and salt, then stir until evenly mixed.
- Prepare Your Cooking Vessel: Add the peanut butter, honey, and vanilla extract to the same bowl.
- Assemble the Dish: Stir everything together until a thick, uniform mixture forms and all oats are coated.
- Cook to Perfection: Using your hands or a scoop, roll the mixture into small bite-sized balls.
- Finishing Touches: Place the bites on the prepared baking sheet and refrigerate for at least 30 minutes to firm up.
- Serve and Enjoy: Once set, they are ready to eat, rich, chewy, and irresistible.
Texture & Flavor Secrets
The beauty of these bites lies in contrast. The oats give a gentle chew, while the peanut butter and honey create a soft, almost fudgy interior. The cocoa adds depth and a slight bitterness that keeps the sweetness in check, making every bite feel balanced and satisfying.
Cooking Tips & Tricks
If you want to fine-tune the results, these little tricks can help.
- Chill the mixture briefly if it feels too sticky to roll.
- Adjust sweetness by adding honey one tablespoon at a time.
- For firmer bites, refrigerate longer before serving.
What to Avoid
Even simple recipes have a few pitfalls, but they are easy to avoid.
- Overmixing, which can make the bites dense.
- Using natural nut butter that is too dry without adjusting sweetness.
- Skipping the chilling step, which helps them hold their shape.
Nutrition Facts
Servings: 12 bites
Calories per serving: 150
Note: These are approximate values.
Preparation Time
Prep Time: 10 minutes
Cook Time: 0 minutes
Total Time: 10 minutes
Make-Ahead and Storage Tips
These bites are perfect for planning ahead. Store them in an airtight container in the refrigerator for up to one week. They can also be frozen for up to two months, and they thaw quickly at room temperature, making them ideal for busy schedules.
How to Serve NO-BAKE CHOCOLATE BITES
Serve them chilled for a firmer texture or slightly softened for extra chew. They pair beautifully with a glass of milk, a warm cup of tea, or tucked into a lunchbox for a sweet surprise.
Creative Leftover Transformations
If you want to change things up, crumble the bites over yogurt, blend them into a smoothie, or press the mixture into a pan and cut into bars for a new shape.
Additional Tips
For extra flavor, lightly toast the oats before mixing. Keep portions small, since these bites are rich and satisfying.
Make It a Showstopper
Arrange the bites on a simple plate and sprinkle a light dusting of cocoa powder on top. A clean presentation makes them look as good as they taste.
Variations to Try
- Add mini chocolate chips for extra indulgence.
- Mix in shredded coconut for texture.
- Use almond butter for a milder nut flavor.
- Add chia seeds for a nutritional boost.
FAQ’s
1. Can I make these without peanut butter?
Yes, any creamy nut or seed butter works well.
2. Do these need to stay refrigerated?
They hold best when chilled, especially in warm weather.
3. Can I freeze them?
Absolutely, they freeze very well and thaw quickly.
4. Are these good for kids?
Yes, they are a great kid-friendly snack.
5. Can I reduce the sweetness?
Yes, simply reduce the honey slightly.
6. Will quick oats work?
They will, but the texture will be softer.
7. How long do they last?
Up to one week in the fridge.
8. Can I add protein powder?
Yes, add a small amount and adjust moisture if needed.
9. Are these gluten free?
Use certified gluten free oats to be sure.
10. Can I make them into bars?
Yes, press into a lined pan and slice once firm.
Conclusion
These no-bake chocolate bites are proof that simple recipes can still feel special. They are quick, comforting, and endlessly adaptable, and let me tell you, it’s worth every bite. Once you make them, they tend to become a regular favorite, the kind you reach for again and again.
Print
NO-BAKE CHOCOLATE BITES
Description
Rich, chewy no-bake chocolate bites made with oats, cocoa, and peanut butter. A quick and satisfying treat that comes together in minutes without turning on the oven.
Ingredients
- 2 cups rolled oats
- 1/4 cup cocoa powder
- 1/2 cup creamy peanut butter
- 1/3 cup honey
- 1 teaspoon vanilla extract
- 1/4 teaspoon salt
Instructions
- Line a baking sheet with parchment paper and set it aside.
- In a large mixing bowl, combine rolled oats, cocoa powder, and salt until evenly mixed.
- Add peanut butter, honey, and vanilla extract to the bowl.
- Stir until a thick, uniform mixture forms and all oats are fully coated.
- Roll the mixture into small bite-sized balls.
- Place the bites on the prepared baking sheet.
- Refrigerate for at least 30 minutes until firm, then serve.
Notes
- Chill the mixture briefly before rolling if it feels sticky.
- Store in an airtight container in the refrigerator.
- Adjust sweetness by adding honey gradually.