Pop Pies
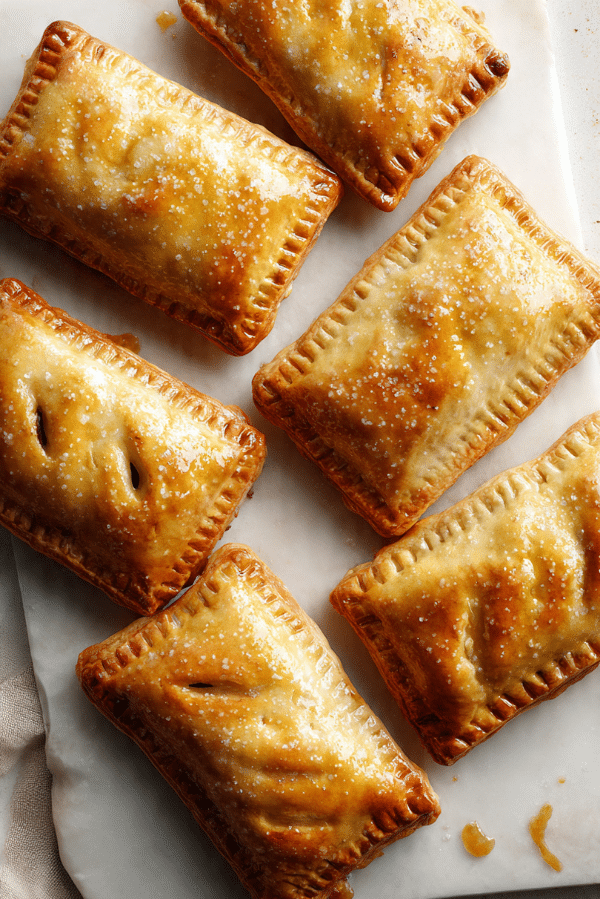
There is something instantly cheerful about a batch of homemade pop pies cooling on the counter. The pastry turns lightly golden, the filling bubbles just enough to peek through the little vents, and that first bite gives you flaky layers followed by a sweet burst of strawberry. Trust me, you’re going to love this. These are the kind of treats that feel playful and nostalgic, but still special enough to make from scratch on a slow afternoon.
Why These Little Pies Steal the Show
Some desserts have a way of making everyone smile before the first bite even happens, and this is one of them. These little pastries are cute, crisp at the edges, tender in the center, and filled with bright fruity flavor. They feel a bit bakery-style, a bit homemade, and completely worth it.
The best part is the balance. You get buttery pastry, jammy fruit, and a soft drizzle of icing that settles into every little ridge. This one’s a total game-changer when you want something simple, charming, and seriously satisfying.
A Sweet Little Story Behind This Treat
Pop pies take inspiration from classic hand pies and toaster pastries, both of which have long been loved for being portable, practical, and wonderfully snackable. Small pies have shown up in different forms across many home kitchens, from folded fruit pies to jam-filled pastries baked for easy breakfasts and lunchbox treats.
What makes this version especially fun is how it blends that old-fashioned hand pie feeling with a more modern homemade dessert vibe. You still get the comfort of a familiar pastry, but now with flaky crust, real fruit filling, and the kind of fresh taste that makes store-bought versions fade into the background.
Reasons You Will Keep Coming Back to This Bake
Before you even roll out the dough, it helps to know why this recipe earns a permanent place in the dessert rotation. Let me tell you, it’s worth every bite.
Versatile: These can be served as breakfast pastries, lunchbox treats, dessert, or a sweet afternoon snack. They fit almost anywhere and always feel welcome.
Budget-Friendly: The ingredient list is refreshingly simple, with basics like pie crust, jam, egg, and powdered sugar. You get a bakery-style result without spending bakery-style money.
Quick and Easy: Using ready-made pie crust keeps the process smooth and approachable. You can have them baked and cooling without turning the kitchen upside down.
Customizable: Strawberry is lovely here, but the method works beautifully with other fruit preserves too. A little lemon zest or vanilla can also shift the flavor in a delicious way.
Crowd-Pleasing: Kids love the sweet filling and soft icing, while adults appreciate the flaky pastry and homemade feel. They disappear fast, which tells you everything.
Make-Ahead Friendly: You can assemble them in advance and bake when you’re ready. That makes them perfect for holidays, brunches, and weekend prep.
Great for Leftovers: They keep well for a couple of days and reheat nicely. A quick warm-up brings back that just-baked charm.
A Few Smart Secrets for Better Results
Once you know why these are so lovable, the next step is making sure they come out just right. A few small choices make a big difference here.
- Keep the dough cool: Cold dough is easier to handle and gives you flakier layers once baked.
- Do not overfill: A modest spoonful of jam gives plenty of flavor without leaking everywhere.
- Seal the edges well: Pressing firmly with a fork helps keep the filling tucked inside where it belongs.
- Chill before baking if needed: If the pastry starts feeling soft, a short chill helps the pies hold their shape.
- Let them cool before icing: Warm pastries melt the glaze, so patience pays off.
Kitchen Tools That Make It Easy
Now that the technique is in place, let’s talk about the tools that help everything move smoothly from dough to golden pastry.
Baking Sheet: This gives the pies a flat, sturdy surface for even baking.
Parchment Paper: It prevents sticking and makes cleanup much easier.
Rolling Pin: Helpful for lightly smoothing and evening out the dough.
Sharp Knife or Pizza Cutter: This makes clean, neat rectangles with minimal fuss.
Fork: Perfect for crimping the edges and creating that classic hand pie look.
Small Bowl: Useful for mixing the egg wash and later the glaze.
Pastry Brush: Helps spread the egg wash evenly for a glossy finish.
Ingredients That Bring It All Together
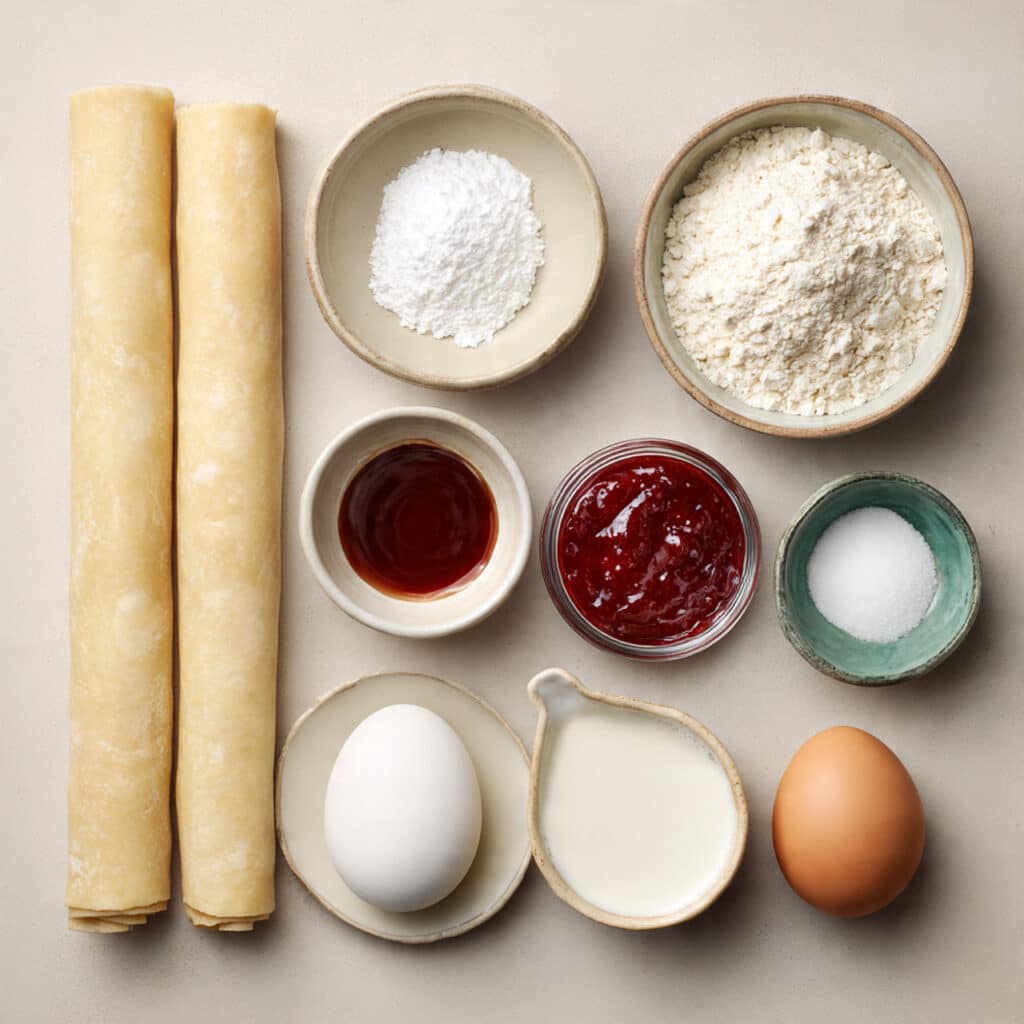
And now we get to the heart of it, the ingredients that make these pastries flaky, fruity, and completely irresistible. Each one plays a simple but important role, and together they create that lovely balance of crisp crust and soft, sweet filling.
- Refrigerated pie crust: 2 rolled crusts, this gives you a buttery, tender shell without extra prep.
- Strawberry jam: 1 cup, this brings the bright, fruity center and a glossy, jammy texture.
- Egg: 1 large, beaten, this helps the tops bake up shiny and golden.
- Water: 1 tablespoon, mixed with the egg to make a smooth egg wash.
- Powdered sugar: 1 cup, this forms the sweet glaze that finishes the pies beautifully.
- Milk: 2 tablespoons, this loosens the glaze so it spreads easily.
- Vanilla extract: 1 teaspoon, this adds a warm bakery-style note to the icing.
Easy Swaps That Still Taste Great
The beauty of a recipe like this is how flexible it can be without losing its charm. If you need to make small adjustments, these swaps work beautifully.
Strawberry jam: Raspberry jam or blueberry jam.
Pie crust: Homemade pastry dough.
Milk: Heavy cream or half-and-half.
Vanilla extract: Almond extract, use a smaller amount for a stronger flavor.
The Ingredients That Really Shine
Even with a short ingredient list, a couple of items do most of the heavy lifting. That is where the magic really starts to show.
Strawberry jam: This is the flavor star, bringing sweetness, color, and that soft fruity center that makes every bite feel cozy and bright.
Pie crust: The crust creates the texture contrast that makes these so satisfying, crisp at the edges, tender in the middle, and beautifully flaky all around.
Let’s Bake These Sweet Little Pastries
This is the fun part, where everything comes together and your kitchen starts smelling buttery and sweet. Here are the steps you’re going to follow, and once you get going, the process feels easy and very satisfying.
- Preheat Your Equipment: Preheat your oven to 375°F and line a baking sheet with parchment paper.
- Combine Ingredients: In a small bowl, stir the egg and water together to make the egg wash. In another bowl, mix the powdered sugar, milk, and vanilla extract until smooth to create the glaze, then set it aside.
- Prepare Your Cooking Vessel: Unroll the pie crusts on a lightly floured surface and gently smooth them flat. Cut the dough into 12 equal rectangles.
- Assemble the Dish: Spoon about 1 tablespoon of strawberry jam into the center of 6 rectangles, leaving a border around the edges. Top with the remaining rectangles, press the edges gently, and crimp all around with a fork. Cut a few small vents in the tops and brush each pie with egg wash.
- Cook to Perfection: Place the pies on the prepared baking sheet and bake for 18 to 22 minutes, until puffed and golden brown.
- Finishing Touches: Let the pies cool for 10 to 15 minutes, then spoon or drizzle the vanilla glaze over the tops.
- Serve and Enjoy: Serve slightly warm or fully cooled, and enjoy the flaky pastry with that sweet strawberry center.
The Texture and Flavor Magic in Every Bite
What makes these so memorable is the contrast. The pastry turns crisp and delicate on the outside while staying a little tender underneath the glaze. Then you hit the center and get that smooth, bright strawberry filling, which feels soft and jammy against the flaky layers.
The flavor develops in simple but lovely steps. First comes the buttery crust, then the fruit, and finally the vanilla icing softens everything with a sweet finish. It tastes nostalgic, fresh, and just a little indulgent in the best way.
Helpful Tricks for Foolproof Results
Even simple bakes have a few tricks that make them feel easier, and these help a lot once you start making them regularly.
- Chill the assembled pies for 10 minutes before baking if your kitchen is warm.
- Use a thick jam so the filling stays neatly inside.
- Glaze them after they have cooled slightly so the topping stays visible and pretty.
Mistakes to Dodge for the Best Batch
A recipe this simple is very forgiving, but a couple of common issues can affect the final look and texture. The good news is that they are easy to avoid.
- Overfilling the pies can cause leaks, so keep the jam centered and measured.
- Skipping the vents can trap steam, which may cause uneven puffing.
- Baking on warm dough can lead to softer edges, so keep the pastry cool.
- Icing while the pies are very hot can make the glaze disappear instead of setting nicely.
A Quick Look at the Nutrition
Before serving these up, it helps to have a rough idea of what each portion brings to the table.
Servings: 6
Calories per serving: 320
Note: These are approximate values.
Time Breakdown for Planning Ahead
One more reason these are so appealing is that they fit nicely into a busy day. They look special, but the timing stays very manageable.
Prep Time: 20 minutes
Cook Time: 20 minutes
Total Time: 40 minutes
Make-Ahead and Storage Tips That Really Help
If you like having something sweet ready to go, these are excellent for planning ahead. You can assemble the pies, place them on a lined tray, and refrigerate them for several hours before baking. That is especially handy for brunches, birthdays, or relaxed weekend baking.
Once baked, store them in an airtight container at room temperature for up to 2 days, or in the refrigerator for up to 4 days. They can also be frozen after baking. Reheat in the oven for a few minutes to bring back some of the crispness, and glaze after reheating if you want the freshest finish.
Ways to Serve Them That Feel Extra Special
These pastries are lovely on their own, but they also pair beautifully with a few simple extras. Serve them with hot coffee for a cozy breakfast, or add them to a brunch spread with fresh fruit and yogurt.
For dessert, try them slightly warm with a spoonful of whipped cream or a small scoop of vanilla ice cream. They also look especially charming stacked on a platter for a shower, tea party, or weekend get-together.
Clever Ideas for Leftovers
If you happen to have extras, which is never guaranteed, there are some fun ways to give them a second life. Crumble one over yogurt for a sweet breakfast situation, or warm one up and serve it with fresh berries.
You can also slice them into smaller pieces and add them to a dessert board with fruit, cookies, and little bowls of whipped cream. They hold their own surprisingly well in a bigger spread.
Extra Notes That Make a Difference
Sometimes the small details are what turn a good bake into one you make again and again. These are the little things I always keep in mind.
Keep your work surface lightly floured so the dough stays easy to move. Use just enough glaze to decorate without hiding the pastry completely. And if you want a prettier finish, let the icing drip naturally instead of spreading it too perfectly.
Make Them Look Bakery Beautiful
Presentation matters with a treat like this because they are already adorable, and a few simple touches make them look even better. A light drizzle of icing across the top gives them that classic finish while still letting the golden pastry show through.
For serving, arrange them on a white plate or cooling rack and let the glossy glaze catch the light. A few fresh strawberries nearby can add color without stealing focus. They already look charming, so you really do not need much.
Fun Variations Worth Trying
Once you make the base version, it is hard not to start imagining all the other possibilities. Here are a few that work especially well.
Blueberry Lemon: Use blueberry jam and add a little lemon zest to the glaze for a brighter finish.
Raspberry Vanilla: Swap in raspberry preserves for a slightly tangier filling with the same soft sweetness.
Apple Cinnamon: Use thick apple butter and add a pinch of cinnamon to the glaze for a cozy fall version.
Cherry Almond: Fill with cherry jam and replace the vanilla with a tiny splash of almond extract.
Mixed Berry: Combine strawberry and blueberry jam for a deeper fruit flavor and a gorgeous color.
FAQ’s
1. Can I use homemade dough instead of refrigerated pie crust?
Yes, absolutely. Homemade pastry works beautifully here as long as it is rolled to a similar thickness.
2. Do I need to chill the pies before baking?
Not always, but it helps if the dough has become soft. A short chill can improve the final texture.
3. Can I use a different filling?
Yes. Raspberry, blueberry, cherry, and apple butter all work very well in this recipe.
4. How do I keep the filling from leaking out?
Do not overfill, leave a border, and crimp the edges firmly with a fork.
5. Can these be made ahead for a party?
Yes. You can assemble them ahead and refrigerate until you are ready to bake.
6. Are they best warm or cold?
They are delicious both ways. Warm feels softer and cozier, while cooled gives the glaze more time to set.
7. Can I freeze them?
Yes. Freeze baked pies in an airtight container, then reheat in the oven before serving.
8. What kind of jam works best?
A thicker jam or preserve usually works best because it is less likely to run during baking.
9. Can I skip the glaze?
You can, but the glaze adds sweetness and gives them that classic pop pie look.
10. How long do they stay fresh?
They are best within 2 days at room temperature, though refrigeration can stretch that a bit longer.
Conclusion
By the time these pop pies come out of the oven, your kitchen smells sweet, buttery, and completely inviting. They are simple enough for an everyday treat, but cute enough to feel a little special, which is probably why they disappear so quickly. Trust me, once you make them, you’ll start thinking of all sorts of reasons to bake them again.
Print
Pop Pies
Description
Flaky homemade-style pop pies filled with sweet strawberry jam and finished with a simple vanilla glaze. These charming little pastries are easy to make, fun to serve, and perfect for breakfast, dessert, or an afternoon treat.
Ingredients
- 2 rolled refrigerated pie crusts
- 1 cup strawberry jam
- 1 large egg, beaten
- 1 tablespoon water
- 1 cup powdered sugar
- 2 tablespoons milk
- 1 teaspoon vanilla extract
Instructions
- Preheat the oven to 375°F and line a baking sheet with parchment paper.
- In a small bowl, whisk together the egg and water to make the egg wash.
- In another bowl, stir together the powdered sugar, milk, and vanilla extract until smooth to make the glaze. Set aside.
- Unroll the pie crusts on a lightly floured surface and cut into 12 equal rectangles.
- Spoon about 1 tablespoon of strawberry jam into the center of 6 rectangles, leaving a small border around the edges.
- Top with the remaining rectangles and press the edges closed. Crimp all around with a fork.
- Cut a few small vents in the tops and brush each pie with the egg wash.
- Transfer to the prepared baking sheet and bake for 18 to 22 minutes, until golden brown and lightly puffed.
- Let the pies cool for 10 to 15 minutes, then drizzle or spoon the glaze over the tops.
- Serve warm or at room temperature.
Notes
- Use a thick jam for the cleanest filling and less leaking.
- Chill the assembled pies for 10 minutes before baking if the dough becomes too soft.
- Let the pastries cool slightly before glazing so the icing sets nicely.
- Try raspberry, blueberry, or cherry jam for easy flavor variations.