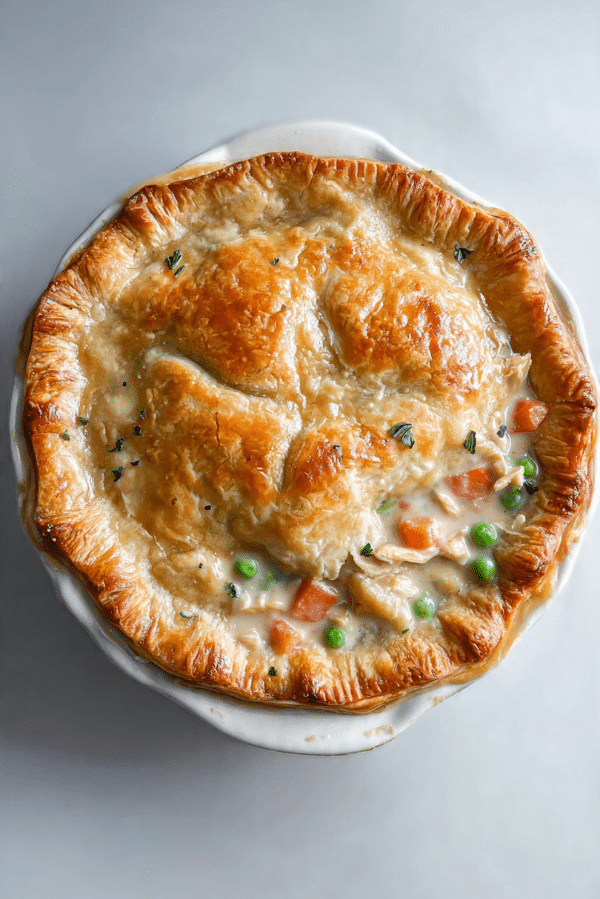
Chicken Pot Pie
There is something about pulling a bubbling pie out of the oven that just makes the whole kitchen feel softer, warmer, and a little more inviting. The flaky golden crust, the creamy savory filling, and those tender bites of chicken and vegetables all tucked underneath, it is the kind of comfort food that never goes out of style. Trust me, you’re going to love this, because every forkful feels cozy, hearty, and deeply satisfying.
And now let’s dive into what makes this dish such a favorite, because once you make it from scratch, it quickly becomes one of those recipes you keep coming back to on cool evenings, busy weekends, or whenever dinner needs to feel a little extra special.
Why This Cozy Classic Always Hits the Spot
Some recipes are good, and then there are the ones that make everyone at the table go quiet for a minute because they are too busy eating. This one absolutely belongs in that second category. The filling is rich without feeling too heavy, the vegetables bring sweetness and color, and the crust adds that buttery, shattering finish that makes each bite feel complete.
It is the kind of meal that feels both homey and impressive. You can serve it for a simple family dinner, bring it to the table when friends come over, or make it as a little weekend project when you want your kitchen to smell amazing. Let me tell you, it’s worth every bite.
A Little History Baked Into Every Slice
Before it became a beloved comfort food in so many home kitchens, pot pie had roots in the practical idea of wrapping hearty fillings in pastry so they could be baked into a complete meal. Over time, versions of savory pies appeared in different regions, especially in British and American cooking, where they became a dependable way to turn meat, vegetables, and gravy into something warm and filling.
And that is part of the charm here. It feels nostalgic, but not old-fashioned in a boring way. It feels timeless. Every bubbling spoonful of creamy filling under that crisp crust tells the story of a dish designed to comfort people, and honestly, that is exactly why it still works so beautifully today.
Reasons This Recipe Earns a Permanent Spot in Your Dinner Rotation
Once you see how simple the process really is, it becomes obvious why so many people swear by it. This one’s a total game-changer, especially when you want something hearty that still feels homemade and thoughtful.
Versatile: You can serve it on a chilly weeknight, for a Sunday family dinner, or even as a cozy dish for guests. It fits just about any occasion that calls for comfort.
Budget-Friendly: It uses straightforward ingredients like chicken, vegetables, butter, broth, and flour, which means you get a rich and satisfying meal without needing anything fancy.
Quick and Easy: Using cooked chicken and a ready pie crust keeps the process manageable. You still get that from-scratch flavor without spending all day in the kitchen.
Customizable: You can swap vegetables, adjust the herbs, or even make it a little thicker or creamier depending on what you love most.
Crowd-Pleasing: Creamy filling and flaky crust is a combination that rarely misses. It is hearty, familiar, and almost always a hit.
Make-Ahead Friendly: The filling can be prepared in advance, which makes assembly much easier when you are ready to bake.
Great for Leftovers: The flavors settle in beautifully, and reheated slices are every bit as comforting the next day.
Smart Kitchen Secrets for a Better Bake
Before we get into the details, here are a few little tricks that make a big difference. These are the kinds of things that turn a good dinner into one that feels truly polished.
- Let the filling cool for a few minutes before topping with crust, because very hot filling can soften the pastry too quickly.
- Keep the crust cold until the last moment, which helps it bake up flakier and more defined.
- Stir the broth in slowly when making the sauce so it stays smooth and silky.
- Cut a few vents in the top crust so steam can escape and the pastry bakes evenly.
- Rest the pie for at least 10 minutes after baking so the filling can settle and slice more neatly.
The Kitchen Tools That Make This So Much Easier
Now that the plan is coming together, let’s talk about the tools that help everything move smoothly. You do not need a fancy setup here, just a few basics that make the cooking process comfortable.
Large skillet or sauté pan: This is where the filling comes together, and it gives you enough room to cook the vegetables and build the sauce without crowding.
Whisk: A whisk helps keep the butter, flour, broth, and milk smooth so the filling turns out creamy instead of lumpy.
9-inch pie dish: This holds the filling beautifully and gives the crust a nice shape as it bakes.
Wooden spoon or spatula: Great for stirring the vegetables and scraping up all the flavorful bits from the pan.
Pastry brush: Useful for brushing the top with egg wash so the crust comes out glossy and golden.
Knife: You will need it for chopping vegetables and cutting vents into the top crust.
Everything You Need for the Perfect Filling and Crust
This is where the real magic starts, because every ingredient plays its part in building that creamy, savory, golden-baked finish.
- Cooked chicken: 2 cups, shredded or diced. This is the heart of the filling, tender, savory, and satisfying.
- Unsalted butter: 5 tablespoons. It creates richness and forms the base of the sauce.
- Yellow onion: 1 cup, diced. It brings sweetness and depth as it softens in the pan.
- Carrots: 1 cup, peeled and diced. These add color, sweetness, and a lovely bite.
- Celery: 1 cup, diced. It adds a fresh savory note that balances the creamy filling.
- Garlic: 2 cloves, minced. Just enough to deepen the flavor without taking over.
- All-purpose flour: 1/3 cup. This thickens the sauce and gives the filling its velvety body.
- Low-sodium chicken broth: 1 3/4 cups. It adds savory depth while keeping the sauce light enough to spoon easily.
- Whole milk: 2/3 cup. This softens the broth and makes the filling creamy and smooth.
- Frozen peas: 1 cup. They bring pops of sweetness and bright green color.
- Yukon Gold potato: 1 cup, peeled and diced small. It makes the filling heartier and gives each bite extra comfort.
- Salt: 3/4 teaspoon. This sharpens and rounds out the savory flavors.
- Black pepper: 1/2 teaspoon. It adds gentle warmth and balance.
- Dried thyme: 1 teaspoon. It gives the filling an earthy, cozy aroma.
- Pie crusts: 2, one for the bottom and one for the top. These bake into that flaky shell everyone loves.
- Egg: 1, beaten. This gives the top crust a glossy, golden finish.
Easy Swaps That Still Taste Amazing
One of the best things about this recipe is how flexible it is. If you are missing something or just want to make it fit what you have on hand, there is plenty of room to play.
Cooked chicken: Turkey works beautifully here, especially after a holiday meal.
Whole milk: Half-and-half can make the filling even richer, while plain unsweetened dairy-free milk can work in a pinch.
Yukon Gold potato: Diced parboiled russet potato or even extra carrots can step in easily.
Frozen peas: Mixed vegetables are a simple substitute if that is what you have in the freezer.
Dried thyme: Poultry seasoning or a little dried rosemary can add a different but equally cozy flavor.
Pie crusts: Puff pastry on top creates a lighter, crisp finish if you want a slightly different texture.
The Ingredients That Quietly Make the Whole Dish Shine
Even though every ingredient matters, a couple of them really carry the personality of the dish.
Low-sodium chicken broth: This is what gives the filling its savory backbone. It blends with the milk and flour to create that classic silky sauce that wraps around every bite.
Dried thyme: It might seem small, but it gives the filling that unmistakable homemade aroma. It brings warmth and a gentle earthiness that makes the whole kitchen smell incredible.

Let’s Build This Comforting Pie Step by Step
Now comes the fun part, and honestly, this is where the whole thing starts feeling real. Once the vegetables hit the butter and the sauce turns creamy, you are well on your way to a dinner that feels like a hug in food form.
- Preheat Your Equipment: Preheat the oven to 425°F. Lightly grease a 9-inch pie dish and set it aside so assembly is easy once the filling is ready.
- Combine Ingredients: In a large skillet over medium heat, melt the butter. Add the onion, carrots, celery, and potato, then cook for 7 to 8 minutes until the vegetables begin to soften. Stir in the garlic and cook for 30 seconds. Sprinkle in the flour and stir for 1 minute so it coats the vegetables and cooks off its raw taste.
- Prepare Your Cooking Vessel: Slowly whisk in the chicken broth, then the milk. Keep stirring until the mixture thickens, about 4 to 5 minutes. Stir in the cooked chicken, peas, salt, black pepper, and thyme. Let the filling simmer gently for 2 minutes, then remove it from the heat.
- Assemble the Dish: Fit one pie crust into the prepared pie dish. Spoon the filling into the crust, spreading it evenly. Place the second crust over the top, trim any excess, then crimp the edges to seal. Cut a few small vents in the center and brush the surface with beaten egg.
- Cook to Perfection: Bake for 35 to 40 minutes, until the crust is deeply golden and the filling is bubbling through the vents. If the edges brown too quickly, cover them loosely with foil during the last part of baking.
- Finishing Touches: Remove the pie from the oven and let it rest for 10 to 15 minutes. This helps the filling settle and makes serving much easier.
- Serve and Enjoy: Slice and serve warm. The creamy filling, flaky crust, and tender vegetables come together in the most comforting way.
The Texture and Flavor Payoff Is Absolutely Worth It
What makes this dish so special is the contrast. The top is crisp and golden, the bottom crust turns tender as it catches some of the sauce, and the filling stays creamy and rich without becoming too heavy. Then you get those little sweet pops from the peas and carrots, the softness of the potatoes, and the savory depth from the chicken and thyme.
As it bakes, the flavors settle into each other in the best way. The onion and garlic melt into the sauce, the broth deepens everything, and the crust adds that buttery finish that ties the whole thing together. It is warm, layered, and deeply comforting from the first bite to the last.
Helpful Tips for the Best Results Every Time
Once you make it once, you will already feel more confident the next time. Still, a few simple tips can make the whole experience even smoother.
- Chop evenly: Small, even vegetable pieces cook at the same pace and make the filling easier to eat.
- Do not rush the sauce: Let it thicken properly on the stove so the filling is creamy, not watery.
- Vent the top crust well: Those small cuts help steam escape and keep the pastry from getting soggy.
- Rest before slicing: Giving it a few minutes out of the oven makes the filling set up much better.
Common Pitfalls and How to Dodge Them
Even a comforting classic has a few places where things can go off track, but they are easy to avoid once you know what to watch for.
- Watery filling: This usually means the sauce did not thicken enough before baking. Let it simmer until it coats the spoon.
- Undercooked vegetables: Dice the carrots, celery, and potato small enough that they soften properly in the skillet.
- Soggy bottom crust: Avoid overfilling the pie and do not pour in extra liquid.
- Crust browning too fast: Cover the edges loosely with foil if they darken before the center is fully baked.
A Quick Look at the Nutrition
Before we move into timing and storage, here is a simple snapshot of what to expect per serving.
Servings: 6
Calories per serving: 465
Note: These are approximate values.
Timing Your Way to a Smooth Dinner
This recipe feels generous and comforting, but it is still very manageable, especially if you prep the vegetables ahead.
Prep Time: 25 minutes
Cook Time: 40 minutes
Total Time: 1 hour 5 minutes
Make-Ahead and Storage Tips That Actually Help
This is one of those meals that fits beautifully into real life, which is probably another reason it is so loved. You can make the filling a day ahead and keep it chilled, then assemble and bake when you are ready. That little bit of prep makes dinner feel much easier.
Leftovers keep well in the refrigerator for up to 4 days, tightly covered. You can also freeze the fully baked pie or individual slices for up to 2 months. Reheat in the oven at 350°F until warmed through so the crust stays crisp. The microwave works for speed, but the oven really brings back that just-baked texture much better.
The Best Ways to Bring It to the Table
Because this pie is rich and hearty, it pairs beautifully with simple sides that lighten the plate a little. A crisp green salad with a tangy vinaigrette works especially well, and steamed green beans or roasted Brussels sprouts make lovely vegetable pairings.
If you want dinner to feel extra cozy, serve each slice with a spoon so nobody misses any of that creamy filling. A little fresh parsley on top can brighten the look without taking away from the classic feel.
Leftovers Deserve a Second Life Too
And now let’s talk about one of the best parts, because leftovers here are genuinely exciting. A reheated slice makes a fantastic next-day lunch, but there are other ways to give it new life too.
You can spoon leftover filling over toast or biscuits for a quick savory meal. You can also rewarm it and serve it over mashed potatoes if the crust is already gone. Even a small leftover portion can be tucked into ramekins and topped with pastry scraps for mini pot pies that feel brand new.
A Few More Details That Make a Big Difference
Sometimes the smallest details are what make a recipe feel easier and more rewarding.
Use rotisserie chicken if you want to save time, because it adds flavor and convenience. Taste the filling before it goes into the crust so you can adjust the seasoning. Keep the pie dish on a baking sheet if you want to catch any bubbling drips and make cleanup easier.
Simple Ways to Make It Look Extra Special
The beauty of this dish is already there, but a few presentation touches can make it feel even more inviting. Brush the top crust evenly with egg wash so it bakes up glossy and deeply golden. Crimp the edges with a fork or your fingers for a finished homemade look.
If you want a little extra charm, cut a few tiny pastry shapes from crust scraps and place them on top before baking. It is simple, but it makes the pie feel thoughtful and a little festive.
Easy Variations to Keep Things Interesting
Once you have the base recipe down, there are plenty of ways to make it your own without losing what makes it so comforting.
Mushroom version: Add 1 cup sliced mushrooms with the onions for an earthier, deeper flavor.
Herbier filling: Stir in 1 tablespoon chopped fresh parsley at the end for extra freshness.
Biscuit topping: Skip the top crust and finish it with biscuit dough for a more rustic feel.
Creamier bake: Replace part of the milk with a few tablespoons of heavy cream for a silkier filling.
Turkey swap: Use cooked turkey instead of chicken for a great holiday leftover remake.
FAQ’s
Q1: Can I make this ahead of time?
Yes, absolutely. You can make the filling up to 1 day ahead, cool it, and keep it in the fridge until you are ready to assemble and bake.
Q2: Can I use rotisserie chicken?
Yes, and it works beautifully. It saves time and adds great flavor.
Q3: Do I need to cook the bottom crust first?
No, not for this recipe. The filling is thick enough that the crust bakes well without blind baking.
Q4: How do I know when it is done?
The top should be deeply golden and the filling should be bubbling through the vents.
Q5: Can I freeze it?
Yes. You can freeze it baked or unbaked, tightly wrapped, for up to 2 months.
Q6: What vegetables work best here?
Carrots, celery, peas, and potato are classic, but corn or mushrooms also work nicely.
Q7: Why is my filling too thin?
Usually the sauce needed a bit more time on the stove. It should be thick before it goes into the crust.
Q8: Can I use puff pastry instead of pie crust?
Yes, especially for the top. It gives a crisp, airy finish that is really delicious.
Q9: How should I reheat leftovers?
The oven is best, because it helps the crust stay crisp. Reheat at 350°F until warmed through.
Q10: Can I make it in individual portions?
Yes, mini pies in ramekins work wonderfully and feel extra cozy for serving.
Conclusion
This is the kind of dinner that makes the whole house smell incredible and brings everyone to the table without much convincing. It is creamy, flaky, hearty, and packed with the kind of comfort that never gets old. Whether you make it for a quiet family meal or as a cozy dish to share, this one has a way of feeling special every single time. Trust me, once you pull that golden crust from the oven and crack into the creamy filling underneath, you will see exactly why it is such a classic.
Print
Chicken Pot Pie
Description
A cozy homemade chicken pot pie with tender chicken, carrots, celery, peas, and potato in a creamy thyme sauce, all tucked into a flaky golden crust.
Ingredients
- 2 cups cooked chicken, shredded or diced
- 5 tablespoons unsalted butter
- 1 cup yellow onion, diced
- 1 cup carrots, peeled and diced
- 1 cup celery, diced
- 2 cloves garlic, minced
- 1/3 cup all-purpose flour
- 1 3/4 cups low-sodium chicken broth
- 2/3 cup whole milk
- 1 cup frozen peas
- 1 cup Yukon Gold potato, peeled and diced small
- 3/4 teaspoon salt
- 1/2 teaspoon black pepper
- 1 teaspoon dried thyme
- 2 pie crusts
- 1 egg, beaten
Instructions
- Preheat the oven to 425°F. Lightly grease a 9-inch pie dish.
- In a large skillet over medium heat, melt the butter. Add the onion, carrots, celery, and potato, then cook for 7 to 8 minutes until beginning to soften. Stir in the garlic and cook for 30 seconds.
- Sprinkle in the flour and stir for 1 minute to coat the vegetables.
- Slowly whisk in the chicken broth, then the milk. Cook, stirring often, for 4 to 5 minutes until thickened.
- Stir in the cooked chicken, peas, salt, black pepper, and dried thyme. Simmer for 2 minutes, then remove from the heat.
- Fit one pie crust into the prepared pie dish. Spoon in the filling and spread evenly.
- Place the second crust over the top, trim any excess, crimp the edges to seal, and cut a few vents in the top. Brush with the beaten egg.
- Bake for 35 to 40 minutes, until the crust is golden brown and the filling is bubbling. If the edges brown too quickly, cover loosely with foil.
- Let the pie rest for 10 to 15 minutes before slicing and serving.
Notes
- Use rotisserie chicken for a quicker version.
- Make sure the filling thickens on the stove before assembling to avoid a watery pie.
- Let the pie rest before slicing so the filling can settle.
- The filling can be made 1 day ahead and refrigerated until ready to use.